Why you should buy a Mid range phone instead of a flagship?

Don’t get me wrong, I am not against flagship devices. They are beautiful, they’re gorgeous and they are built on the Best Technologies available for smartphones. But, when I look at the pricing of these phones, they cost a bomb, especially in India.

When the flagship smartphones are launched globally they are at least 20% (or maybe higher) expensive in India, because of the import taxes.

If you want to buy a Samsung Galaxy phone you will have to shut around Rs 60,000/- and if you’re looking for the Latest iPhone, you might have to shed around Rs 1,00,000/-

A quick Google search brings me these stats,

The average salary of an Indian is $600, and a flagship smartphone cost somewhere around $1,000 to $1,500

The average salary of a US person is $3,500 and the flagship smartphones cost around $1,000

These are not just made up numbers, I have checked with several other websites and all of them give me similar figures.

All figures are in US Dollars

I know my comparison, of salaries of these two countries and the prices of flagship phones, is greatly flawed, but it pretty much gives you the idea how much people spend on a smartphone

There is a huge gap between the annual average salary of an average person in both the countries,

Despite the flagship phones costing less in the US, the ratio of the salaries with these people spend buying their smartphones,

It’s just a week salary for a US person while an Indian has to had 2 months worth of salary for the same flagship phone.

Let’s not forget the fact that in the US, most of the consumers of these flagship devices are postpaid customers that are bound to a particular telecom operator in a long-term contract, where they can purchase a flagship phone by paying as low as $100.

Where in India, people go mad about these flagship phones even if they have to spend their two-month salary on them. 

The reason I am writing this article is that I see people around me buying flagship phones by taking a loan.

I am not against taking a loan for buying things you love, but I’ve also seen these smartphones owned by people who do not use the features of these flagships at all. They simply use the phone for making calls and maybe browsing Facebook or messaging on WhatsApp, and that’s it, there is nothing else they do on their phone and it pains me to the core.

If you look at the mid-range phones available in the market, there has been a tremendous improvement both in the spark fair and the hardware department.

I have used mid-range phones from last few years and, even though I consider myself a hardcore user, as I run a tech blog and I do a lot of things on my smartphone, I literally use it as a computer in my pocket, and I have no problems using it there is no performance issue at all.

There has been a tough competition in this price bracket and companies from China have been emerging with great products at competitive prices.

And mostly all the phones, no matter which segment it belongs to, there will be an upgraded version every year, and buying a mid-range phone means you will be investing less money and you will still be able to upgrade to the next version of the phone every year without burning a hole in your pocket. 

Xiaomi Redmi Note 4 was the most sold phone in India in its price range, and the trend will continue as new products are being launched this year.

Xiaomi launch Redmi Note 5 along with Redmi Note 5 Pro and both the devices have been getting Great reviews.

Apart from these phones, there are great alternatives to these Xioami Redni Note 5 as well, you can check out this list.

In the end, I would like to say, don’t spend your money on things you don’t need or use, if you really Is the features these flagship devices offer, then go ahead and buy it, if you have got the money, or go for the smartphone you can afford, the mid-range segment of Smartphones will not let you down.

Here is a quick way to read the deleted messages in WhatsApp on your Android phone.

So WhatsApp has introduced this new feature where users will be able to delete the messages not just from their own smartphones but from the phones of the recipients.

While we agree that it is quite a useful feature and will save a lot of relationships from breaking up, but there are times you get annoyed by this feature when you are at the receiving end, and the sender deletes the message.

It happens to me most of the time, especially in some of the groups I am a part of,  so I started looking for a way to read a deleted message on my phone.

There must be a way to actually read them, after a bit of research on Google I found a solution.

I would call it a hack actually because it utilizes one of the rarest features of Android that is logging the notifications.

We have written an article explaining how you can bring back the dismissed notifications and in that article lies the solution for this problem.

You can read the article to set up the widget on your home screen to read all the notification that you have received where you can also read the message that was deleted if you’ve got a notification for that obviously.

If you are a Samsung mobile phone user you may have to install an app called Notification Saver, there are a bunch of apps available in the Play Store, but this app has the highest rating with some good reviews as well.

Now, if you have noticed,  WhatsApp deletes messages even from the notification panel as well,  which means you need to actually I read the notification for it to be logged into the notification log.

I hope you find this article useful and perhaps this will help you uncover the suspense hidden in the messages deleted by your friends who sent them.

How to send Blank Message on WhatsApp Any Other Messaging App

0

As weird as it may sound but a lot of people are actually searching for this particular query about sending a blank message to WhatsApp or any other messaging app.

So, in this article, you are going to find just that.

There are two simple methods to send a blank message on WhatsApp.

Method 1 – Sending a blank message to WhatsApp using an app

You need to install the NoWord app from Play Store,  then open the app and type on send after that he will get the option to choose from Messaging apps is installed on your phone, select the WhatsApp Messenger, and then choose the contact or the group to whom you want to send the blank message.

The blank message will be sent.

Method 2 – Sending a blank message on WhatsApp without using any app.

If you don’t want to use an app for sending a blank message you can simply copy the special character below,  without the brackets.

( )

And then paste it in the chat window of the contact on the group where you want to send the blank message.


How does it work and why does it happen.

In the second method, I showed you a special character that goes as a blank message because WhatsApp is not able to process that special character, help it shows a blank message.

I think you should use the second method instead of installing a dedicated for doing just that, you can simply bookmark this page so that you come back here to copy the special character mentioned in the first method.

Also, you can read more articles from techtippr.com

How to Download Full Movie on Your Mobile

With mobile data getting cheaper, and Smartphones getting high-resolution screens, people have started watching long form videos on their smartphones.

During my visits to New Delhi, I have seen a lot of people travelling in the Delhi Metro who often watch movies on their smartphones.

This trend is not just limited to New Delhi Metro, entire studies have been conducted that back this claim that people love to watch movies on the devices because. It is because the device is always with them and they can utilise their free time by entertaining themselves.

In this article, I am going to tell you how you can download full-length movies on your mobile phones so that you can watch them in your free time.

Now, there are ways to download movies illegally from pirated sites but at Techtippr, we have always preached that browsing pirated sites is not secure, especially from your smartphone, because the websites are filled with spyware and adware.

There are several download button and you don’t know which button will actually get you to content you want to download.

So the safest bet is to use apps that let you watch movies legally.

Download movies in Hotstar

Hotstar is India’s one of the most popular, on-demand content streaming app, the free version is ad-supported, meaning there will be commercials between the movies you are going to watch, but you will get to watch movies legally.

Their movie catalogue is also quite impressive even for the non premium version of the app.

With premium version,  when you have to pay rupees Rs 199 for a month,  you get International TV shows and Hollywood movies.  and you can actually download the movies as well.

On particular movie page, you will find the download button which will let you download the movie so that you can watch it whenever you want, even when there is no internet available.

Download movies in Amazon Prime

Just like hotstar, Amazon Prime is also one of the leading on-demand content streaming apps,  their movie catalogue is also quite impressive and they also offer the feature of downloading the movie  for watching it in offline mode.

What I like about Amazon Prime is,  they offer high quality even for the reduced size as well,  so while on other platforms the movie will be 1 GB in size I have found the same movie to be around 700 MB inside,  and the quality of both the movies was quite similar.

I have also found that Amazon Prime Video does not lag at all, like Hotstar. It has been a very rare occurrence that I had to download a movie to watch it without any buffer or like.

Download Movies in Jio Cinema

Jio cinema app is a new addition to the market but thanks to the crazy growth of Jio network, it has gained quite a substantial user base for the on demand content streaming app.

Just like the Hotstar and Amazon Prime Video,  Jio cinema also offers the feature of downloading movies to watch them in offline mode.  I have actually written about it in detail, With the hack of downloading movies without utilising your daily data limit of 1GB/2GB per day. Sadly it does not work now,  but you can still download movies in Jio cinema to watch them in offline mode.

Then there are some other on-demand content streaming apps, and most of them offer this functionality of downloading the movie for watching offline.

With so many online streaming apps available, I don’t think there is a need of downloading a low quality camera with movies from pirated site at the risk of your security and privacy.

Best apps for Group video calling in mobile

In this article, I am going to list out some of the best apps I have used over time for video calling on my mobile phone.

imo

IMO is another Android app that gives the feature of group video calling, I’ve used it several times and it has proved to be quite a handy app.

It is one of the very few apps which is not blocked in the UAE

Facebook Messenger

Facebook messenger is the messaging app from the social media giant Facebook and it has separated its a chat app from the main App.

Facebook Messenger offers a lot of features and group video calling is one of them, I have used the group video calling feature to chat with my friends who joined the chat from different corners of the world and it felt like we all were in the same room there were no disconnection problems even when everyone was on different type of internet connections.

The good thing about group video calling feature on the Facebook messenger is anyone can leave the chat and join it again conveniently without interrupting the group chat session.

Skype

Skype was acquired by Microsoft in 2010 and Microsoft has incorporated the features of Skype into their own Suit of applications

One thing Microsoft did great it was, it made group video calling free which was earlier paid feature.

Skype allows as much as 10 people to join the chat which is definitely more than enough for a lot of people.

The Skype app is available for Android and you can install it from Play Store.

Google Hangout

Google has launched a separate app for one on one video calling it’s called Google Duo, it still has got Google Hangouts which can be installed from the Play Store.

Google Hangouts offers video calling with up to 10 people which again is quite enough for a lot of people.

WhatsApp?

There have been speculations that WhatsApp is also working on bringing the group video calling feature and even some of the Tech blogs have posted stories around it.

So we can expect a group video calling feature from WhatsApp as well, maybe by the end of this year, I’ll update the article, once it becomes official. Update: The group video calling feature in WhatsApp is finally being rolled out.

How to open mobile websites  in Google Chrome on your PC

There may be many reasons why you would want to open the mobile version of any website on a PC.

In this article,  I’m going to show you how you can do just that using Google Chrome.

Method: 1

Now there are two ways you can open a mobile site in Google Chrome on your PC.

The simplest way is to use a user agent extension from Chrome web store.

What the user agent extension will do is,  it will let you choose the User Agent of an Android phone or an iPhone so that the Website server thinks it is rendering the website on a mobile browser and it will automatically open the mobile version of the website for you in the Google Chrome itself.

Add UA Spoofer to Google Chrome 

Method 2:

The second method involves a bit of technical knowledge, but you obviously don’t need to be a rocket scientist, simply follow these steps below.

Open the website in Google Chrome,  and then right click on the page and select Inspect Element.  

The developer window will appear either on the left-hand side or at the bottom.

Then click on the icon shown in the image above, or Press Control + Shift + M. 

You can then click on the drop-down menu and select the device as the user agent and then click refresh so that the browser can render the mobile version of the website.

Both the methods serve the same purpose of opening the mobile version of website on PC.

But if you do this more often you should use the method one because it’s quite easy to choose the user agent tags.

How to open zip file in Android mobile

We are living in a post PC era, what it means is, We have computers in our pockets.  

You may have you read it somewhere that the smartphones in our pockets are more powerful than the computer that was used for launching man into, Space.

Now, we will talk about the glory of the mankind some other day, but in this post, let’s talk about how you can open zip file on your Android mobile.

You may be using your smartphone as your primary computing device, and it totally makes sense because it is always with us and it has an internet connection, thanks to the high-speed mobile data, available everywhere.

How do you open zip file on Android mobile

The simple answer is there is an app for everything, and when it comes to accessing zip format, there are plenty of them.

My favourite app is ES Explorer,  which is an amazing app that can be installed free of cost from the Play Store.

The ES Explorer has many functions,  the user interface of the app is to make your smartphone feel like a computer,  you can access all the files and folders on your Android device.

And it also lets you open zip files, and extract its contents wherever you want.

The awesome thing about this app is that it also lets you compress files into a single zip file so that it can be easier if you want to send it to someone as an email attachment or you want to upload it in your Google Drive or Dropbox.

Install ES Explorer 

How to use multi window in Android

The multi-window (or the split screen) feature has been introduced in Android devices with the Android Nougat (Android 7.0) before that it was not natively available to the Android OS.

Samsung has been offering this feature to some of the Galaxy devices.

The multi-window feature is also called Split Screen feature in Android, but what Samsung offer it is a bit different than split screen.

While the native feature of Android lets you use two apps at once, Samsung multi-window feature allows users to use more than two apps at once,

Check out the video below to understand how the Samsung multi-window feature works.

If you don’t own a Samsung phone, you can still enjoy the multi-window feature on your android device if it had got Android Nougat.

Also, if you own a Xiaomi device, there is one more requirement other than having Android Nougat. Since the Xiaomi devices use MIUI ROM, users need to be on MIUI 9 or above.

We have written about a hack that lets you enable the split screen feature even without the MIUI 9.

but if you are reading this article in the mid of 2018 then chances are you show me device already has got MI UI 9 on Android 7.0,  and the split screen feature is enabled for a device like other Android nougat devices.

How to use split screen feature on Android  Nougat

There are two ways to use the split screen feature on Android device having Android Nougat.

Method 1:

Tap on the recent button on your Android device, and then drag one of the apps to the top area of your Android, for the app to cover the top half of your phone. Once it covers the top half of your phone, you will be able to select the second app from the recent apps, for the bottom half of your phone.

After you are done selecting both the apps,  you can resize the partition by typing and tracking the partition line up and down,  you can also double tap on the partition line to switch the positioning of the app.

Method 2:

Method 2 might not be available for all the Android devices but it is available for Samsung when I checked it last time, you can find the option, to set a shortcut button, in the settings.

For example, in Samsung, the user can enable the split screen feature by long pressing the recent button.

If you use a smartphone from some other OEM you can find if there is a shortcut one tap button to enable the screen split screen feature,  else the Method 1 works perfectly fine on all the Android devices.

Watch the video

How to Root Any Xiaomi Device, using this Simplest Guide

If you’re reading this article I assume you are interested in rooting your Xiaomi device. 

Now, I have specifically written articles about rooting Xiaomi Redmi 4 and Xiaomi Redmi Note 4

if you go through both of these articles you will notice that 90%  of the process is same.

In case you have got a different device from Xiaomi, you can use this guide to root your Xiaomi device.

There are three steps involved in rooting a Xiaomi device.  

The First step is it to unlock the bootloader,  this process is pretty much same for all the Xiaomi devices

Step 1: Unlock the Bootloader

Xiaomi has tightened the security of their smartphones by locking the bootloader, which keeps anyone from flashing a custom recovery,  which is something required for rooting the device.

So, you will need to have the bootloader unlocked, fortunately, you can request for the unlock code from Xiaomi but it requires a bit of patience since it might take a few days to get it.

You can head over to this webpage to request the unlock code,  simply fill up the form mentioning the reason why you want to unlock the bootloader.

You will get the bootloader unlock code in one or two days.  Once you get the code you will have to wait for at least 72 hours before unlocking the bootloader.

Once you are past that date,  you can download unlock tool and unlock the bootloader.

The second step is to flash the custom recovery for your particular device,  this is tricky because you will have to download the specific TR develop file for your device.  

Step 2: Flash Custom Recovery

Now that the bootloader is unlocked,  it’s time to flash a custom recovery for your Xiaomi device. You will need to download the TWRP file for your particular Xiaomi Device, use the link below to search for it. 

Download TWRP.img

There is now an app available for finding the TWRP file for your particular device, the app can be installed from Play Store using this link.

There are several methods to flash custom recovery but the one we would be using is probably the easiest and requires an additional software called Minimal ADB Fastboot.

If you use the app to donwload the TWRP file, you will have to transfer it to your PC for this method. And for the ease of understanding this guide, rename the twrp file to twrp.img

Download Minimal ADB Fastboot

Once you have downloaded and installed minimal ADB, move the TWRP.img file to the minimal ADB folder in the program files,  the file path is mentioned below.

C:\Program Files\Minimal ADB Fastboot

Once you are done with that,  launch minimal ADB and Launch Minimal ADB Fastboot and type this command.

fastboot flash recovery twrp.img

This picks up the recovery image and loaded to the phone.

Type this command. “fastboot boot twrp.img

(This will flash the twrp recovery image to the phone, might take few minutes)

The TWRP would be flashed to your Xiaomi Device.

The third step is to root the Xiaomi device which is also pretty much is same for all the devices from Xiaomi. You will need to download magisk.zip and lazyflasher.com.

The only thing you will have to keep in mind is that you download the latest version of these files.

Step 3: Root Xiaomi Redmi 4

Now, download the magisk.zip*,  lazyflasher.zip file on your PC and transfer it to your mobile,  and flash the Magisk.zip from TWRP, and then the lazyflasher.zip, and then reboot the phone.

*Note: Make sure you check this page for downloading the latest version of Magisk.zip. 

Note: The first reboot takes a few minutes and it will be rooted.

Install the ES explorer app if you haven’t already, and enable root access. which will also let you uninstall system apps and much more.

This is it I hope this works for your Xiaomi device, do let us know in the comments below if it works or not so that we can modify the guide accordingly.

How to Root Xiaomi Redmi 4, or any other Xiaomi device using Magisk

In this article, we are going to talk about how you can Root Xiaomi Redmi 4. If you want to root the Xiaomi Redmi Note 4, you can check out this guide

But before we do that I want you to understand the potential risk a rooted device carries.Your smartphone would be more prone to hacks since the access to the root or system files is granted. This is why banks restrict the installation of the apps on rooted devices,

Some might just warn you of the consequences,  while some might not let you use their services at all.

Also,  since you get access to the system files, you may accidentally delete some files that are required for the Android OS to run smoothly, resulting in your phone to become a piece of brick.

Having said that,  if you are a little bit of tech savvy, you won’t be having any issues as such.

I would still like to take the time to put a disclaimer that Techtippr will not be responsible if any of the above things happen to you after following this guide.

Step 1: Unlock the Bootloader

Xiaomi has tightened the security of their smartphones by locking the bootloader, which keeps anyone from flashing a custom recovery,  which is something required for rooting the device.

So, you will need to have the bootloader unlocked, fortunately, you can request for the unlock code from Xiaomi but it requires a bit of patience since it might take a few days to get it.

You can head over to this webpage to request the unlock code,  simply fill up the form mentioning the reason why you want to unlock the bootloader.

You will get the bootloader unlock code in one or two days.  Once you get the code you will have to wait for at least 72 hours before unlocking the bootloader.

Once you are past that date,  you can download unlock tool and unlock the bootloader.

Step 2: Flash Custom Recovery

Now that the bootloader is unlocked,  it’s time to flash a custom recovery for your Redmi 4,  you will have to pick the right custom recovery file for your phone since this guide is specifically for redmi 4. I will put the link below.

Download TWRP.img

There are several methods to flash custom recovery but the one we would be using is probably the easiest and requires an additional software called Minimal ADB Fastboot.

Download Minimal ADB Fastboot

Once you have downloaded and installed minimal ADB, move the TWRP.img file to the minimal ADB folder in the program files,  the file path is mentioned below.

C:\Program Files\Minimal ADB Fastboot

Once you are done with that,  launch minimal ADB and Launch Minimal ADB Fastboot and type this command.

fastboot flash recovery twrp.img

This picks up the recovery image and loaded to the phone.

Type this command. “fastboot boot twrp.img

(This will flash the twrp recovery image to the phone, might take few minutes)

The TWRP would be flashed to your Redmi 4.

Step 3: Root Xiaomi Redmi 4

Now, download the magisk.zip*,  lazyflasher.zip file on your PC and transfer it to your mobile,  and flash the Magisk.zip from TWRP, and then the lazyflasher.zip, and then reboot the phone.

*Note: Make sure you check this page for downloading the latest version of Magisk.zip. 

The first reboot takes a few minutes and it will be rooted.

Install the ES explorer app if you haven’t already,  and enable root access. which will also let you uninstall system apps and much more.

How to block ads in Android Smartphone

0

Before we talk about how to block ads in Android, you must understand that ads are the reason it is possible for so many publishers to publish amazing content on the internet for you to read it for free

I am also a publisher and this blog relies on ads to pay the bills, but I still understand why you would want to block ads on your Android smartphone.

Perhaps you are talking about those annoying pop-up ads that you see on some of the websites when you try to download something.

Mostly these websites are pirates, which distribute copyrighted material which causes millions of dollars of loss to the original creators of the material.

And there is no easy way for them to make money by such practice, this is why they turned to services which let them put annoying pop-up ads and their websites.

I think it is not fair to all the Publishers, who would like to use respectable ads that do not do not annoy the readers.

Having said that, As you have landed here in search of your solution to block ads on Android smartphone I would like to point you to one of our articles where we have listed the best ad blockers for any type of web browser, whether for the desktop or for the Android smartphone, or for the iOS devices.

If you don’t want to read such a long article and want the solution right here, I would like to mention that you should install Google Chrome on your Android smartphone if you haven’t already, or simply update if you have not been using it as your default browser

Because the newer version has got Ad blocker built right into the browser which will block ads on all the websites that put annoying ads on their website.

You can follow this Google Chrome link that will take you to the Play Store where you can find if there is an update available, so that the Ad-blocker can be turned on for your Android smartphone

I hope you find this article you can read more articles on techtippr.com

How to Remove System Apps in Android Smartphone, Not Exactly Uninstalling

We all have reached a stage where our smartphone does not have enough storage to install another app or download another file. 

This is because smartphones these days have stopped putting microSD slots into their smartphones because they want to sell the higher variant of the smartphones with more storage.

Well, Xiaomi and some other Chinese companies have come up with Hybrid Sim Slots, which gives you the option to use two SIM Cards at a time or 1 SIM and 1 MicroSD card to increase the storage.

Many have decided to live with this limitation and use two sim cards. Because this gives them the option to pick best data plans between the two Operators. 

What a lot of people don’t know is that they can make some more storage space in their smartphones by removing the system apps or the bundled apps on the Android.

And as I said in the title of this article that you are not exactly going to remove these apps from your smartphones, because to remove your smartphone you need to root your device,  which is just not the option for a lot of people.

So here is what you can do to make more space in your smartphone

You can disable the ads that you don’t use,  the good thing is that you will find quite a handful of app that you won’t be using anytime soon, you can disable this app and make some data just like I did on my phone.

I disabled a dozen of apps on my Samsung Galaxy S6 edge, which is a single SIM phone and has 32GB of internal storage with no expandable storage option.

After disabling a dozen apps, I was able to make 2 GB of space on my phone, which is kind of awesome because I can now save 3 full-length movies (if each of them is 650 MB in size) or I can install a few more apps of my liking.

How to disable the system apps on your smartphone

Disabling the system apps it’s quite easy, you will have to go to the Apps section from the settings area, and then turn to system apps.

Or, you can simply long tap on the particular System app and get over to info, which can be found on the top right or left (depending on which smartphone you use)

Another simple way is to use ES Explorer app, which has a section that lets you access Apps, where you can also access system apps

So, tap on the system apps which will open more options for that particular app, such as ‘clearing the cache’, ‘clearing the default’. force stop’, or ‘disable the app’

Note: If you have installed updates for that particular app you may need to first uninstall the updates before getting the option to disable the app

Apps that are bundled with the Android OS,  such as Google Plus, Google Play Newsstand, Google Music, Microsoft Excel, Microsoft Word can easily be disabled to make more space on the smartphone

Also, note that there will be a few system apps that you won’t be disabled.

So this is the best way to make some space on your smartphone if you are not looking to buy a smartphone with highest storage option.

I hope you find this useful you may share this with other people on your Facebook or WhatsApp that you can read more articles on techtippr.com

Gboard vs SwiftKey which is the best keyboard for smartphone?

Just over a decade ago the entire human race, (or at least the ones who owned smartphones), had to do with the tiny keyboards on their smartphones. Nokia was one of the phones that brought full qwerty keypads to some of their Smartphones and called it innovation.

Suddenly, in 2007, when Apple introduced iPhone, everything changed for the better. With the release of Android platform, the market was filled with smartphones with the entire front area made up of the screen and the smartphones having on-screen keyboards which were touchscreen.

Initially, the smartphone enthusiasts downvoted the idea of having touchscreen keyboard, but with time and improvements in the smartphone input technology, people started loving it.

Fast forward to 2018, we have a bunch of dedicated apps that want to be the default keyboards on your smartphones.

Today, in this article, we are going to compare two of the best keyboard apps available for Android phones, the Gboard and SwiftKey.

Both the apps are free, both the apps can be installed from the Play Store and both the app have zero in-app purchases.

Layout and Design comparison

No matter which keyboard you decide to use, it will always cover at least 30% of your screens real estate since it has to give you the complete keyboard experience, and the buttons need to be big enough to be tapped without having mistyped.

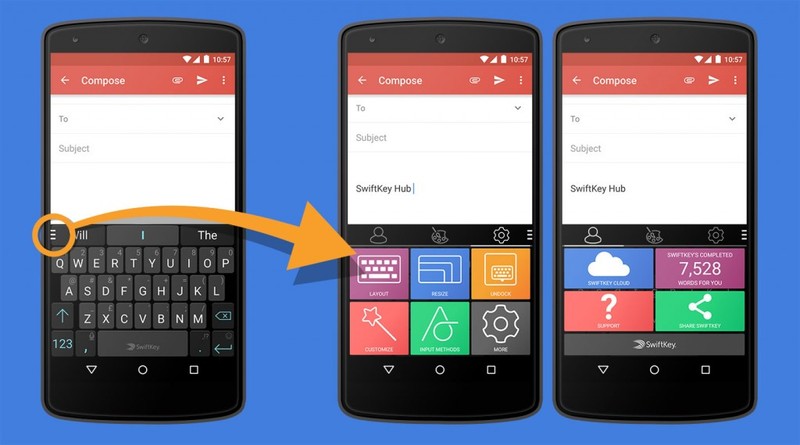
The SwiftKey keyboard has actually understood their users, that is why they offer the flexibility of resizing the keyboards so that you can select the height of the keyboard as per your preference.

This is actually kind of awesome because we have Android Smartphones of different sizes, and we can actually customize the size and the layout of the keyboard.

Not just the size of it, SwiftKey also offers a variety of themes for the keyboard, you can also personalize it by using any image you want as background to the keyboard, which is kind of an overkill in my opinion, but there are people who love to personalize things to this extent, even keyboards.

Gboard also offers customizations, but the options are not as broad as Swiftkey. Gboard offers a few themes to choose from, and for a lot of us, it’s quite sufficient. You can also choose the height of the keyboard like you can do in Swiftkey. 

Gboard’s approach in offering customizations is pretty minimal, though it is lesser than Siwtkey it also makes the setup much easier.

Making searches, specifically Google

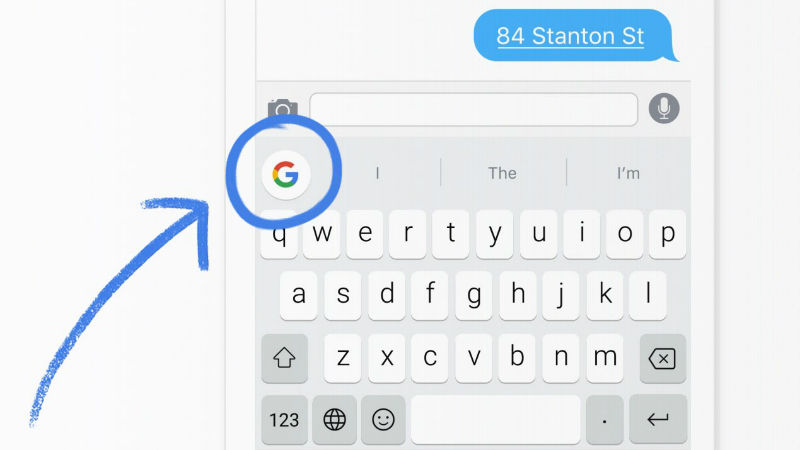
One feature, and probably the most important why Gboard gained its name, is the integrated Google search into the Gboard app itself. It has a dedicated button that lets you make Google searches right inside the app and share the results in just one tap.

It is something which is quite a lengthy process If you are using SwiftKey or any other keyboard app, because, If you are using WhatsApp and you need to make a Google search, for typing something into WhatsApp, you will have to

  • Leave WhatsApp
  • Open browser,  
  • Make your search,
  • Copy the result,
  • Come back to WhatsApp
  • And paste it.

I think you may now realize how awesome the integrated Google search feature in the Gboard app is.

For someone who is always turning to Google for finding answers or any other piece of information, Gboard is quite useful.

Tip For Swiftkey users, if you want to save a bit of your time you can also use Google assistant, just say OK Google right where you are and ask your question, It will still take you to the Google Assistant search result page, but you won’t have to switch between apps, you can simply get your answer and come back to the messaging app.

A Clipboard for copy-pasting a piece of text

SwiftKey has got a Clipboard Manager built right into the app itself, so some of the recent ‘copied’ items will be available in the Clipboard Manager, which makes life a bit easier if you copy multiple things.

I also found it useful for copy-pasting Passwords and OTPs and other details where pasting is not allowed, you can simply go to the clipboard manager select that text and it will be pasted into the input text field even if the web page does not allow it.

Other than the ability to paste a few of your recent copied items from the clipboard manager, SwiftKey has this new feature of letting you paste the copied item in just a single tap by showing it in the prediction bar that is just above the keyboard itself.

Taking your typing to the next level

SwiftKey has many features to let you type faster, it learns how you type and gives you predictions which are quite amazing, you can simply type big sentences just by choosing the predicted words from the prediction bar.

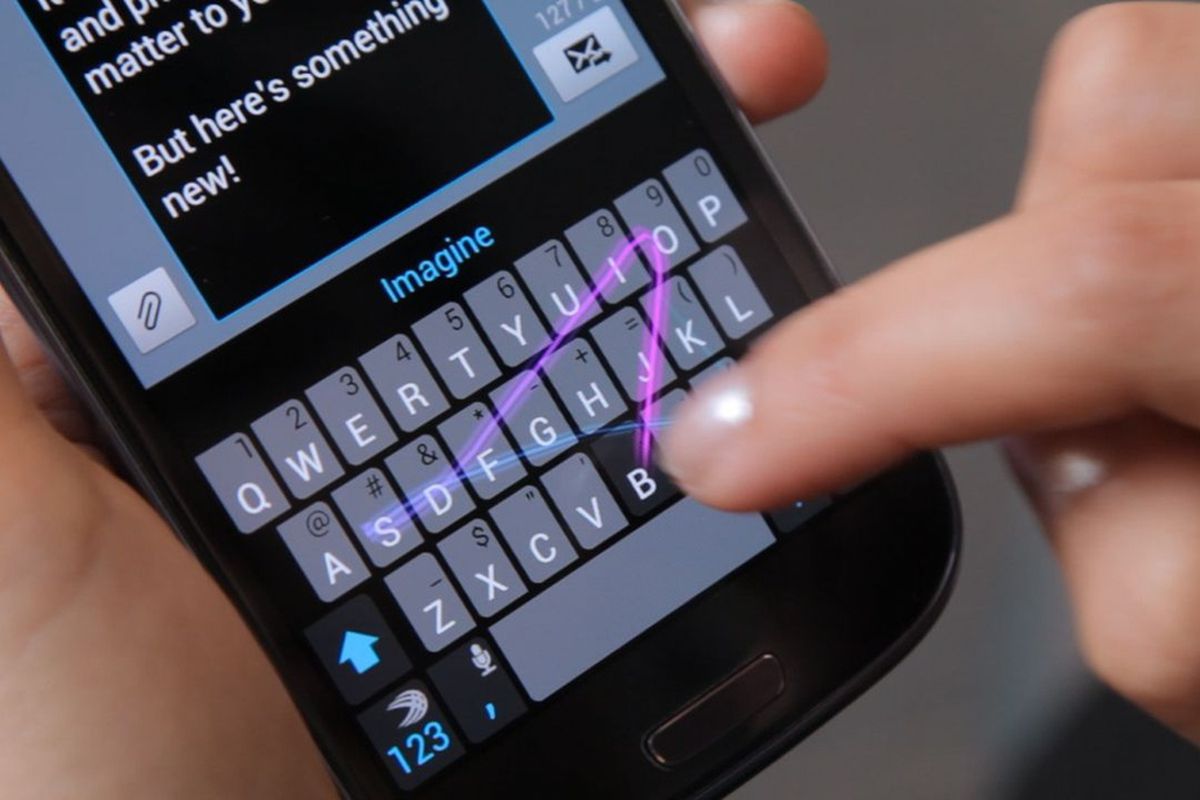
It also has a feature called Flow, where you can simply slide your fingers across the characters to form a word, it requires a bit of practice though.

And there is also a newly introduced feature that is custom acronyms, you can create short forms of your most used sentences.

For example,  You can use ‘incy’ for ‘in case you missed it’,  or you can use ‘ttyl’ for talk ‘to you later’.  So, when you type the short form the longest sentence would be typed instead.

Talking about Gboard, it also offers a feature similar to SwiftKey’s Flow, Gboard calls it Glide.  Both work in a similar manner, but I’ve found Glide to be more accurate.

Voice Typing (Speech to Text)

Both the Keyboard provide Voice typing, and both use Google’s speech engine, which means both have the same performance.

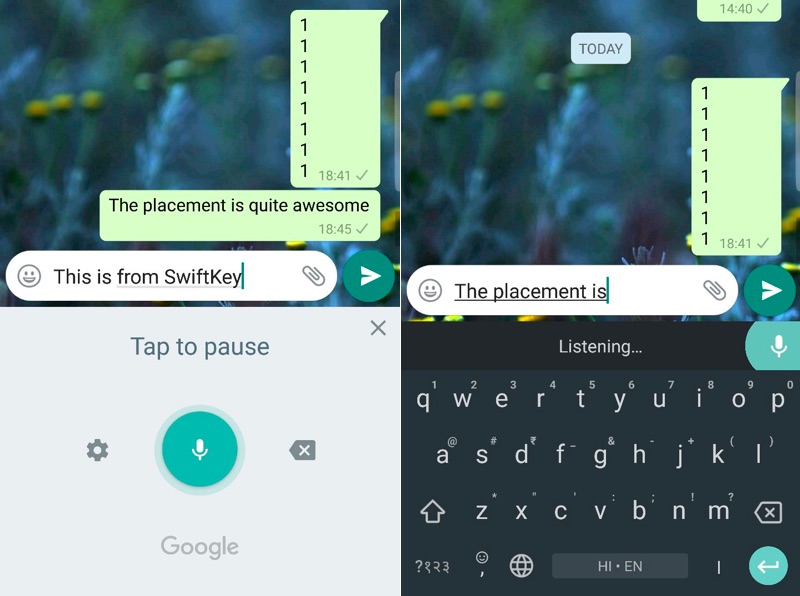
But the placement of the Voice input button is better on Gboard. It does not make the Keyboard go away, which is helpful in going to the next line or adding a full stop, something which is quite a task in Swiftkey as it replaces the keyboard with a big mic icon.

This has become one particular reason I am currently using Gboard as my primary keyboard.

Special characters and punctuation marks

SwiftKey takes the gold in this category as well, they have two type of keyboards.

One, where the special characters are mentioned on the keyboard itself, where you just have to long tap on the particular key and the special character will be typed.

But, if you don’t use the special characters too much, or you have learnt where the special characters would appear, you can select the simple keyboard where only the main characters will be visible, which looks minimalistic.

One of the reasons why SwiftKey is my main keyboard is because choosing most frequently used special characters like / and ? it is easy as you just have to long press the dot (.)

White Swiftkey has two types keyboards to choose from, Gboard has an option to enable or disable the Special characters on keypads.

Gboard has also this unique feature of letting you use the space bar to move the cursor precisely, just slide your finger to the left or right on the spacebar to move the cursor precisely.

Emoji and GIF search

The Gboard and the SwiftKey keyboard both stand at par in this department since both offer Emoji and GIF search.

You can type the word associated with the emoji and it will appear in the prediction bar for you to select just that. This saves a bit of time as that you don’t have to scroll through all the emoji is available and pick the one you want to use.

I have used both SwiftKey and Gboard keyboard side by side in two of my phones and I feel that SwiftKey is a bit slower when it comes to GIF search.

But GIF search is not something that I use on a daily basis so it’s ok for me and so it is for a lot of people. But, you should know that it is slower than Gboard keyboard.

Also, Gboard is faster in response, maybe because it is a product by Google, which also owns the Android OS, but the difference is not huge.

I’ve also found switching between Languages is easier in Gboard, You can either enable a dedicated button to switch between added languages or just long press the spacebar to do it.

So, who is the winner?

If you have gone through the entire article there is no point in guessing that SwiftKey is better than Gboard when it comes to offering features and the ability to customise the keyboard.

I may be wrong in choosing SwiftKey keyboard this is why I would urge you to install both the apps and try it by yourself, if you don’t want a lot of features and still want a faster keyboard that can do things easily, such as searching for anything right inside the keyboard then Gboard is for you.

And, you can always start using SwiftKey and utilise all the awesome features it offers.

Do let us know which app you use for the keyboard on your Android phone, and if you have any other suggestions, you can leave it down in the comments below we would love to read them.

How to Stop Autocorrect in Android

0

We all know how useful the autocorrect feature in smartphones is, the Simple feature allows us to type faster on our touch screens.

But, we also know that the autocorrect has ruined so many relationships as well.  so much that entire blogs have come into existence dedicated entirely to autocorrect fails.

The Internet is filled with MEMEs on how autocorrect has ruined someone’s job,  love and many things.

So in this article we are going to talk about how we can stop the auto correct in our smartphones specifically in Android smartphones.

Disable autocorrect on your keyboard

If you are using the default keyboard on your smartphone check in the settings whether there is an option to disable the autocorrect feature.

If you can’t find it,  you can install third-party keyboard apps such as the SwiftKey keyboard,  which will solve your problem of autocorrect fails, but will also let you type faster.

I have been using it from last few years and I have also mentioned in several of my articles on the blog

It has an option of disabling the autocorrect feature.

to disable the feature in SwiftKey keyboard,  go to the settings, and select, Do not auto correct the word.  and you are done.

How to minimise the chance of autocorrect fails

I’ve actually created dedicated video about  how to minimise typos on your smartphones, it is actually useful in minimising the chance of autocorrect fails as well.

And the method is to use speech to text feature so that when you speak it translates it into words,  it is useful because it gives you a chance to review the text before sending it.

Surprisingly I have found that  weekend to find mistakes accurately when we see the words being written in front office rather than we type the words.

Sewing speech to text you see the words being typed and this is where you can pick weather at the word is right or being mistyped.

You can also watch the video below

I hope you find this article useful you can read many more articles on techtippr.com

How to move the Chrome address bar from top to the bottom on Your Android

In this article we will talk about how we can move the address bar in Chrome for Android from top to bottom.

It’s actually quite useful, when you have the address bar at the bottom.

With Smartphones becoming bigger, it’s becoming tougher to access and navigate the Smartphones with one hand, and having the address bar at the bottom actually is quite helpful.

I have been using it from last few days and it has allowed me to use my phone with one hand.

So, if you Are a Google Chrome user on your Android phone, this is how you can move the address bar from top to bottom.

Step 1

Launch Google Chrome, then type chrome://flags in the address bar.

Step 2

This will open advanced settings, where you can make changes, you can scroll down to Chrome Home or simply find it by searching it from the top search bar.

Step 3

Once you get it, it would be set default. Tap on the default and select enable after that the Chrome browser will ask to relaunch.

Step 4

You might have to close Google Chrome and clear it from the recent app in order for the changes to take effect.

Step 5

You can watch the screencast below to learn how to do it

I hope you find this post useful in accessing your phone with one hand.

How to Fix YouTube Error 400 on Your Computer, Smartphone or Smart TV (Solved)

YouTube is probably the most popular website for watching videos online,  but you can run into various kind of problems while watching the videos. YouTube error 400, YouTube error 401, YouTube error 404, YouTube error 500, YouTube error 503, etc

In this article, we will specifically find a solution for the error 400 (Bad Bequest) issue.

YouTube error 400 happens in many situations, when we browse YouTube website on a computer, when we use YouTube app on mobiles, and when we open YouTube app on smart TV. So in the following, we will list different solutions according to different occasions.

Fix YouTube Error 400 on Computer

Clearing cookies and caches in your browser might work solve your problem. Clearing the temporary Internet files, history, and password would be best. I usually solve this problem by clearing everything from last one week.

This occasion happens mostly because when you surf on YouTube, you have sent YouTube server a bad header in the request, and this can also happen if the browser tries to use something that’s already been cached.

Fix YouTube Error 400 on Phone

Try logging out of YouTube app, then log in again. If it does not work, you should try the ultimate advice. You need to replace the direct YouTube video link to just the video ID itself. It works every time.

Fix YouTube Error 400 on Smart TV


Make sure the device is on the latest software. If it is up to date and YouTube error 400 still exist, you may try with disconnecting the power supply for a few minutes.

If it still does not work, the last solution is to hard reset your device, or restore the default settings. By these steps, you can totally get your YouTube right.

I hope the above solutions that I mentioned work for you and you are able to solve your problem. You can read other articles on techtippr for solving your other queries.