You may have got the fastest internet plan, but you can still struggle to load a webpage because there can be possibly n number of reasons your internet can be slow.
And Google DNS and Open DNS can help you improve your internet speed.
The DNS server from Google is one of the fastest DNS servers which is used by many people across the globe.

Here are the best google DNS settings to speed up your internet.
What is Google DNS and how I can help you improve your internet browsing?
DNS stands for Domain Name System, and it is an important system that matches the domain names to its correct IP address.
When the connection is made to the right IP address, we are able to browse that particular website.
So, the DNS is actually a database of domain names and IP addresses. Whenever you enter a domain name in your web browser, your computer will contact the DNS servers and ask for the IP address which is associated with the domain name.
When the IP address for the domain name is served, it’s connected to the web server of the website, and it opens in your web browser.
All this happens in milliseconds, and even in milliseconds, the system can be improved to enhance the overall browsing experience.
Even if you do not use Google DNS or Open DNS or any other public DNS that is available, you are still using DNS offered by your internet service provider.
And maybe the DNS offered by your ISP isn’t that fast. Or, there can be a lot of other issues with the ISP provider DNS servers. Such as,
DNS Lookup Failed On Google Chrome
Err_Connection_Timed_Out Error
Err_Connection_Refused Error
Dns_Probe_Finished_Nxdomain Error
DNS Server Not Responding On Windows
Majority of the people do not care about what DNS they are using, because they are either not that tech-savvy are they don’t really face any issue with their internet browsing speed,
Why you should use Google DNS servers?
If you are facing internet browsing issues, you can test out Google DNS or Open DNS, however, I would recommend you to first try Google DNS.
Open DNS does offer a number of useful features, but for simple users, the Google DNS is the best option. Unless you are setting it up in an Office network or you want to restrict websites in office.
People who are a little tech savvy, are aware of these issues prefer Google DNS, and have seen improved browsing speed.
One of many reasons to use public DNS servers like a Google DNS is for accessing those websites which have been blocked by the ISP by routing the domain names to block IP addresses.
And if you use Google DNS, you will be able to bypass search restrictions.
How to configure Google DNS in Windows
On your Windows computer go to the control panel and click on ‘Networks and Sharing center’
In the next window, find ‘Change Adapter Settings‘ on the left-hand side. Click on it and you will be able to see the connected networks.
Right click on the connected Network and then click on properties.
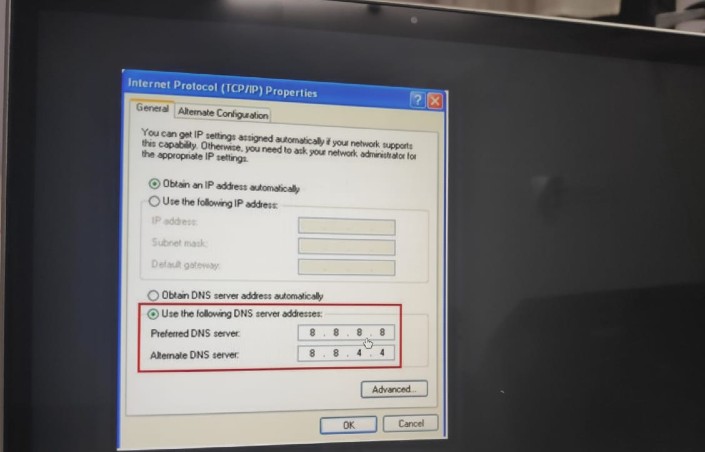
Go to the networking tab, and find Internet Protocol Version 4 (TCP/IPv4) and click on Properties on the bottom right-hand side of the box.
Under the General tab, click on ‘Use the Following DNS Server Addresses‘ in fill the DNS value as 8.8.8.8 or 8.8.4.4 and then click ok, and you are done.
The network will get restarted and you will start using the Google DNS server.
So, these are the Google DNS settings which you can apply on your computer, and start using if faster DNS server for improved by browsing experience.

