
I have always used my laptop for my full-time work. In 2009, someone recommended connecting an external monitor to get an extended screen for some extra screen real estate. More than a decade has passed, in I am still using an external monitor, in fact, A 42 inch smart TV as my monitor.
The desktop has a limitation. You have to be on your desk to use a big monitor, but I love the screen real estate my 4K a resolution smart TV gives me. But when I am traveling or working from a local Cafe, I am limited to using only the screen of my laptop.
So over the past few years, I have developed a workflow that lets me make the most of my Mac’s screen does not affect my productivity too much.
You may or may not be using an external monitor to get some extra screen real estate; you may only be using your laptop’s screen, you will still benefit from the tools I use for my Mac.
Get extra Screen Real-estate using Switch Res X
I have mentioned the Switch Res X tool in the past as well. It’s a great utility to get screen resolution that is not natively available. It has been pretty useful for me when I used my 2015 MacBook Air.
Since the screen resolution of my 2015 MacBook Air was 1440×900, it was a struggle to work on it when I was used to working on an 1140×900 + 1920×1080. The utility let me pick a screen resolution close to Full HD, 1680×1050 to be precise.
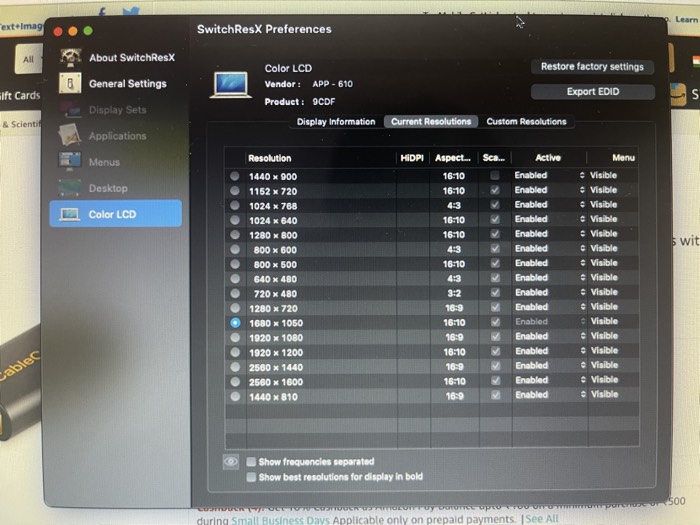
You can also check out Switches X and see which resolution you can manage. The downside of using switch raise x for taking resolution for your MacBook is that the text is not crispy enough, but if you are looking to get more productive and do not care about the crispiness of the text, you can use big a resolution you can manage for a while and then switch back, and you don’t need extra screen space.
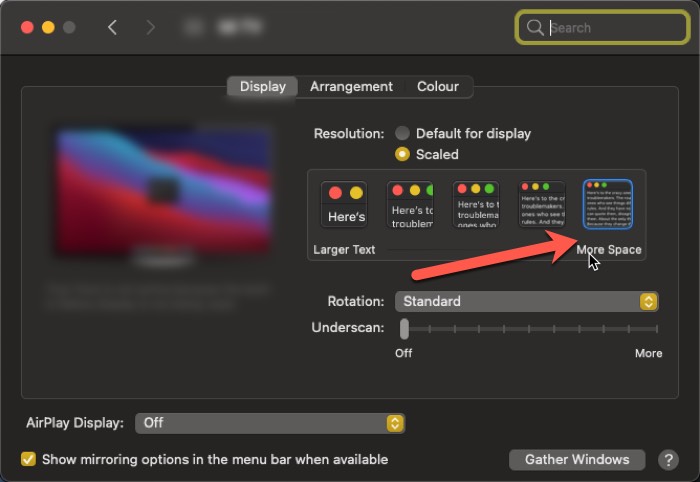
If you are using MacBooks bought in recent years, you can choose more space options for the display you are using from the settings area of the MacBook.
Tuck App
If you want to be more productive and want to get more done in less time, you need to switch between Windows faster. Split-screen is the way to go, but on a laptop screen, which is already quite limited, you cannot open more than two windows side by side.
This app makes it possible for you to have more than two windows open at once.
When you have the app installed, it allows you to hide Windows on the four corners of your screen, and when you move your mouse word to the particular corner, the window pops out. When you move away from the mouse, it hides back again, which is pretty awesome if you have a window open that you use for reference purposes.
Slidepad
This works pretty much like the Tuck app. A mini-browser that is hidden until you move your mouse over to the center of the right edge of your screen. The popup browser slides in, in where you can open any link from where you want to reference something.
It is much better than having to minimize and maximize a window or use a gesture just to take a look at something.
Taskly

This is another excellent app that is used regularly. The app stays in the menu bar of your Mac, which means it does not take any screen space. You can add tasks to it you want to perform, and when you play, it keeps track of time, which helps you stay on track and stay focused on your work.
It is not just great for optimizing the small screen space of your computer; I use it even when I am connected to the external monitor because it is easier to look at the timer and not get distracted by it.
Add Virtual Desktops
This I haven’t used much because whenever I have to get productive, I already have an external monitor, which gives me so much extra screen space. But if you only use your MacBook, this one can be beneficial.
Mac OS allows you to add different Desktops. Do a five-finger swipe on the trackpad to get the app overview. On the top, you will find your desktop 1. On the top right-hand side, you will find a plus icon (+). When you click on it, it opens a new space, Desktop 2.
This is helpful if you arrange Windows in specific ways and do not want to do them again when working on different apps. So you can set up different desktops with different layout arrangements.
View Websites at 80% in Google Chrome.
My primary Browser on my Mac is Google Chrome browser, so I use this often when I am only using my laptop. I view websites at 80%, which gives me some extra steam space, and I can resize the browser window a little narrower to make room for other Windows to fit on the screen.
This can be done by clicking the three dots on the top right-hand side and then clicking the minus (-) where it’s written Zoom.
So, I follow some tools and tricks when I only use the screen on the laptop to be more productive and get stuff done quickly. I hope you find this article useful. There are many other articles on the website to make your Tech life easy. go to Homepage.