How to Post Instagram Reels from Your Computer

0

In recent updates, Instagram has made it possible to post reels directly from your computer without the need for third-party applications or Android emulators.

This guide will walk you through the process of posting Instagram reels from your computer, ensuring a seamless transition from your desktop to your social media profile.

Watch the Video Instead

Posting Instagram Reels via Computer: Step-by-Step

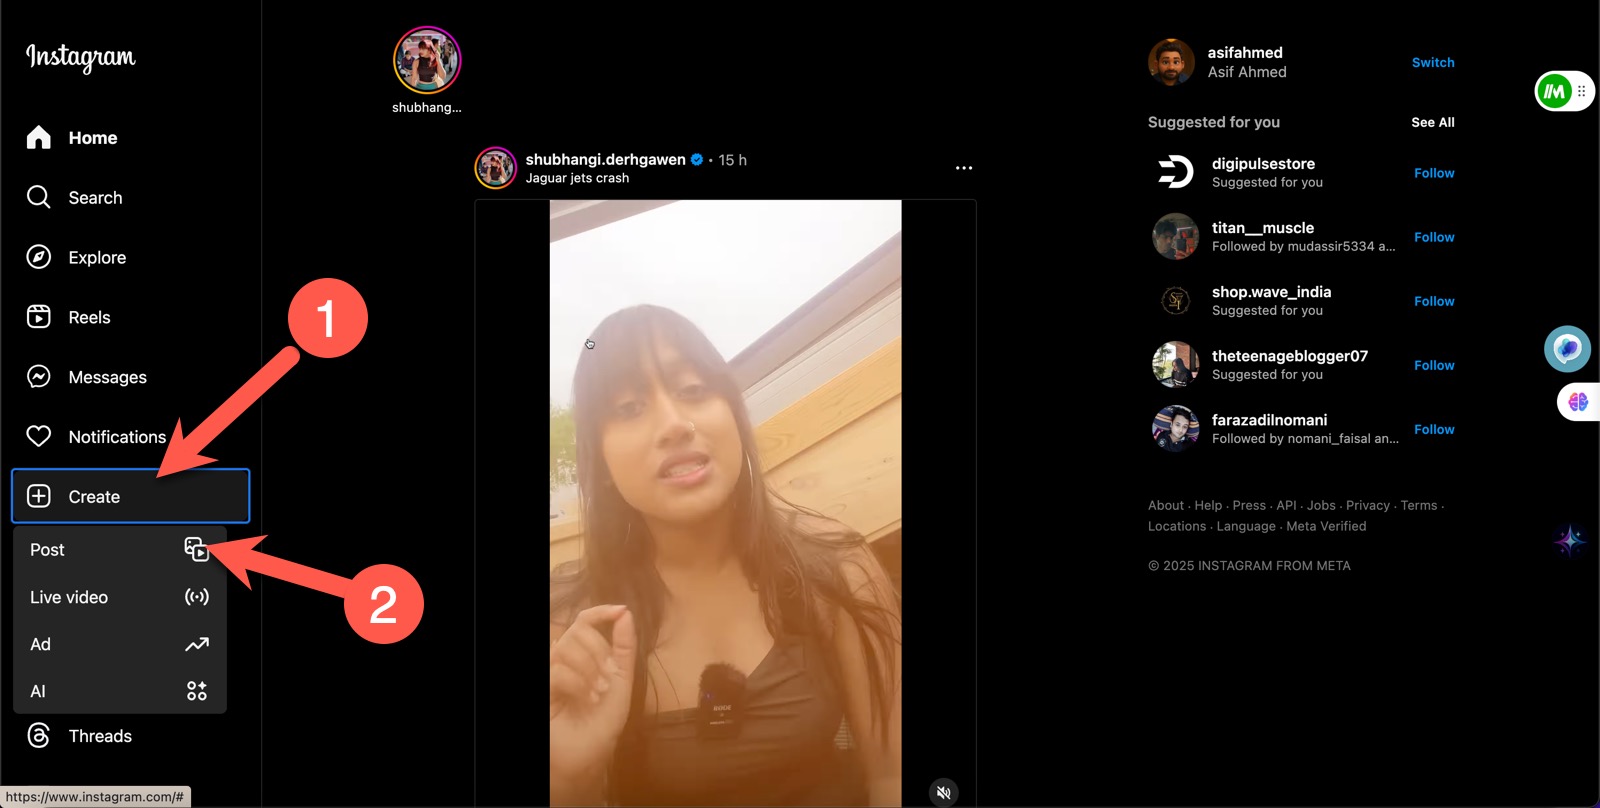
  1. Log In and Access the Create Button Start by logging into your Instagram account on your computer. Once you’re logged in, look for the “Create” button on your Instagram homepage. Click on it, and you’ll see an option to post both photos and videos.
  2. Understanding the Transition to Reels It’s important to note that Instagram has recently converted all previously uploaded videos into reels. So, any video uploaded henceforth using this method will automatically be categorized as a reel.
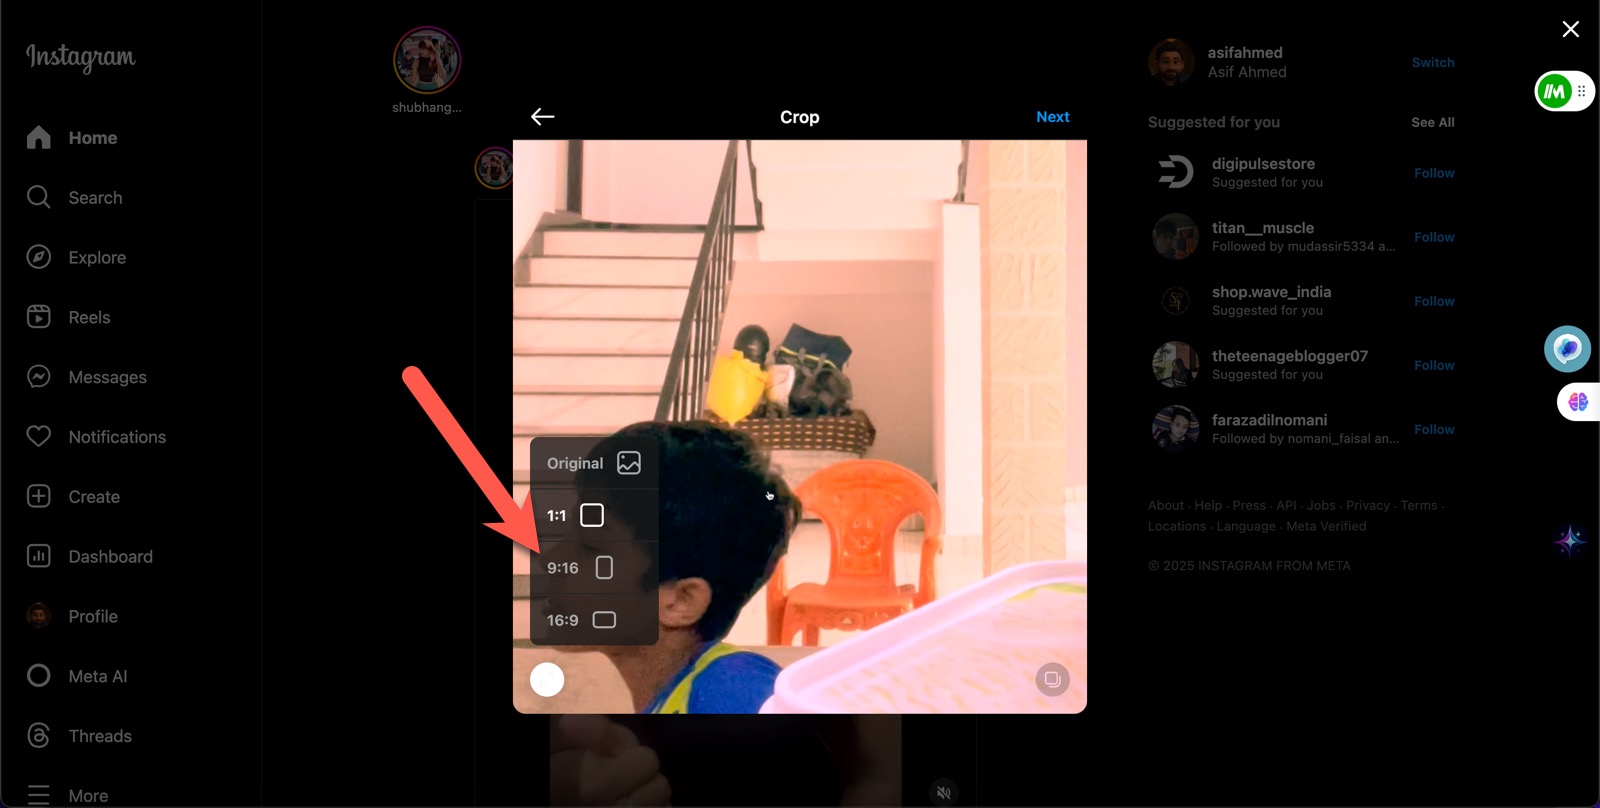
  3. Uploading Your Reel Select the video you wish to upload from your computer. Use the available options to change the aspect ratio if necessary. If your video was shot and edited in a vertical format, selecting “Original” will maintain its original size.
  4. Choosing a Cover Photo Click “Next” once your video is uploaded. You will have the option to change the cover photo. It’s advisable to choose a frame from your video or upload a unique image tailored for this purpose.
  5. Editing Features and Limitations While Instagram allows you to trim and mute the video, the music library feature available on mobile is not accessible here. However, don’t let this deter you; there are workarounds to incorporate music into your reels.

Adding Music to Instagram Reels: Two Methods

For Apple Users

If you’re an Apple user with both a Mac computer and an iPhone, you can leverage the Apple ecosystem to your advantage.

The latest updates to macOS and iOS introduce the functionality to mirror your iPhone on your Mac. With this feature, you can control your iPhone directly from your Mac, allowing you to post reels from your phone. Simply ensure the file is accessible on your iPhone by using AirDrop to transfer it.

For All Users

A universal method is to post your reel from the computer and save it as a draft. You can then open the draft on the mobile Instagram app to add music before publishing. This approach gives you the flexibility to integrate soundtracks regardless of your device ecosystem.

We hope you find these instructions helpful. With these methods, you can now post reels directly from your computer and enhance them with music using either of these two strategies.

I hope you find this useful. Check out more cool tips under our Internet Tips section.

Enhance Your Audio with AirPods Pro: A Comparison with External Microphones

0

Did you know that your AirPods Pro can double as an external microphone when paired with your iPhone? In this guide, I’ll show you how to make it happen, plus we’ll compare its performance with a budget-friendly external microphone. Let’s dive in!

Watch the Video

Using AirPods Pro as an External Microphone

Last year, I explored how to use AirPods Pro with an iPhone to capture quality audio, particularly when filming from a distance. Although I previously recommended a pro video camera, its recent watermark addition requires a payment of ₹300 (about $2.50) for removal. If you’re not keen on paying for an app, let me introduce an alternative: Black Magic Camera.

Created by the developers behind Da Vinci Resolve, this powerful, free application can be found on the App Store. Though primarily designed for cinematic video creation, we’re more concerned with its functionality of using AirPods as an external mic.

Head to the settings menu. The app won’t automatically record vertical videos, even when held upright, as it defaults to landscape to suit cinematic needs. But for our purposes, the audio source is key. Scrolling down reveals three options: none, your iPhone’s microphone, or AirPods Pro. After connecting my AirPods, I recorded a sample to see how it works in action.

In sample recordings with the Black Magic Camera app, all audio captured through the AirPods Pro held up impressively. This solution shines when filming in noisy environments, ensuring your voice remains clear and undistracted despite ambient noise. With AirPods always at hand, they’re a convenient choice.

Comparing Audio Quality: AirPods Pro vs. Budget Microphone

Let’s pit the AirPods Pro against a cheap external microphone I purchased for my iPhone. Available on my YouTube channel, this video gives you a side-by-side comparison.

For older iPhones like mine, the external mic utilizes a lightning adapter, though newer models support USB-C. It’s a plug-and-play operation, with the receiver clipping onto your shirt. Charging is via USB-C, and successful pairing is indicated by constant red and blue lights on the receiver and transmitter, respectively.

In newly recorded samples using the external microphone with my iPhone 12 Pro Max, it’s evident that the audio quality is slightly superior to that of the AirPods Pro. However, in terms of convenience, the AirPods Pro win out—always accessible, unlike an easily forgotten separate microphone.

This external microphone excels in scenarios where superior audio is necessary, such as Instagram stories or other on-the-go recordings. Nonetheless, decide for yourself which option delivers the audio quality that meets your expectations.

AirPods Pro as an external microphone presents a simple yet effective solution for capturing audio on-the-go. Though alternative mics may offer audio quality enhancements, the ubiquitous nature of AirPods means you’ll never be without a usable option.

If you found this guide helpful, subscribe for more insights. Until next time, take care!

Transform Your Ghibli Photos into Enchanting Videos: A Guide

In the era of digital creativity, the possibilities are endless. You’ve probably experimented with new features that convert your regular photos into the whimsical Ghibli art style. But did you know that you can further enhance these photos by transforming them into videos? In this blog post, we will guide you through this creative process by testing out three websites that effortlessly turn your Ghibli-style photos into captivating videos without any cost. So, let’s dive in!

Watch the Video Instead

Getting Started with Ghibli Art Style

To embark on this creative journey, you’ll first need a photo that has already been transformed into the Ghibli art style. It’s worth noting that free versions of these conversion services often have limitations—typically allowing only a couple of images to be converted per day. However, this limit is usually sufficient for personal use. Once you have your Ghibli art style photo saved on your computer, you’re ready for the next step: converting it into a video.

Step 1: Using KlingAI

Advantages: Offers a free tier; allows conversion from photos to videos.
Disadvantages: Slow processing due to long queues.

KlingAI, although subscription-based, provides a free tier where you can create videos from photos. Keep in mind that the free version might require you to wait, often up to an hour, due to a crowded queue.

Here’s how to get started: Sign into KlingAI, navigate to the video section, and ensure you select “image to video.” Drop your saved photo into the platform, input a simple prompt, and hit the generate button. Remember, experimentation can exhaust your AI credits quickly—stick to straightforward prompts to avoid this!

Step 2: Experimenting with RunwayML

Advantages: Fast output; user-friendly interface.
Disadvantages: May not follow prompts exactly; watermark present.

The interface of RunwayML mirrors that of KlingAI, offering a straightforward way to convert images once you’re logged in. After uploading your photo and inputting a prompt, the service can generate a five-second video in under a minute. Although the output might not follow detailed instructions perfectly, it offers impressive speed and ease of use.

Step 3: Discovering HailuoAI

Advantages: Accurate prompt following; smooth effects.
Disadvantages: Longer processing time; limited free credits.

With HailuoAI, after uploading your image and selecting a quantity of one, you can expect a turnaround time of 15 to 30 minutes. Notably, HailuoAI excels in following prompts accurately and adding smooth effects to your videos, making it a formidable choice if quality is your priority.

Comparing Results

After using all three platforms, it was observed that:

  • KlingAI took an hour but ultimately delivered a visually pleasing video.
  • RunwayML offered the quickest service, completing the conversion in less than a minute.
  • HailuoAI provided the smoothest zoom and best captured the essence of the prompt.

Given these outcomes, HailuoAI emerged as the top choice for quality, while RunwayML led in speed. At the end of the day, each service has its strengths and could be the right fit depending on your specific needs.

Conclusion

Transforming your Ghibli or other styled photos into videos can open up a world of creative possibilities. Whether for personal memories or more professional endeavors, these three platforms—KlingAI, RunwayML, and HailuoAI—provide excellent starting points with their free-tier offerings. Experiment with all three to discover which aligns best with your creative aspirations. Happy creating!

If you found this guide helpful, consider hitting the like button and subscribing for more insightful posts. Until next time, take care and keep creating!

Maximize Your Productivity: Organize Your Bookmarks Efficiently

0

In today’s digital world, where our lives are increasingly spent online, having an efficient system to organize our work resources is imperative. Here is a productivity tip that I’ve been using for a long time to keep my digital workspace clutter-free and super organized.

Organizing Websites with Bookmark Folders

In my last video, I shared how I organize my websites into different folders on my Google Chrome browser. Keeping these folders easily accessible in the bookmark bar ensures that they’re always available whenever I need them.

As you can see in my browser’s bookmark bar, I have many folders designed to neatly organize all my tools according to their purpose.

For example, my “Publish” folder contains the dashboard links to all the sites where I regularly publish content. Meanwhile, in the “Dollars” folder, I keep a list of sites where I generate income. Additionally, there’s a “Resources” folder that holds all the essential resources I need on a daily basis.

Overcoming Bookmark Bar Limitations

While this method is super effective, the primary limitation is the limited space in the bookmark bar.

For instance, if I venture beyond content creation and want quick access to additional tools, I need the flexibility to accommodate other activities, such as trading. I prefer keeping these activities separate, so when I’m focused on trading, I don’t want these usual bookmarks cluttering my space.

The Bookmark Bar Switcher

To solve this, I’ve discovered a remarkable tool – the “Bookmark Bar Switcher,” a free extension available on the Chrome Web Store. Once installed, it might not immediately appear next to the address bar. You’ll need to click on the extensions icon and pin the Bookmark Bar Switcher for visibility.

Effortless Switching Between Modes

This switcher allows me to toggle between different sets of bookmark bars with ease, enabling me to create as many configurations as I need. For example, I’ve set up a “Trading” bar for trading resources and an “AI Tools” bar when working within AI project zones. So, when switching tasks, I can switch the bookmark bar with a single click, ensuring that all necessary tools are accessible exactly when I need them.

Incorporating this tool has transformed my productivity and drastically streamlined my digital organization. With just a few clicks, you too can maintain a clutter-free workspace, making it simpler to switch gears and focus on different tasks throughout your day. Try this method and enhance your efficiency like never before!

Add to Chrome

Create A Shortcut to Airdrop Files in a Single Click

If you’re someone who spends countless hours working on a computer, saving even a few seconds can be valuable—especially if you’re a MacBook user who frequently needs to transfer files via Airdrop.

Traditionally, airdropping files from a MacBook to an iPhone involves multiple steps: selecting the file, navigating to the share option, clicking on Airdrop, and finally selecting the target device.

Thankfully, there are tools to simplify this process, saving you time and effort. In this post, we’ll explore two methods: a paid app from the App Store and a free alternative using the Shortcuts app.

TopDrop: The Paid App for Quick Airdropping

I recently discovered an app developed by Ian Keen, available on the App Store, that streamlines the Airdrop process. Although it’s a paid utility, it provides significant time savings by allowing you to drag files directly to the notch on your MacBook Pro. Once the file is in position, the Airdrop option appears automatically, letting you swiftly transfer files to your iPhone or iPad.

DIY Airdrop with Apple’s Shortcuts App For those who prefer not to spend money on another app, Apple’s Shortcuts app offers a cost-free alternative. Available on Mac, iPhone, and iPad, Shortcuts lets you create powerful automations.

Setting Up the Shortcut for Airdrop:

1. Open Shortcuts App: Available on your Mac, this app enables complex task automation with a straightforward interface.

2. Create a New Shortcut: Begin by clicking the “New Shortcut” button in the top-right corner.

3. Select Files to Share: In the documents section, choose “Get Selected Files in Finder.” This allows you to specify which files you wish to share.

4. Enable Airdrop: Next, navigate to the sharing options and add Airdrop to your shortcut. Now you’ll see Airdrop as part of your automation sequence.

5. Assign a Quick Trigger: Add a shortcut button using the shortcut details button. For instance, you can choose `Ctrl + Shift + P`.

6. Test Your Shortcut: By running the shortcut, you can confirm its functionality. A prompt should appear, allowing you to select the target device for file transfer. With the shortcut created, you can further streamline the process by adding it to your dock. Simply right-click on the shortcut and select “Add to Dock,” ensuring easy access whenever you need to share files.

Comparison: Free vs.

Paid Both methods provide efficient solutions for quickly transferring files via Airdrop. The paid utility, TopDrop, offers convenience with its notch integration, while the Shortcuts method provides a customizable and cost-free approach. Whether you choose to invest in the app or leverage Apple’s native tools, both options can enhance your workflow and keep your focus on the tasks that matter most.

By using these tools, you can enhance your productivity and reduce the hassle of sharing files between your MacBook Pro and other Apple devices. Try out both methods and see which one best fits your workflow.

Help Me Write: This Premium AI Feature is Now Free in Google Chrome

0

Whether you’re drafting lengthy emails, responding to comments, or writing documents, every second counts.

Fortunately, Google has introduced a remarkable writing tool integrated within the Google Chrome browser, designed to streamline these tasks. Let’s explore this free feature and how it can revolutionize your workflow.

Discovering the Tool Google’s innovative writing aid, nestled within Chrome’s ecosystem, is easy to access. If it’s not already enabled, simply navigate to the settings area of your browser and activate it.

This hidden gem is now ready to assist, offering a range of features at your fingertips. Let’s delve into how it works.

Enhancing Email Replies Email management is a daily ritual for many, often requiring us to respond to numerous messages efficiently. With Chrome’s ‘Help Me Write’ feature, lengthy compositions are no longer a burden.

Imagine writing just a few words and then allowing the tool to formalize your response, ensuring grammatical precision without the stress of sentence construction.

A simple right-click activates options like ‘Formalize,’ effortlessly refining your message with just a click.

Versatility in Writing Tools The ‘Help Me Write’ feature doesn’t stop at formalizing. It caters to various needs with options to ‘Elaborate’ your text, adapting to different contexts and preferences.

By selecting this, you get a slightly nuanced version of your original input, perfect for when you need to be a bit more descriptive or detailed. This flexibility means you can choose the style that best suits your message.

Addressing Comments and Chats Beyond emails, responding to comments—whether on social platforms or chat applications—becomes a breeze.

The tool can detect the context of the conversation from within the Chrome browser, allowing for context-aware expansions that develop simple inputs into detailed replies. This feature is particularly useful for social media enthusiasts and professionals alike, who can now save time while maintaining meaningful interactions.

Saving Precious Time Time is invaluable, and this tool conserves it splendidly. Tasks that typically consume several minutes are significantly shortened to just a few seconds. Previously reliant on paid tools, users will appreciate the inclusion of these capabilities in Chrome at no cost, offering premium-like functionalities to everyone.

Final Thoughts Google’s Chrome-integrated writing tool is a game-changer for anyone seeking efficiency in digital communication. It’s free, accessible, and invaluable in enhancing your writing tasks.

Give it a try and experience a substantial boost in productivity.

Achieve Inbox Zero with These Powerful Tools

If you’ve been struggling to keep your inbox clean and manageable, you aren’t alone; many people seek the inbox zero method for better email management and an empty inbox.

Fortunately, I’ve discovered some amazing tools that can streamline your email management and help you achieve the elusive “inbox zero.” In this blog post, I’ll walk you through two standout tools: Speechify and Sider AI, which can help you manage your email in your inbox more efficiently. 

These tools have transformed the way I handle my email inbox, saving me time and boosting productivity while helping me to archive unnecessary messages into designated folders, all contributing to my goal of zero email. 

Leveraging Speechify for Email Management 

First up, let’s dive into Speechify—a phenomenal application that has simplified the process of managing my emails by turning text into audio, helping me reach inbox zero. Speechify is perfect for those times when you can’t sit down to read your emails but still need to process important emails efficiently, allowing you to set aside distractions.

With its ability to speed up audio playback, you can listen to your emails while multitasking, turning your daily commute or even gym time into a productive session, keeping your email inbox in check.

One of its standout features is the flexibility it offers. Available on iOS, Android, and as a web app, you can use Speechify anywhere, anytime, ensuring that important emails are never missed, even if they arrive as a newsletter, helping you maintain a zero email strategy. 

Adjusting playback speeds is straightforward, and it can save you a remarkable amount of time, helping you stay on top of incoming email and manage your to-do list effectively. Plus, Speechify offers a free version with basic features and a robust premium version for just $8 per month or $70 annually, making it a great addition to any email client. 

Enhancing Productivity with Sider AI Next

Let’s explore Sider AI—a powerful Google Chrome extension that integrates seamlessly into your email routine, helping you delete clutter from your inbox and move closer to a zero email state. One feature that has truly revolutionized the way I handle emails is Sider AI’s ability to generate quick and efficient replies.

Gone are the days of crafting lengthy responses; with Sider AI, you can select predefined responses or personalize them as needed to achieve the elusive empty inbox.

This tool is especially useful in a professional environment, enabling you to respond to clients promptly and maintain a professional demeanor without the added stress of an overflowing email inbox, which can feel like your brain is in his inbox. 

While Sider AI offers a free version, the premium version—at just $5 per month—provides you with 1800 credits to utilize all the AI models, a worthwhile investment for anyone serious about improving their email handling.

Conclusion to get inbox zero

Integrating Speechify and Sider AI into my daily workflow has been a game changer, allowing me to delegate and manage my emails more effectively. Typically, I start my day by listening to unread emails using Speechify while performing other tasks to automate my workflow. For emails that demand a response, Sider AI comes into play, allowing me to craft quick, effective replies and delegate tasks when necessary, ensuring no incoming email goes unanswered. 

This powerful combination keeps my inbox organized and greatly enhances my productivity, making it easier to defer non-urgent emails to a designated folder while I work toward zero inbox. Whether you’re jaded by a cluttered inbox or just looking to improve your workflow, I highly recommend giving these tools a try to help you defer less important tasks and ultimately reach inbox zero.

Embrace the ease and efficiency they offer, and reclaim control over your emails to help automate your process toward zero inbox. Don’t forget to share your experiences, and if you found this post helpful, feel free to like, comment, and spread the word about how to use email more effectively. Here’s to a more organized and productive digital life, where you can easily archive or delete unnecessary emails and keep notifications under control!

If you have got tons of emails in your inbox from newsletters you don’t know when you signed up for or other junk emails that land in your inbox instead of the spam folder, check out this guide that will help you clean your inbox

Photo Colorizer, Upscaler, and Extender, All Useful Tools in One Place on Flexclip Web App

0

Its 2025, and it’s all about AI. If you’re not using AI in your workflow, you’re lagging behind your competition.

One field where AI can be utilised smartly to speed up workflow and and do quality work is video production can feel daunting—especially for beginners or small teams.

In this blog post, we will explore how to use AI for content production with a web app called FlexClip.

Making video production accessible even to non-technical users. As a cloud-based platform, FlexClip operates seamlessly across devices and provides a host of advanced AI-powered features.

Having used FlexClip extensively, I can confidently say it’s a game-changer. With new AI integrations, it now offers a suite of innovative tools tailored for content creators. Let’s dive into some standout features that can elevate your projects.

1. AI Photo Colorizer: Breathing Life Into Old Photos

Do you have old black-and-white family photos or faded memories stored away? FlexClip’s AI Photo Colorizer transforms these images by adding vibrant colors.

I tested it on some old family album photos, and the results were remarkable. The AI accurately identified elements in the image and colorized them to bring them to life.

This tool is perfect for preserving memories or creating nostalgic content with a fresh twist.

2. AI Photo Restoration: Reviving History

Over time, photographs degrade—they fade, tear, or lose clarity. FlexClip’s AI Photo Restoration solves this effortlessly.

Simply snap a picture of an old photograph and let the AI restore it. It clears blemishes, enhances details, and returns your treasured photos to their original glory.

Whether you’re creating a family archive or enhancing visuals for a story, this tool works wonders.

3. AI Image Upscaler: Boosting Digital Quality

If you’ve ever clicked photos with a low-resolution camera, you know the struggle of pixelated or blurry images. The AI Image Upscaler enhances such photos, increasing their resolution and improving overall quality.

I used it on photos taken with my first digital camera—a budget device that left me with grainy, low-quality memories. The AI upscale breathed new life into those images, adding clarity and detail.

4. AI Image Extender: Expanding Your Creativity

Want to extend the size of an image without distorting the subject? FlexClip’s AI Image Extender is the perfect solution.

Unlike upscaling, which enlarges the entire image, this tool intelligently fills the surrounding areas of a photo, expanding its dimensions seamlessly.

I tested it on a cropped image and was amazed by how naturally it recreated the background, making the image look complete.

5. AI Face Swap: Adding Fun and Functionality

The AI Face Swap feature brings endless possibilities. Whether you’re creating memes, brand promotions, or storytelling visuals, this tool lets you swap faces in images effortlessly.

For example, I used it to create a fun meme for social media, adding a touch of humor to a promotional post. This tool is versatile, catering to both personal and professional use cases.

Why FlexClip Stands Out

FlexClip doesn’t just stop at these AI tools. Its video editing platform includes:

Templates: Pre-designed layouts for professional-looking videos.

Text Animations: Perfect for captions and titles.

Stock Library: Access to millions of royalty-free images, videos, and music tracks.

Whether you’re a solo creator or part of a small team, FlexClip’s intuitive interface and powerful tools can help you create engaging, high-quality videos with ease.

Final Thoughts

The integration of AI into tools like FlexClip is transforming content creation. Features like photo colorization, restoration, upscaling, and face swapping open up new creative possibilities for both novice and experienced creators.

If you’re looking to streamline your video production process and stay ahead in the content game, FlexClip is worth exploring. Give these tools a try, and watch your projects come to life.

Automating Customer Service Using MetaDialog AI

0

Leveraging MetaDialog AI to Automate Customer Service

Building a sustainable business requires increasing engagement and establishing long-term relationships with clientele. Trying to scale up operations, companies face a difficult choice between hiring new staff and implementing innovative solutions. The adoption of AI technology streamlines dealing with large volumes of queries due to task automation and optimizing customer support (CS) processes.

Selecting a reliable provider with a team of experienced developers facilitates the integration of AI tools with legacy systems. MetaDialog builds easy-to-customize AI models compatible with dedicated software, messengers, and other services employed by CS agents. In this article, we will examine the key upsides to using AI-enabled CS products to see whether they allow firms to automate daily tasks.

Benefits of Automating Customer Service 

AI-driven CS bots rely on the power of machine learning (ML) and natural language processing (NLP), allowing enterprises to embrace a personalized approach when interacting with clients. MetaDialog builds customizable AI models to help its clients automate up to 87% of CS interactions. Integrating AI customer service solutions with legacy systems has multiple advantages:

  • Short response times: Using AI tools, small, medium-sized businesses (SMBs) and large enterprises provide replies 2 times quicker and reduce the average resolution time to 20 seconds.


  • Ability to process many queries during peak times: Increasing CS teams’ productivity by 5x allows firms to scale up operations and handle requests during peak hours.


  • Personalized approach: Complex AI models trained on datasets analyze past interactions and select the most relevant responses to solve issues efficiently. Tailoring replies in accordance with customer needs and providing relevant recommendations fosters stronger relationships with the target audience. 


  • 24/7 availability: Unlike regular CS teams, chatbots are available even outside regular business hours, which improves a satisfaction rate and enables companies to build long-lasting relationships with their clientele.


  • Enhanced satisfaction: After communicating with MetaDialog’s chatbots, the number of people happy with the provided support services increases by 28% on average. AI systems analyze client behavior and detect dissatisfaction.


  • Cost saving: AI-powered tools enable firms to reduce expenses and allocate funds to development and innovation. Instead of hiring new employees, SMBs and large firms optimize CS processes using AI.


  • Accurate responses: AI chatbots find the right answer in a fraction of a second providing the information clients need. Even though their replies may contain a bias, training AI models using datasets and adding a human to the loop solves the problem. Such tools do not make mistakes even when answering queries across multiple communication channels. Besides, they escalate tasks to live agents when it is necessary.

As building AI-based support platforms from scratch requires a high level of technical expertise, outsourcing this task to a trusted service provider like MetaDialog allows businesses to save valuable resources and invest them in future development.

How MetaDialog AI Works

Utilizing custom large language models (LLMs) trained on extensive datasets enables companies to reply to customer queries promptly. MetaDialog builds AI chatbots from scratch and integrates them with existing solutions to ensure its clients get multi-language support across various communication channels. Based on NLP technology, AI tools perform the following tasks:

  • Generate human-sounding replies;

  • Converse on difficult topics;

  • Gauge customers’ moods;

  • Dissipate concerns;

  • Provide recommendations about items and services.

When training AI models, MetaDialog utilizes textual content, including CRMs, documents, and databases. Employing machine learning algorithms enables the company to build chatbots capable of learning and improving the accuracy of responses based on past conversations and user feedback. 

All chatbots are deployed on-premises for top-grade security. MetaDialog’s specialists integrate AI tools with clients’ platforms within 5 hours. Providing context-relevant responses in real time across Facebook, Instagram, WhatsApp, and other channels, AI chatbots answer queries, analyze customer needs, and make it easier for people to find the right information.

Challenges and Considerations

Integrating AI-powered solutions with legacy systems requires specific skills and an extensive technical background. As hiring in-staff engineers may be too expensive for some, companies benefit from finding a service provider knowledgeable about potential implementation issues they could face. 

Let’s consider the most common problems related to the usage of AI:

  • Training AI models utilizing fact-based insights: Using reliable datasets facilitates fine-tuning chatbots and improving their ability to process queries automatically. Accurate data about past interactions enables AI models to learn and adjust their responses. However, ensuring that datasets are free of possible biases and incorrect information may be an arduous task.


  • Data privacy: Governments across the globe tighten regulations aiming to protect user data from being accessed by third parties. Nevertheless, some AI models may accidentally disclose sensitive data which raises concerns about the safety of their usage.


  • Embedding AI tools on web-based platforms: Integrating an AI-driven chatbot with existing systems may be challenging without understanding how to edit code, perform testing, and fix bugs. Outsourcing this task to MetaDialog enables firms to leverage chatbot functionality.

AI integration often necessitates cultural and organizational changes, including adapting workflows, upskilling employees, and fostering a culture of experimentation and innovation. Resistance to change and internal alignment can pose significant barriers.

Future of Customer Service Automation

Building a sustainable business necessitates reducing expenses. With over 63% SMBs and corporations employing AI to increase the efficiency of CS teams, implementing AI models becomes a must for those who want to keep a cutting edge over competitors.

The increased adoption of AI in retail, healthcare, and financial sectors is likely to be accompanied by the development of the following trends:

  • Voice-controlled virtual assistants: AI chatbots decipher recorded conversations and react to voice commands to provide personalized responses, which contributes to improved satisfaction.


  • Self-service platforms: Due to the intuitive interface of such sites and integrated AI tools, users can place orders and solve any issues they may face.


  • AI-driven CS team training: Generative AI models facilitate training employees using specific scenarios based on the history of real conversations.

Choosing AI models and tailoring them to the needs of a business enhances the performance of CS teams, increases client loyalty, and builds trust in a brand.

Conclusion

Automating the most difficult CS tasks allows companies to improve every step of a customer’s journey, increase client satisfaction, and build a positive brand image. By making response times shorter and providing tailored replies to queries, companies boost the retention rate and expand their target audience. Reducing the number of manual tasks allows firms to optimize the work of CS teams and handle increased volumes of requests. 

Implementing AI-powered products and integrating them with existing systems may be a challenging endeavor without the assistance of seasoned developers. If you are looking for an authoritative service provider, schedule a demo at MetaDialog’s website and make its AI-based CS tools an integral part of your workflow.

How to Expand Your MacBook Storage Permanently for Less

MacBooks are top-of-the-line computers, but their high price, especially for higher storage options, can be a deterrent. Here’s an inexpensive way to expand your MacBook’s storage without buying a new one.

Affordable Storage Expansion

You know it’s 2024 and the SSD storage is quite affordable. There are tons of external SSD options available on amazon. You can easily find a 1 TB SSD for around $100. Hack you can even go for it 2 TB SSD.

But the question is, how to carry it around conveniently?

Get A Magnetically Attached Storage

Well initially what I used to do was I used to tape my Samsung T5 SSD to the lid of my Macbook. Although it looked ugly, it got the job done. But since it’s a common problem, hence the solutions have now emerged.

Here’s a cool product on Amazon called an SSD sleeve. It magnetically attaches to your MacBook’s lid, staying with you all the time. And doesn’t look ugly at all.

Make it Sleeker and Clean Connection

Most SSDs come with a 1-ft Type-C cable. However, for a sleeker look with minimal cable visibility, consider getting a short, right-angled Type-C cable from Amazon. I have found this one.

Cost-Effective Upgrade

This method costs under $150, a significant saving compared to a laptop upgrade costing at least $300.

SSD Performance

While slower than the built-in SSD, most tasks will run smoothly on an external SSD. Video editors and users of heavy software might require the inbuilt storage for rendering large files.

Real-World Use Case

I edit 4K videos in Final Cut Pro directly from the SSD storage without any issues.

Does attaching SSD, drain the batteries faster?

Running sst does require power but it is quite minimal, good thing is, the latest macbook computers that are powered by Apple’s own M series chipsets, are quiet power efficient. You will easily get 10 hours of battery life on a single charge. And if you attached an sst, reduce 2 hours from it.

I think it’s a fair trade off.

Buy these Products

Get the SSD Sleeve

Get the Right Angle Type C Short Cable

Additional Tips

Sync iPhone Text Messages to Mac: A Seamless SMS Experience

0

Apple’s ecosystem is known for its seamless integration, and that extends beyond just phone calls. If you own a MacBook and an iPhone, did you know you can receive and reply to SMS messages directly from your Mac? This feature is remarkably convenient, especially for quickly accessing OTPs (One-Time Passwords) for secure online transactions. Let’s dive into how to enable it!

Step 1: Enable Messages in iCloud (Mac)

  1. Open the “Messages” app on your Mac.
  2. Navigate to “Settings” (found in the Messages menu bar).
  3. Click on the “iMessage” tab.
  4. Ensure the box next to “Enable Messages in iCloud” is checked. This step is crucial for syncing your messages across devices.

Step 2: Enable Text Message Forwarding (iPhone)

  1. Open the “Settings” app on your iPhone.
  2. Scroll down and locate “Messages.”
  3. Find the “Text Message Forwarding” section and tap on it.
  4. You’ll see a list of devices signed in to your Apple account. Locate your MacBook and toggle the switch next to it to the “ON” position.

Why This Feature is Awesome

Now, whenever a text message arrives on your iPhone, you’ll also see it on your Mac. This saves you the hassle of reaching for your phone every time you need to reply to a text or grab an OTP code for logging into your bank account or other secure websites.

Important Note: For smooth syncing, ensure you’re using the same Apple account on both your Mac and iPhone.

Why this feature might not be for you.

While it is an excellent feature for productivity, it has its own cons. If you have private messages incoming, you might want to receive on the device which is with you all the time.

If you share your macbook computer with anybody else which is unlikely but a possibility, then it is not a good idea to have your text messages land on your computer as well because, Privacy.

Let me know if you’d like assistance with optimizing other tech articles on your blog!

Also, if you are a visual guy, here is youtube video showing you how to do it.

How to Save Time Deleting Dozens of Emails

0

If you’re like me and find yourself overwhelmed by a cluttered Gmail inbox, I’ve got a quick tip that can save you a lot of time. Want to learn more? I’ve also written a detailed article on techtripper.com, and you’ll find the link in the description below.

The Tip

Instead of clicking through dozens of emails to find the ones you want to delete, try this:

  1. Select All Unread Emails: This highlights all the emails you haven’t opened yet.
  2. Deselect Emails You Want to Keep: Scan the list and uncheck only the emails you want to read. Since most of your unread emails are likely unwanted, this is much faster than selecting the ones to delete individually.
  3. Delete the Rest: With a few clicks, you can clean out your inbox in seconds!

Example

Let’s say I have all these unread emails. Out of this whole list, I only want to read this one and maybe this one. Instead of selecting all the rest for deletion, I’ll leave these two checked and then delete the remaining emails. That just took a few seconds, way faster than the old way!

Watch this video tutorial

Boost Your Productivity with a Clipboard Manager for Mac

0

Copying and pasting between documents is a common task, but constantly switching between windows slows you down. A clipboard manager app is the answer for speeding up workflows on Mac.

Watch the Video

The Problem with the Default Clipboard

Mac’s built-in clipboard only remembers your most recent copy, forcing constant switching between apps to paste content. This fragmentation kills your productivity momentum.

For research and compiling data, you likely need to:

  • Copy text, links, images from various sources
  • Paste these clips into a working document
  • Rapidly access clips you copied earlier

The default clipboard fails at quick access and chaining these capture-paste cycles.

How a Clipboard Manager Improves Your Workflow

A dedicated clipboard manager app enhances the copy-paste process:

  • Saves your clipboard history – access anything copied previously
  • Organizes clips for easy retrieval
  • pastes clips with one click back into documents

No more wasting time toggling between apps to paste one item at a time. Your entire clipboard is preserved in one place for instant pasting when needed.

Top Clipboard Managers for Mac

Here are top-rated clipboard managers for Mac:

  • Copy’em Paste – Free, unlimited clibpoard history
  • Alfred – Robust paid app with clipboard plus automation
  • PasteBot – Cross-platform and iCloud syncing options
  • ClipMenu – Lightweight and customizable

Try the free tools to experience the convenience of clipboard history. Some paid apps add bonus features like text expansion and automation.

Supercharge Your Mac Copy-Paste

A clipboard manager optimizes your ability to quickly access, manage, and paste clips you’ve copied. Key benefits:

  • Stop wasting time finding clips to paste
  • Assemble research and notes efficiently
  • Retrieve anything you copied with ease

Install a clipboard manager and see your productivity soar. No Mac user should be without this game-changing utility!

Best 5 Clipboard Manager Apps for Mac

ClipboardManager

A powerful and customizable clipboard manager and launcher. Allows you to easily access your clipboard history, create text snippets, integrate with system actions, and launch apps.

Copy’em Paste

A simple clipboard manager that stores unlimited clipboard history. Allows you to easily access and paste previous copies. Has cross-device syncing between Mac, iPhone and iPad.

Pastebot

Clipboard manager with robust search and organization features. Saves unlimited clipboard history, allows tagging copies for easy search, and has customizable hotkeys.

Clipboard

Lightweight clipboard manager that runs in the menu bar. Saves clipboard history and allows you to quickly search and paste previous copies.

CopyClip – Clipboard Manager

Open source clipboard manager with a minimal interface. Automatically saves clipboard history and makes copies easily accessible through a menu bar icon. Has text formatting and editing options.

These apps help you quickly access your clipboard history, manage and organize copies for reuse, and save time by eliminating repetitive typing or switching between documents. They provide a variety of useful features while keeping the clipboard easily accessible.

Supercharge Your ChatGPT Experience with This Free Mac Utility

For those of us who rely on ChatGPT in our daily workflows, the quest for tools that enhance productivity is never-ending.

Enter a game-changer: a free utility for Mac computers that seamlessly integrates ChatGPT into your menu bar.

In a world where various wrapper apps charge monthly fees for specific use cases, this utility stands out by offering a straightforward solution without breaking the bank.

Try MacGPT: Download and Installation

Simply download and install it from Gumroad, and you’re ready to take your ChatGPT experience to the next level. The utility provides the flexibility to use either your own API key or the free web version available to everyone.

Enhanced Productivity with these two Awesome Features

Here’s where using your OpenAI API key becomes a game-changer. Two standout features significantly improve your ChatGPT productivity:

Global Controls

This feature empowers you to ask ChatGPT any question from anywhere, triggered by a simple keyboard shortcut. The conversational mode adds another layer, allowing you to speak into the microphone and have ChatGPT respond.

MacGPT Inline

This feature allows you to access ChatGPT seamlessly from any window on your computer, using a trigger keyword. Imagine creating a note or drafting an email while effortlessly integrating ChatGPT to enhance your content or decision-making process.

Here’s an Example Use Case

Let’s dive into a practical example. Say you want to create a daily routine. Using the trigger keyword, followed by a prompt detailing your waking and sleeping times, and daily activities, MacGPT gets to work.

With a press of the enter key, the MacGPT app generates a personalized daily routine. This efficient integration showcases the utility’s versatility and time-saving capabilities.

No more window-switching hassle. Perform any task in any window while harnessing the power of ChatGPT, thanks to this utility.

It’s Also Very Cost-Effective

Unlike many monthly subscription models, this utility follows a pay-as-you-go approach. Your OpenAI API key, which is reasonably priced, allows you to use this tool efficiently without breaking the bank.

I am not a fan of monthly subscription. Either I’m willing to pay a fixed, one-time fee or would want to opt for pay-as-you-go model. I am writing this article on 10th November and my usage has been just four cents. I haven’t used it much, and this is what I like about this pay as you go model. I only pay for what I use.

Explore More from the Developer

As an added bonus, the same developer has also crafted Mac Whisper, a tool that utilizes OpenAI’s Whisper AI for transcription.

This tool, too, is free to use and works seamlessly. Check out our article to learn how you can leverage transcription services on your Mac without incurring additional costs.

So, this free Mac utility offers a streamlined solution for maximizing your ChatGPT experience. With features like Global Control and MacGPT Inline, you can enhance productivity without the need for complex setups or monthly subscriptions.

Download the utility and discover a new level of efficiency in your daily workflow.

How to Use OpenAI’s Text-to-Speech API with this Free Tool

Recently, OpenAI, the parent company of ChatGPT, made some groundbreaking announcements regarding new features related to ChatGPT and other AI tools. One particularly exciting revelation is the opening of the API key for their text-to-speech services.

This development complements their existing transcription AI, Whisper AI, which specializes in speech-to-text conversion. Now, with this new text-to-speech service, users can input text, and the system will generate human-like audio output.

Watch the Video Tutorial

What are its use cases?

The text-to-speech service with human-like voices opens up a myriad of use cases. In the realm of content creation, users can leverage this tool for voiceovers and tutorial videos, especially in situations where recording personal audio might be impractical, such as during travel.

Bloggers can transform their articles into audio formats, making them suitable for distribution as podcasts. Additionally, companies can integrate this service into Interactive Voice Response (IVR) automated call systems. The versatility of the tool ensures its applicability across various domains.

Download Voices for Mac

For individuals who require a user interface to harness the power of OpenAI’s text-to-speech services, there’s an invaluable tool called Voices. Developed by the creator of Mac Whisper and MacGPT, this application is available for free download and serves as a bridge between users and OpenAI’s API key.

How to Get Started with Voices:

Download and Installation

  • Voices is currently available for Mac users.
  • After downloading the tool, users receive an email containing the download link.
  • The file comes in a zip format, requiring extraction and installation.

Acquiring OpenAI API Key:

  • Users need to visit OpenAI’s website to create an API key.
  • Ensure you have signed up and obtained free credits or purchased them.
  • API keys can be created in the Billing section.

Using Voices Application:

  • Launch the Voices application and paste the API key in the designated section.
  • The user-friendly interface allows voice selection, output quality adjustment, and choosing the desired output format.

Testing Voices: Quality and Options:

The Voices application provides users with a range of high-quality voices, each with its distinct characteristics. Users can experiment with different voices and observe how the tool interprets variations in intonation, punctuation, and emphasis. The tool’s intelligence is evident as it adjusts its output based on the input’s nuances, making the generated speech sound remarkably human-like.

Cost Consideration

The nominal charges associated with the Voices application make it an attractive option for those who prefer a pay-as-you-go model. Unlike other tools in the market that often rely on monthly subscriptions, Voices offers a cost-effective solution for users who may not require continuous access to text-to-speech services.

OpenAI’s new text-to-speech API, coupled with the user-friendly Voices application, represents a significant stride in AI technology. The seamless integration of human-like voices into content creation processes, along with the pay-as-you-go pricing model, positions this tool as a valuable asset for various professionals and enthusiasts alike.

As the field of AI continues to evolve, innovations like Voices contribute to making advanced technologies more accessible and user-friendly.

For more detailed information and a step-by-step tutorial, refer to the written article linked in the video description. Stay tuned for more updates and tutorials on similar tools.

Take Notes with Apple Watch | Never Forget an Idea Ever

0

When it comes to creativity, you can get any idea anywhere and at any point of time. And if you rely on your mind to remember it so that you can execute it later, it will be lost forever. So, the rule is to always capture your ideas whenever it strikes, no matter where you are.

AI Tools Make it Easy To Take Notes

And technology has made it easy. You have your smartphone all the time, so you can use it to note down your ideas or you can speak into your microphone and it will transcribe it for you nicely.

There are so many AI tools available. Even my extension, even my iPhone shortcut, Dictation Pro is quite useful for this exact use case.

Watch the video tutorial

Take Notes on Apple Watch, With your Voice

I came across another app that takes it even one step further. If you are in Apple ecosystem already, and if you have an Apple watch, you can use this app on your Apple watch.

Which means even if you have that idea in the middle of the night, you don’t have to look for your smartphone. You can simply tap on your smartwatch and capture that idea. And it works anywhere, wherever you don’t have your smartphone with you and your watch is always on your wrist.

How to use it?

The app is called Whisper Memo. The name comes from the Whisper, the name is inspired from OpenAI’s Whisper AI model, which is amazing. And this app brings that technology to your Apple watch, install it from the app store and then go to the app watch on your iPhone where you can install this app for watch. Once you have installed it, you can use it on your Apple watch.

Access it faster on your Apple Watch, using complications 

Even better, you can add a complication. You can add a shortcut to your watch complication so that you can enable it in just one tap. It starts recording right away and when you stop it, it gets uploaded to your iPhone. I don’t think it can get easier than this.

Freemium Model

This app is not free, there is a limit of the number of times you can do the transcription on your mobile phone. But if you use it on your Apple Watch, it will still upload the audio to your iPhone and process it, and the limit doesn’t count here, at least for now.

This app is called Whisper Memos. You can install it on your iPhone and there is also an Apple watch app available that can be installed on watch.

Read more productive related articles here