
If you have got the Insta 360 One X, and you want to edit 360 videos in Final Cut Pro, we will learn about the same in this article.
You can utilize Insta 360 One X in two different ways. One is to create flat videos from the 360 footage by reframing in post-production, which is a pretty cool thing to do since you don’t have to worry about framing your shots while you are recording.
The second way is to create 360 videos, which are supported by both YouTube and Facebook. You upload them, and people can watch everything by moving their phones. Or they can get an immersive experience using a VR Box.
There are many use cases of 360 videos, such as virtual tours of cities, taking people around in famous places.
Watch the Video Tutorial
So in this article, we will learn how we can do that in Final Cut Pro.
Insta 360 One X uses a proprietary video format called .insv. Any video editing software does not natively support it.
Fortunately, insta 360 provides 360 Studio along with the plugins for Adobe Premiere Pro so that you can directly use .insv files inside Premiere Pro.
The only problem is, the footage and Adobe Premiere Pro struggles with that, even on powerful computers. You need superpowerful machines, which is a luxury for a lot of people.
If you are a MacBook user and you use Final Cut Pro, it handles 4K footage 3D smoothly. But again, .insv is not supported neither there is a plugin available by Insta 360 One X, at least not yet (2020).
Fortunately, the Insta 360 Studio has an option of converting .insv files into .mp4. And Final Cut Pro supports MP4 format 360 videos.
So here is what you need to do.
Connect your Insta 360 One X to your computer using the data cable provided with the camera and turn the camera on so that you computer can recognize the micro SD card inside it.
Alternatively, you can also pop out the MicroSD card from the camera and use a Micro SD card reader to connect with the laptop.
Once you access your files, launch Insta 360 Studio app, drag, and drop all the footage in the app. Select all the apps. You can review the footage if you want, select the starting and ending point of the video footage.
Then select all the video footage in the left sidebar, select batch export, keep the target resolution and bitrate original, encoding format: H.264, and make sure Flowstate Stabilization and Lock Direction is checked.
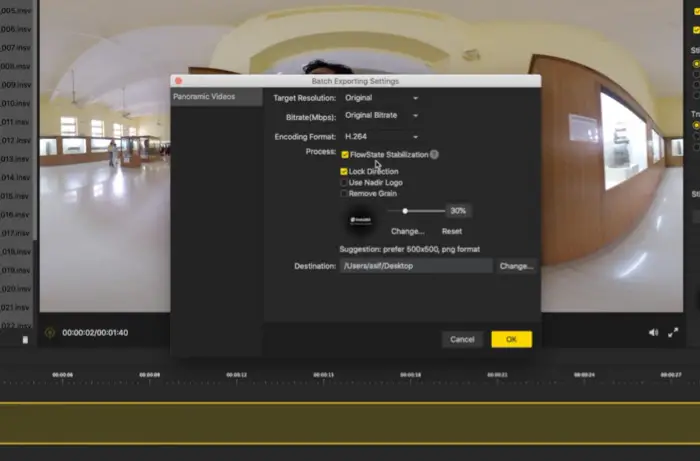
Choose the destination where you want the footage to be exported and click on ok.
The amount it will take to convert the file will depend on the size and the duration of the footage.
I had over 25 footage, with a total of 27 GB, it took around 2.5 hours to convert the .insv footage to .mp4.
I would recommend you not to use your computer as it will slow down the conversion process. The app needs the full power of your computer to do the processing faster so you can do other things while it is getting converted.
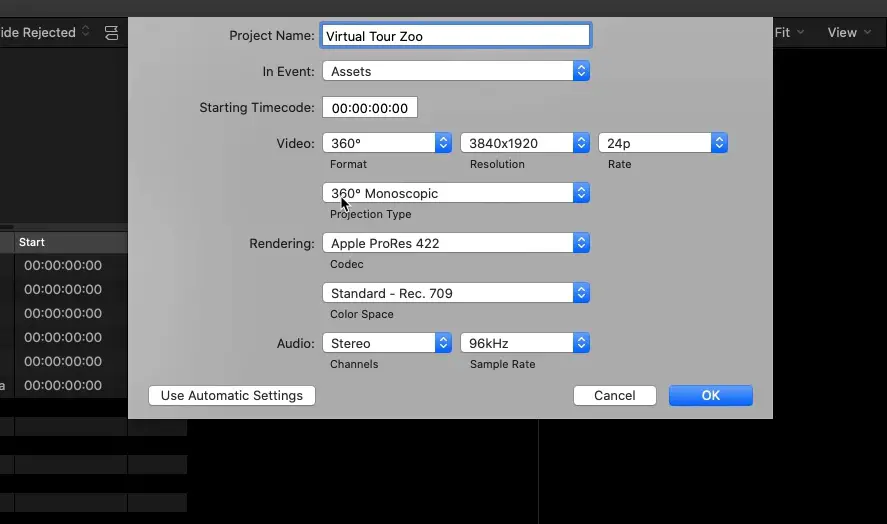
Once the files are converted, you can open Final Cut Pro X and import all the files in a new Event, under your Library.
Then you can create a new project, make sure you select a 360 video, and it should be. Also recommended to change the frame rate t Tuo 24fps, as our original footage was 5.3k at 24fps. (extra processing would be required to add or remove frames per second).
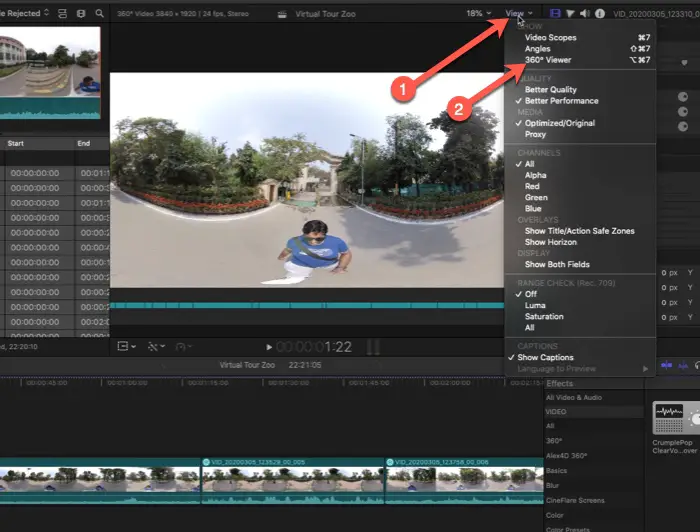
Once you have all the footage in the browser, you can drag it into the timeline accordingly, as you do with other projects.
At this point, you might notice the video looks weird. It is because you see the entire 360-degree view in a flat picture. You need to enable the 360 Viewer from ‘View.’ You can find it on the top right-hand side in the preview window.
Once the 360-view is enabled, the footage would look normal. You will find a globe icon, where you see Transform, Crop, Distort. The globe icon lets you reorient the framing.

You can highlight it and then move the screen in a 360-viewer. To be more precise, you can use the numbers under reorienting in the video inspector. You can change values like Pan, Roll, Tilt.
It is essential to reorient your 360 ° video because it would be the reference point where the video would be started, the point where you want the if you’re going to see if he does not move left or right.
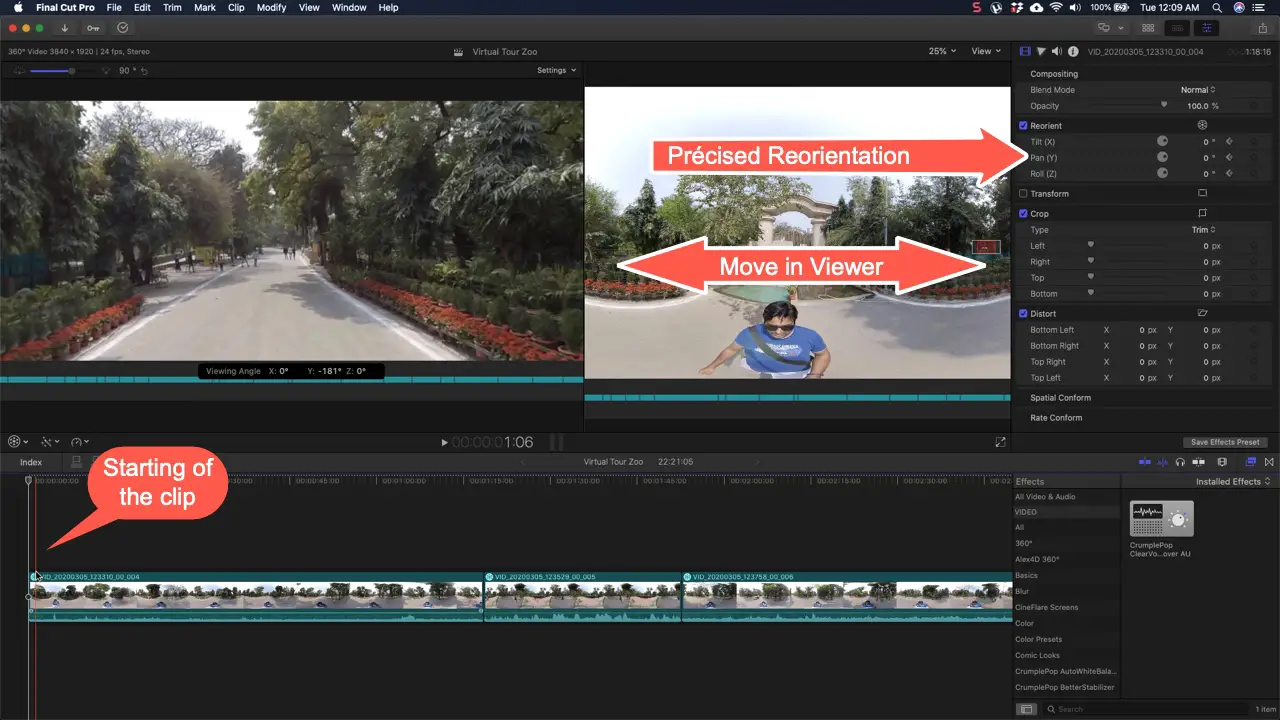
The entire video project can be reoriented using keyframes. So make sure you are at the starting of the footage when you position the footage in Reorient.
Go to the end of the footage, to make sure you have another keyframe to lock the positioning.
This is where direction lock comes in handy, which we did while exporting .insv files into .mp4. When it is enabled, we don’t have to do a lot of keyframing, which saves a lot of time.
Adding voice over Background music
This is optional, but if you want to do it, it works similarly, the way you do on standard videos.
Add a copyright-free music track, keep the audio level to -20db (you can experiment as per your preference).
Voice over can be directly done inside The Final Cut Pro, by pressing Option + Command +8, how we can go to the Window, and select Voiceover.
Adding titles
It is not required to add titles, but if you want to Emphasis something in the 360-video, you can add 360 titles.
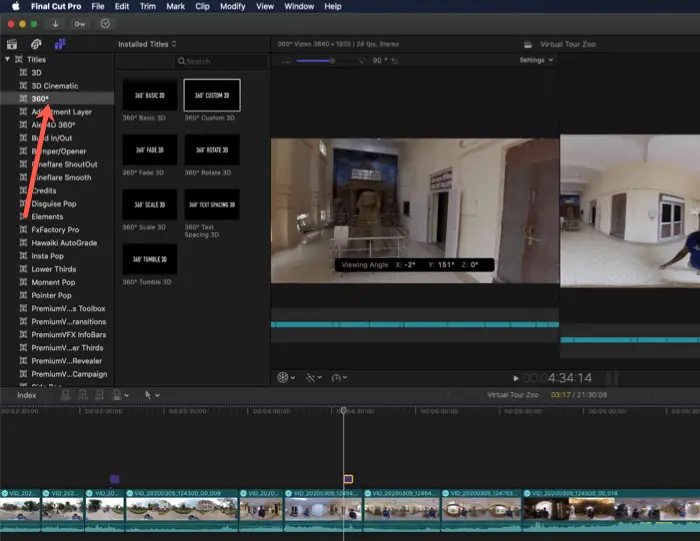
Final Cut Pro does offer 360 video titles. You can only use that. Placing it precisely on the footage is a little tricky, so, use the controls in the inspector. You can play with it yourself to choose the desired font and style of the text, but I would recommend you keep it simple and minimal.
Colour grading your 360 videos
If you have a few video footage, then you can individually go to the footage and make edits, or maybe you can make edits on one footage and then copy-paste attributes to two other footage.
The shortcuts are, Command + C to copy attributes from edited footage and then Command + Shift + V, to paste it, a popup would appear where you can select the effects you want to paste to the other footage.
If you have got a lot of footage, then you can utilize the adjustment layer feature and make the color changes to the adjustment layer under which all the footage will be affected.
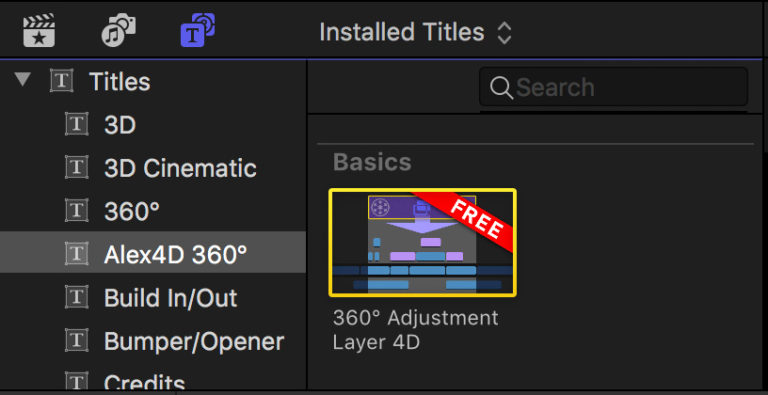
360-videos require a 360 adjustment layer, and you can download one of them for free by the link mentioned below.
360° Adjustment Layer 4D – Free
Once you are done Reorienting, Color Grading, Adding Music & Voiceover, and Titles, you are ready to export your video.
Not able to play 4K footage?
If you have got an older mad or you are having trouble playing the 4K footage smoothly, you can create proxy files for the photos in your timeline.
Proxy files are low-resolution versions of the footage in your timeline, which makes it easy to scrubber through it and make edits to it.
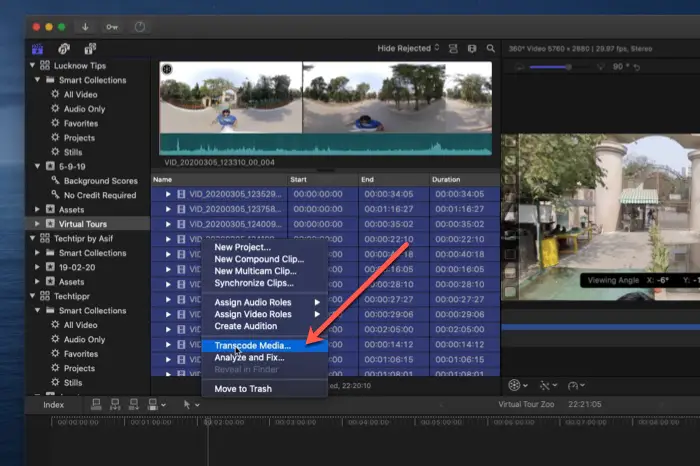
To create proxy files for your video footages, select the footage in the media browser, right-click, select transcode media, and then create proxy files.
Creating proxy files for your footage will take some time depending on the size, but it moves and speeds up the editing workflow, so it’s worth it.
Once the proxy files are created for your footage, select Proxy from View (refer to the image below)
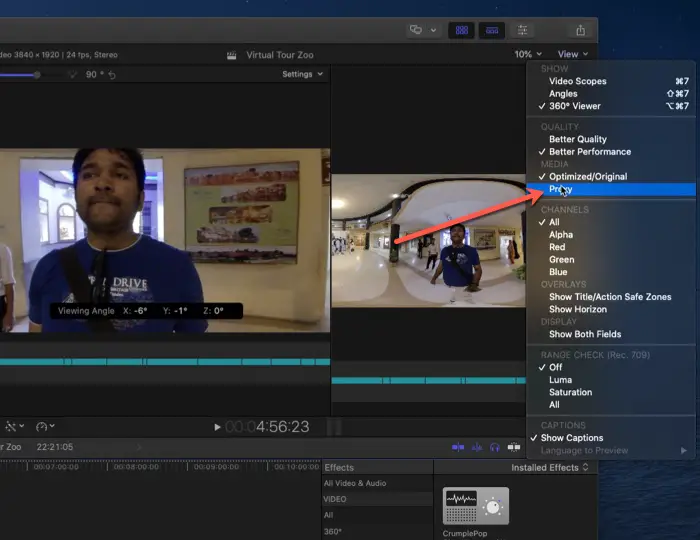
Once you are done with all your editing, you can switch back to the original media. Your editing remains intact only the original video footage is swapped with the low-resolution proxy file, and you can export your high resolution 360 video.
So, this is how you can edit 360 videos in Final Cut Pro. It is the fastest and no brainer workflow for editing 360 video footage from insta 360 camera.
If you’re looking for a 360 video and was looking to know how easy or tough it is to edit 360 videos, it’s entertaining, and the camera can do much more than that. You can find the full review of the camera here.
