MacBooks are top-of-the-line computers, but their high price, especially for higher storage options, can be a deterrent. Here’s an inexpensive way to expand your MacBook’s storage without buying a new one.
Affordable Storage Expansion
You know it’s 2024 and the SSD storage is quite affordable. There are tons of external SSD options available on amazon. You can easily find a 1 TB SSD for around $100. Hack you can even go for it 2 TB SSD.
But the question is, how to carry it around conveniently?
Get A Magnetically Attached Storage
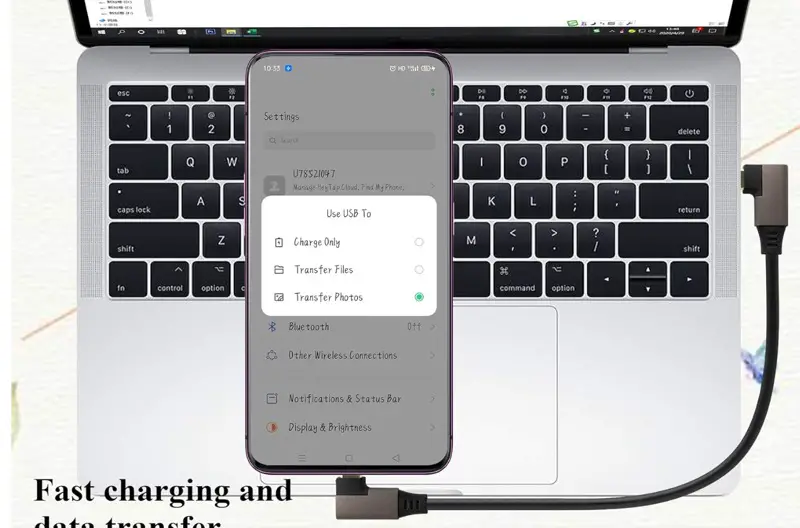
Well initially what I used to do was I used to tape my Samsung T5 SSD to the lid of my Macbook. Although it looked ugly, it got the job done. But since it’s a common problem, hence the solutions have now emerged.
Most SSDs come with a 1-ft Type-C cable. However, for a sleeker look with minimal cable visibility, consider getting a short, right-angled Type-C cable from Amazon. I have found this one.
Cost-Effective Upgrade
This method costs under $150, a significant saving compared to a laptop upgrade costing at least $300.
SSD Performance
While slower than the built-in SSD, most tasks will run smoothly on an external SSD. Video editors and users of heavy software might require the inbuilt storage for rendering large files.
Real-World Use Case
I edit 4K videos in Final Cut Pro directly from the SSD storage without any issues.
Does attaching SSD, drain the batteries faster?
Running sst does require power but it is quite minimal, good thing is, the latest macbook computers that are powered by Apple’s own M series chipsets, are quiet power efficient. You will easily get 10 hours of battery life on a single charge. And if you attached an sst, reduce 2 hours from it.
Apple’s ecosystem is known for its seamless integration, and that extends beyond just phone calls. If you own a MacBook and an iPhone, did you know you can receive and reply to SMS messages directly from your Mac? This feature is remarkably convenient, especially for quickly accessing OTPs (One-Time Passwords) for secure online transactions. Let’s dive into how to enable it!
Step 1: Enable Messages in iCloud (Mac)
Open the “Messages” app on your Mac.
Navigate to “Settings” (found in the Messages menu bar).
Click on the “iMessage” tab.
Ensure the box next to “Enable Messages in iCloud” is checked. This step is crucial for syncing your messages across devices.
Step 2: Enable Text Message Forwarding (iPhone)
Open the “Settings” app on your iPhone.
Scroll down and locate “Messages.”
Find the “Text Message Forwarding” section and tap on it.
You’ll see a list of devices signed in to your Apple account. Locate your MacBook and toggle the switch next to it to the “ON” position.
Why This Feature is Awesome
Now, whenever a text message arrives on your iPhone, you’ll also see it on your Mac. This saves you the hassle of reaching for your phone every time you need to reply to a text or grab an OTP code for logging into your bank account or other secure websites.
Important Note: For smooth syncing, ensure you’re using the same Apple account on both your Mac and iPhone.
Why this feature might not be for you.
While it is an excellent feature for productivity, it has its own cons. If you have private messages incoming, you might want to receive on the device which is with you all the time.
If you share your macbook computer with anybody else which is unlikely but a possibility, then it is not a good idea to have your text messages land on your computer as well because, Privacy.
Let me know if you’d like assistance with optimizing other tech articles on your blog!
Also, if you are a visual guy, here is youtube video showing you how to do it.
If you’re like me and find yourself overwhelmed by a cluttered Gmail inbox, I’ve got a quick tip that can save you a lot of time. Want to learn more? I’ve also written a detailed article on techtripper.com, and you’ll find the link in the description below.
The Tip
Instead of clicking through dozens of emails to find the ones you want to delete, try this:
Select All Unread Emails: This highlights all the emails you haven’t opened yet.
Deselect Emails You Want to Keep: Scan the list and uncheck only the emails you want to read. Since most of your unread emails are likely unwanted, this is much faster than selecting the ones to delete individually.
Delete the Rest: With a few clicks, you can clean out your inbox in seconds!
Example
Let’s say I have all these unread emails. Out of this whole list, I only want to read this one and maybe this one. Instead of selecting all the rest for deletion, I’ll leave these two checked and then delete the remaining emails. That just took a few seconds, way faster than the old way!
Copying and pasting between documents is a common task, but constantly switching between windows slows you down. A clipboard manager app is the answer for speeding up workflows on Mac.
Watch the Video
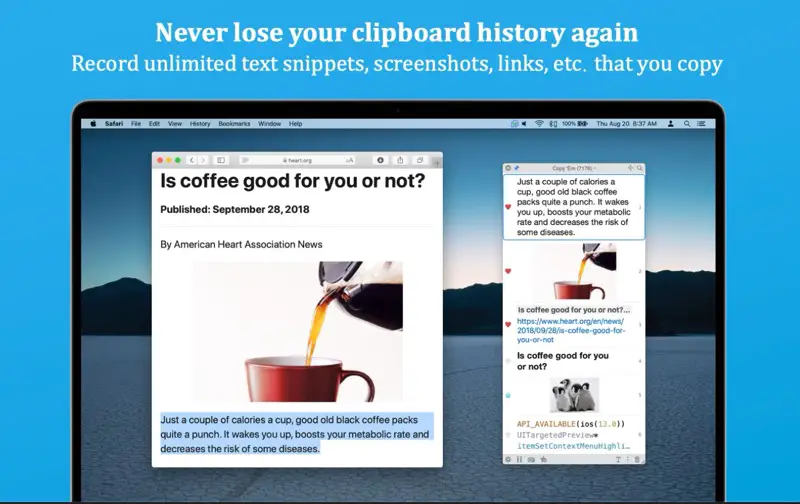
The Problem with the Default Clipboard
Mac’s built-in clipboard only remembers your most recent copy, forcing constant switching between apps to paste content. This fragmentation kills your productivity momentum.
For research and compiling data, you likely need to:
Copy text, links, images from various sources
Paste these clips into a working document
Rapidly access clips you copied earlier
The default clipboard fails at quick access and chaining these capture-paste cycles.
How a Clipboard Manager Improves Your Workflow
A dedicated clipboard manager app enhances the copy-paste process:
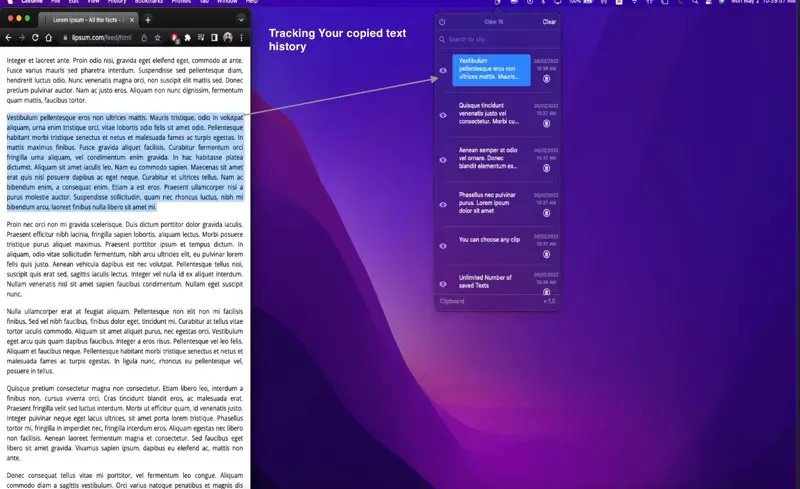
Saves your clipboard history – access anything copied previously
Organizes clips for easy retrieval
pastes clips with one click back into documents
No more wasting time toggling between apps to paste one item at a time. Your entire clipboard is preserved in one place for instant pasting when needed.
Top Clipboard Managers for Mac
Here are top-rated clipboard managers for Mac:
Copy’em Paste – Free, unlimited clibpoard history
Alfred – Robust paid app with clipboard plus automation
PasteBot – Cross-platform and iCloud syncing options
ClipMenu – Lightweight and customizable
Try the free tools to experience the convenience of clipboard history. Some paid apps add bonus features like text expansion and automation.
Supercharge Your Mac Copy-Paste
A clipboard manager optimizes your ability to quickly access, manage, and paste clips you’ve copied. Key benefits:
Stop wasting time finding clips to paste
Assemble research and notes efficiently
Retrieve anything you copied with ease
Install a clipboard manager and see your productivity soar. No Mac user should be without this game-changing utility!
Best 5 Clipboard Manager Apps for Mac
ClipboardManager
A powerful and customizable clipboard manager and launcher. Allows you to easily access your clipboard history, create text snippets, integrate with system actions, and launch apps.
A simple clipboard manager that stores unlimited clipboard history. Allows you to easily access and paste previous copies. Has cross-device syncing between Mac, iPhone and iPad.
Clipboard manager with robust search and organization features. Saves unlimited clipboard history, allows tagging copies for easy search, and has customizable hotkeys.
Open source clipboard manager with a minimal interface. Automatically saves clipboard history and makes copies easily accessible through a menu bar icon. Has text formatting and editing options.
These apps help you quickly access your clipboard history, manage and organize copies for reuse, and save time by eliminating repetitive typing or switching between documents. They provide a variety of useful features while keeping the clipboard easily accessible.
Online betting can be a fun pastime, but it requires the right platform to ensure a seamless experience. The Bet365 Bangladesh platform offers a wide range of features, including modern mobile applications, fantastic welcome bonuses, and secure payment options, all detailed in this informative article.
Overview of Bet365 Bangladesh: An Online Sportsbook for Enthusiastic Gamers
In Bangladesh, the market for online sports betting is expanding quickly, and among sports fans, Bet365 site has become one of the most well-liked platforms. Since its founding in 2000, the website has provided users worldwide with a variety of online betting options. The UK Gambling Commission oversees and licenses Bet365, which contributes to its dependability and security.
An overview of Bangladesh’s online sports betting market
Bangladeshi sports fans are constantly searching for fresh approaches to interact with their preferred groups and athletes. Because it enables Bangladeshi sports fans to bet on live games without leaving their homes, online sports betting has grown in popularity over the years. Betting online has become simpler than ever because of advancements in smartphone and internet access.
How Bet365 joined the Bangladeshi market?
In 2019, Bet365 official made its debut in Bangladesh with the goal of giving players access to a dependable and trustworthy platform. As soon as it entered the market, Bet365 started customizing its platform to meet the unique requirements of sports fans in Bangladesh. The website provides a wide variety of sports, such as basketball, tennis, football, cricket, and more, for bets.
Bet365’s significance to Bangladeshi sports fans
Bet365 has rapidly established itself as a vital resource for sports lovers in Bangladesh, providing a variety of betting options that have completely changed the way followers engage with their preferred sports. With Bet365 com, Bangladeshi players may now easily bet on the results of games, bet on certain players or teams, or even play a variety of online casino games.
The opportunity to profit from special bonuses and awards is one of the primary advantages of using Bet365 Bangladesh. These bonuses are intended to provide participants a better chance of winning large and to help them hone their sports betting techniques. Additionally, Bet365 provides a committed customer support team that can help Bangladeshi players in any way needed to make sure they have the best possible experience.
How to Sign Up with Bet365 Bangladesh and Get Started?
On Bet365 Bangladesh, opening a new account is a simple process that only takes a few minutes. The following easy procedures make it simpler for players to join the platform:
Go to the Bet365 official site and select “Join” from the menu in the upper right corner.
Enter your personal information into the registration form, including your name, email address, country of residence, and date of birth.
Choose your favorite language and time zone, then create a unique username and password for your account.
Select your currency and acknowledge that you have read and accepted the terms and conditions posted on the website.
To finish the registration procedure, click the “Join Bet365” button.
Procedures for New Users’ Verification
Bet365 betting has implemented stringent verification procedures that all new players must successfully complete before they can begin playing for real money, in order to provide a safe and secure gaming environment for all of its customers. The purpose of these protocols is to guard against fraudulent activity and protect the platform from illegal activity.
Players must present acceptable identification upon registration, such as a passport, driver’s license, or national ID card, to verify their identity and address. Their age, place of residence, and ability to bet online will all be confirmed using this information. Verify your account and make the very first bet!
Payment Methods Available to Players in Bangladesh
A variety of payment methods are available to players at Bet365 Bangladesh for both deposits and withdrawals from their accounts, including:
Visa;
Mastercard;
Skrile;
The Neteller;
Paytm;
Bank transfers;
IMPS;
UPI;
The Bet365 Bangladesh platform employs cutting-edge encryption technology to safeguard all transactions, and the payment processing partners on the site are well-known and reliable.
Bet365 Bangladesh Bonus and Promotions
Known for offering its consumers a variety of incentives and promotions, Bet365 Bangladesh is an online betting platform. Along with a variety of sports, casino games, and other betting opportunities, the site Bet365 also provides exclusive incentives and promotions. Bet365 Bangladesh is a well-liked option among online gamblers since it offers a transparent, safe, and secure betting environment. The welcome bonus, conditions for claiming the bonuses and promotions, and a comparison with other online betting sites are all covered in-depth in this article about Bet365 Bangladesh’s bonuses and promotions.
An Overview of Bonuses and Promotions at Bet365 Bangladesh
Bet365 Bangladesh offers its consumers a substantial welcome bonus, which entails a 100% bonus on their initial deposit up to 10,000 BDT. This welcome bonus is a great way to encourage new customers to register with the site and begin their betting adventure. Bet365 Bangladesh also provides its members with a number of other promotions, such as unique prizes, free bets, cashback offers, and loyalty bonuses.
Conditions to Redeem Promotions and Bonuses at Bet365 Bangladesh
The Bet365 Bangladesh welcome bonus can only be redeemed by users who have registered for the platform and completed the registration process. Once finished, consumers must choose one of the various payment methods to make their initial deposit. The user can get a maximum bonus value of 10,000 BDT, and a minimum of 500 BDT is necessary to claim the bonus. Bet365 Bangladesh also provides a number of different promotions, each with unique terms and restrictions. Therefore, before claiming any bonuses or promotions, consumers are encouraged to thoroughly read the terms and conditions.
Bet365 Bangladesh Bonus Comparison with Other Sites
When compared to other online betting sites, Bet365 Bangladesh has some of the most attractive bonuses and promotions. In contrast to other platforms of a similar nature, Bet365 Bangladesh is unique in that it offers a variety of distinctive promotions to its players, such as cashback incentives, loyalty bonuses, free bets, and special prizes. By always providing its users with innovative and captivating promotions, Bet365 Bangladesh has distinguished itself from its rivals.
Bet365 Bangladesh Betting Options
A well-known online sports betting site, Bet365 Bangladesh is well-known for its extensive sports selection, aggressive odds, and user-friendly interface. Bet365 Bangladesh offers a one-stop shop for all the betting requirements of sports fans who are passionate about sports betting.
Variety of Sports Bet365 Bangladesh Is Offering
Football, cricket, basketball, tennis, horse racing, and many more sports are available to Bet365 Bangladesh user accounts. One of the most popular sports among users of Bet365 Bangladesh is football, and the website provides a wide selection of alternatives, including the UEFA Champions League, La Liga, Serie A, and English Premier League. Football bettors can choose from a wide range of markets, including match winner, first goalscorer, over/under goals, and handicap betting, to mention a few.
In a similar vein, fans of Bet365 Bangladesh also love cricket, and the website offers a variety of cricket leagues to pick from, such as the Big Bash League (BBL), T20 Blast, and Indian Premier League (IPL). Bets on a variety of markets, including match winner, top batsman, and top bowler, are available to cricket lovers.
Major sporting events in Bangladesh, such as the Challenger Cup, Dhaka Premier Division Cricket League, and Bangladesh Premier League, have also been sponsored by Bet365 Bangladesh. This has aided the corporation in increasing its reputation and brand awareness among the nation’s sports fans.
Bet Types Offered for Every Sport
A wide range of betting alternatives are provided by Bet365 Bangladesh for every sport, so players may select the ideal wager to fit their budget and tastes. In football, for example, consumers can search for several markets, such Asian handicaps, total goals, precise score, and handicap.
User bets can be placed on a variety of cricket markets, including match winner, top batsman, top bowler, total runs, total sixes, and total fours. In order to assist customers in making wise wagering choices, the site also offers comprehensive information on each match and participant.
Options for Live Betting and Streaming
The live betting and streaming facilities of Bet365 Bangladesh are among the most well-liked aspects of the website. The next team to score, the total amount of goals scored, and the next person to score are just a few of the in-play markets where users can put bets. Football, cricket, tennis, and basketball are just a few of the sports that are covered live on the website. On a tablet, smartphone, or PC, users can watch live matches.
Bet365 Bangladesh Mobile App and User Experience
For many years, sports bettors have turned to Bet365, one of the most well-known online betting services in the world. The release of the Bet365 Bangladesh Mobile App has led to unprecedented levels of website popularity in Bangladesh. This app offers one of the greatest user experiences available on the market and is intended to give Bangladeshi people access to the thrill of sports betting.
The Bet365 Bangladesh App’s Compatibility with Various Devices
The Bet365 Bangladesh Mobile App is made to work with a variety of gadgets, such as tablets and smartphones. Both iOS and Android smartphones can download and install the app. The application doesn’t need a powerful device to function properly because its design is tailored to perform well on low-resource devices.
The application’s user interface and navigation
The user interface and navigation of the Bet365 Bangladesh Mobile App are among its most remarkable characteristics. It is simple to navigate about the app because to its clear, clutter-free interface, which is designed to be straightforward and user-friendly. Users may easily find the sports they are interested in thanks to the app’s homepage, which features the most recent and well-liked sporting events.
Easy and user-friendly navigation is provided by the app. The several sports categories, such as football, basketball, cricket, and tennis, are shown on the main navigation menu. The app is simple to use and makes it simple for users to place bets because the bet slip function is clearly visible.
Comparing This Sports Betting App to Others That Are Available in Bangladesh
The enhanced user experience of the Bet365 Bangladesh Mobile App makes it stand out from other sports betting apps that are accessible in Bangladesh. Users can easily locate and place bets on sports they are interested in because of the app’s excellent navigation and user experience, which rank among the finest on the market. The application can be used on older or less powerful devices due to its low resource requirements and interoperability with a variety of devices, making it accessible to a broad audience.
In addition, what distinguishes the Bet365 Bangladesh Mobile App from certain other sports betting apps is the extensive array of betting choices it provides, including live and in-play betting. Users can watch live sporting events using the app’s live-streaming capability, which enhances the immersive user experience.
I am a big fan of apps that can do multiple things. Pretty much every application installed on my Mac computer, does multiple things.
And that’s why I’m writing this article
About Movavi Video Converter.
It is a must have app for a video editors/ content creators who has to deal with a lot of video files. Movavi Video Converter’s primary feature is to convert videos to specific formats. If you do client work, your client may demand videos in different formats and this is the easiest way to create multiple files of different file formats.
The Movavi Video Converter also offers formats of specific devices. In case, you don’t know which format will work on a specific device, you can select the particular device and Movavi Video Converter will do the rest.
It has a lot of other features to offer. I can see multiple use cases for this application which are as follows.
Convert Media for Playback on Different Devices
One of the main uses of Movavi Video Converter is to convert video and audio files into formats compatible with different devices.
For example, you can convert MOV files from your DSLR camera to MP4 to play on your smartphone, or FLAC audio files to MP3 format for your old car stereo.
Movavi makes it easy to convert any media to the optimized format needed for smooth playback on phones, tablets, smart TVs, gaming consoles, and more.
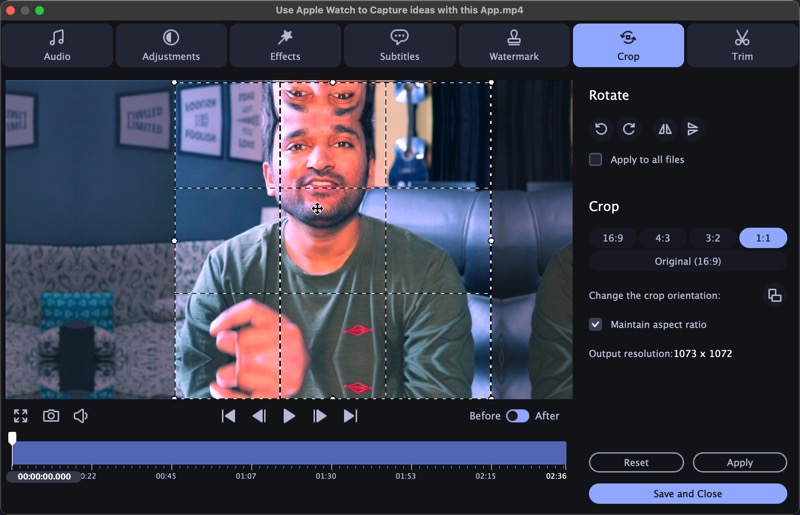
Trim, Change Aspect Ratio, and Enhance Videos Before Converting
Before converting your videos, Movavi Video Converter lets you do basic editing like:
This is extremely handy for preparing videos for uploading to sites like YouTube and social media where you want concise, polished videos.
Batch Convert Multiple Files to Save Time
Manually converting each video or audio file individually can be extremely time consuming.
Movavi Video Converter supports batch processing so you can convert entire folders of media files in one batch.
Whether you have vacation videos, podcast files, or a whole drive of media, you can convert everything to a needed format with one click.
Extract and Save Audio Tracks from Videos
Movavi makes it easy to extract just the audio track from video files. This lets you:
Save music from videos to your music library
Create audio clips and soundboards from videos
Listen to podcasts and lessons in audio-only format
No need for complex audio channel splitting – just specify audio format like MP3 and extract.
AI Upscaling: Upscale Low Res Videos with AI
Movavi Video Converter has also got a feature that lets you easily upscale row, low resolution videos with the help of AI. The tool gives you an option of upscaling the videos upto 8X of its original size.
If you have got a decade old videos, when the camera video resolution was not as high as it is today, you can use this tool to upscale your old videos and give them a new life.
Download Movavi Video Converter
Movavi Video Converter is an invaluable utility for media conversion, editing, extraction, downloading, and more. It streamlines working with multimedia so you can spend time on creative work rather than technical hassles.
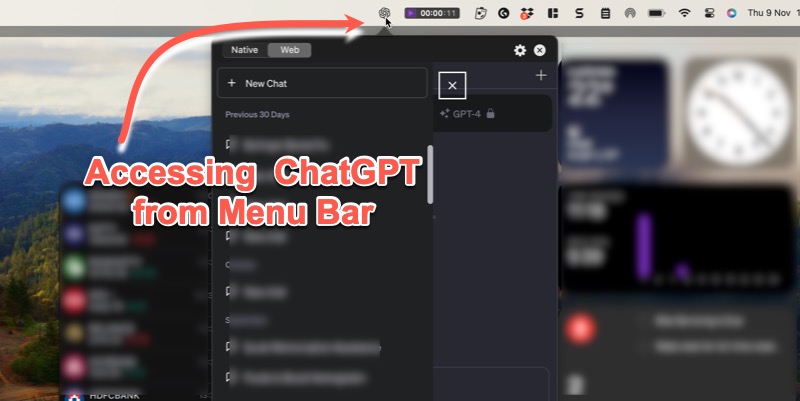
For those of us who rely on ChatGPT in our daily workflows, the quest for tools that enhance productivity is never-ending.
Enter a game-changer: a free utility for Mac computers that seamlessly integrates ChatGPT into your menu bar.
In a world where various wrapper apps charge monthly fees for specific use cases, this utility stands out by offering a straightforward solution without breaking the bank.
Try MacGPT: Download and Installation
Simply download and install it from Gumroad, and you’re ready to take your ChatGPT experience to the next level. The utility provides the flexibility to use either your own API key or the free web version available to everyone.
Enhanced Productivity with these two Awesome Features
Here’s where using your OpenAI API key becomes a game-changer. Two standout features significantly improve your ChatGPT productivity:
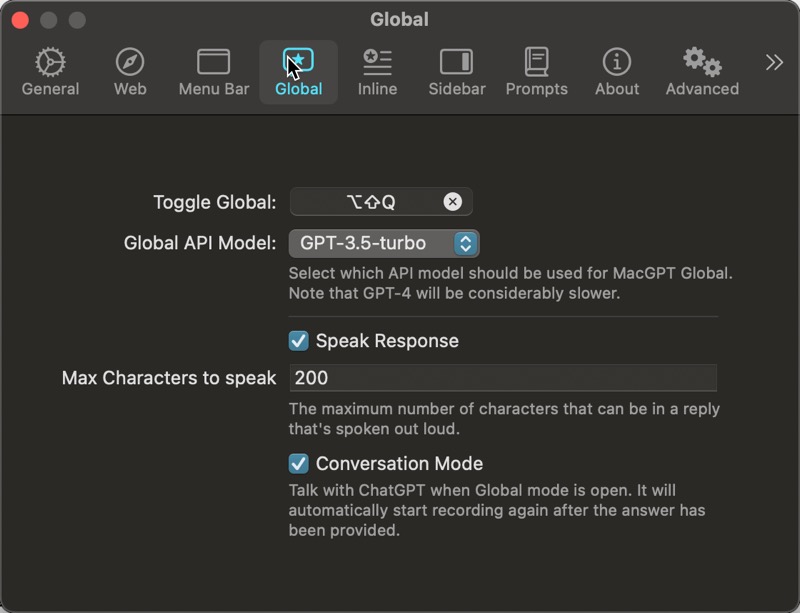
Global Controls
This feature empowers you to ask ChatGPT any question from anywhere, triggered by a simple keyboard shortcut. The conversational mode adds another layer, allowing you to speak into the microphone and have ChatGPT respond.
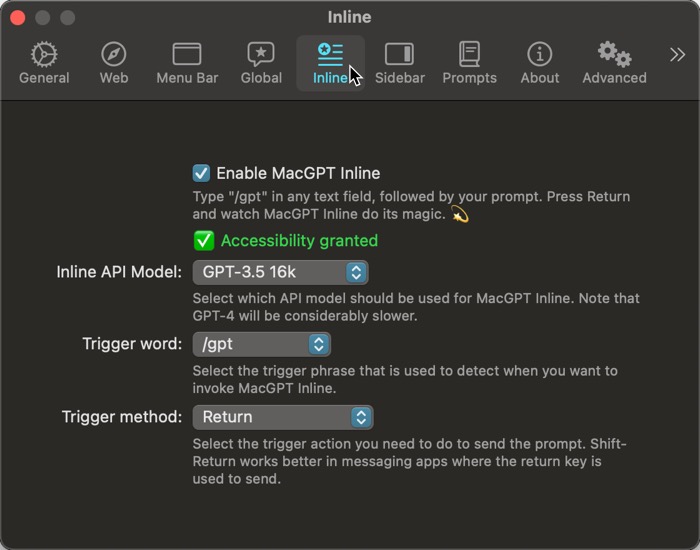
MacGPT Inline
This feature allows you to access ChatGPT seamlessly from any window on your computer, using a trigger keyword. Imagine creating a note or drafting an email while effortlessly integrating ChatGPT to enhance your content or decision-making process.
Here’s an Example Use Case
Let’s dive into a practical example. Say you want to create a daily routine. Using the trigger keyword, followed by a prompt detailing your waking and sleeping times, and daily activities, MacGPT gets to work.
With a press of the enter key, the MacGPT app generates a personalized daily routine. This efficient integration showcases the utility’s versatility and time-saving capabilities.
No more window-switching hassle. Perform any task in any window while harnessing the power of ChatGPT, thanks to this utility.
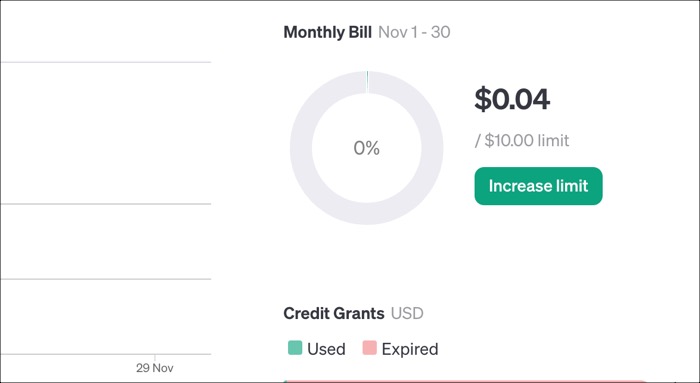
It’s Also Very Cost-Effective
Unlike many monthly subscription models, this utility follows a pay-as-you-go approach. Your OpenAI API key, which is reasonably priced, allows you to use this tool efficiently without breaking the bank.
I am not a fan of monthly subscription. Either I’m willing to pay a fixed, one-time fee or would want to opt for pay-as-you-go model. I am writing this article on 10th November and my usage has been just four cents. I haven’t used it much, and this is what I like about this pay as you go model. I only pay for what I use.
Explore More from the Developer
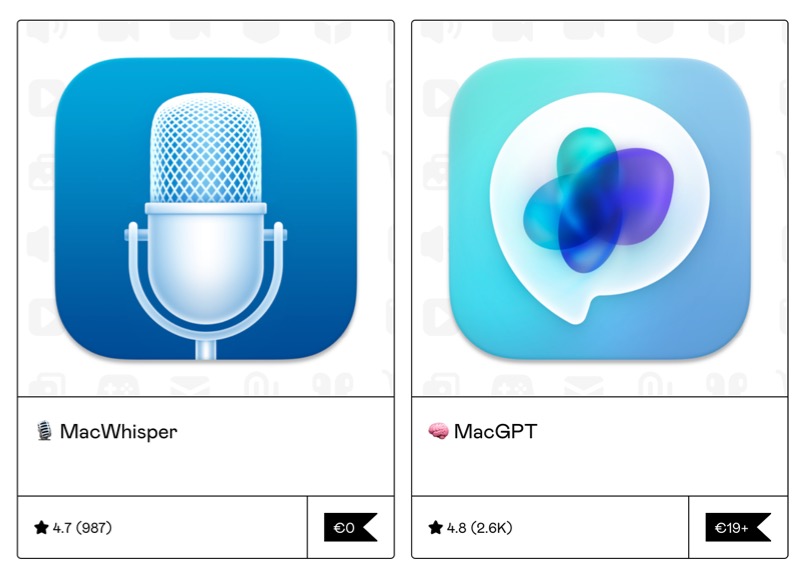
As an added bonus, the same developer has also crafted Mac Whisper, a tool that utilizes OpenAI’s Whisper AI for transcription.
This tool, too, is free to use and works seamlessly. Check out our article to learn how you can leverage transcription services on your Mac without incurring additional costs.
So, this free Mac utility offers a streamlined solution for maximizing your ChatGPT experience. With features like Global Control and MacGPT Inline, you can enhance productivity without the need for complex setups or monthly subscriptions.
Download the utility and discover a new level of efficiency in your daily workflow.
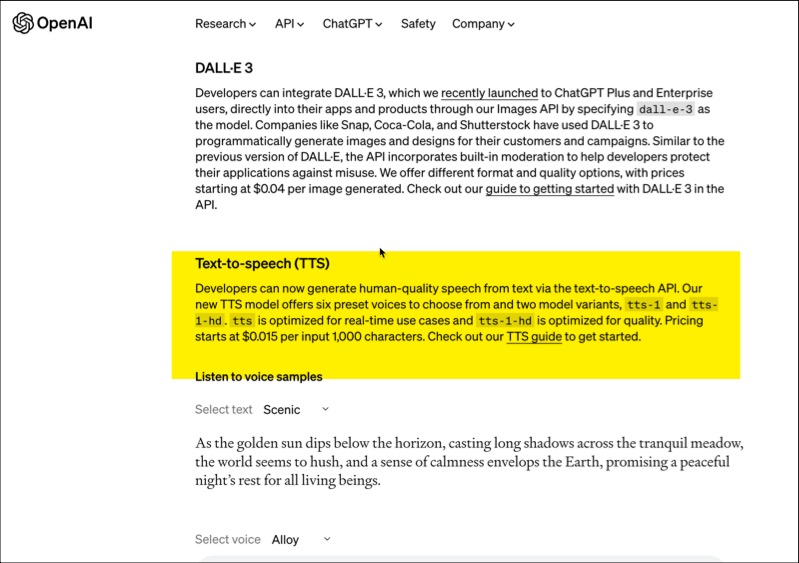
Recently, OpenAI, the parent company of ChatGPT, made some groundbreaking announcements regarding new features related to ChatGPT and other AI tools. One particularly exciting revelation is the opening of the API key for their text-to-speech services.
This development complements their existing transcription AI, Whisper AI, which specializes in speech-to-text conversion. Now, with this new text-to-speech service, users can input text, and the system will generate human-like audio output.
Watch the Video Tutorial
What are its use cases?
The text-to-speech service with human-like voices opens up a myriad of use cases. In the realm of content creation, users can leverage this tool for voiceovers and tutorial videos, especially in situations where recording personal audio might be impractical, such as during travel.
Bloggers can transform their articles into audio formats, making them suitable for distribution as podcasts. Additionally, companies can integrate this service into Interactive Voice Response (IVR) automated call systems. The versatility of the tool ensures its applicability across various domains.
Download Voices for Mac
For individuals who require a user interface to harness the power of OpenAI’s text-to-speech services, there’s an invaluable tool called Voices. Developed by the creator of Mac Whisper and MacGPT, this application is available for free download and serves as a bridge between users and OpenAI’s API key.
How to Get Started with Voices:
Download and Installation
Voices is currently available for Mac users.
After downloading the tool, users receive an email containing the download link.
The file comes in a zip format, requiring extraction and installation.
Acquiring OpenAI API Key:
Users need to visit OpenAI’s website to create an API key.
Ensure you have signed up and obtained free credits or purchased them.
API keys can be created in the Billing section.
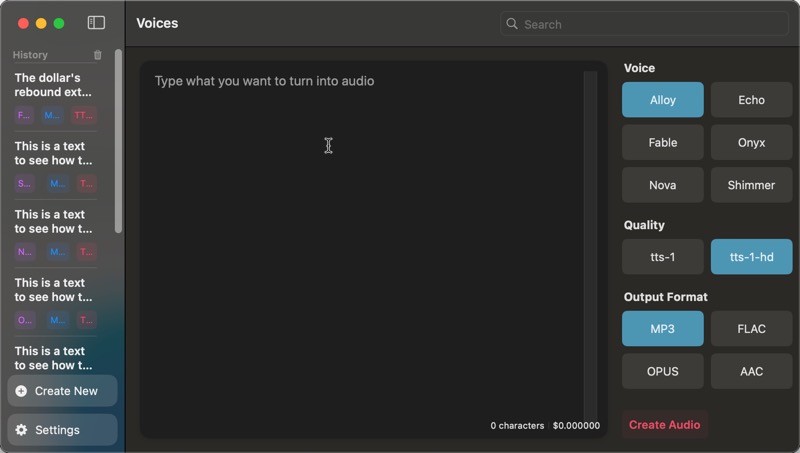
Using Voices Application:
Launch the Voices application and paste the API key in the designated section.
The user-friendly interface allows voice selection, output quality adjustment, and choosing the desired output format.
Testing Voices: Quality and Options:
The Voices application provides users with a range of high-quality voices, each with its distinct characteristics. Users can experiment with different voices and observe how the tool interprets variations in intonation, punctuation, and emphasis. The tool’s intelligence is evident as it adjusts its output based on the input’s nuances, making the generated speech sound remarkably human-like.
Cost Consideration
The nominal charges associated with the Voices application make it an attractive option for those who prefer a pay-as-you-go model. Unlike other tools in the market that often rely on monthly subscriptions, Voices offers a cost-effective solution for users who may not require continuous access to text-to-speech services.
OpenAI’s new text-to-speech API, coupled with the user-friendly Voices application, represents a significant stride in AI technology. The seamless integration of human-like voices into content creation processes, along with the pay-as-you-go pricing model, positions this tool as a valuable asset for various professionals and enthusiasts alike.
As the field of AI continues to evolve, innovations like Voices contribute to making advanced technologies more accessible and user-friendly.
For more detailed information and a step-by-step tutorial, refer to the written article linked in the video description. Stay tuned for more updates and tutorials on similar tools.
When it comes to creativity, you can get any idea anywhere and at any point of time. And if you rely on your mind to remember it so that you can execute it later, it will be lost forever. So, the rule is to always capture your ideas whenever it strikes, no matter where you are.
AI Tools Make it Easy To Take Notes
And technology has made it easy. You have your smartphone all the time, so you can use it to note down your ideas or you can speak into your microphone and it will transcribe it for you nicely.
There are so many AI tools available. Even my extension, even my iPhone shortcut, Dictation Pro is quite useful for this exact use case.
Watch the video tutorial
Take Notes on Apple Watch, With your Voice
I came across another app that takes it even one step further. If you are in Apple ecosystem already, and if you have an Apple watch, you can use this app on your Apple watch.
Which means even if you have that idea in the middle of the night, you don’t have to look for your smartphone. You can simply tap on your smartwatch and capture that idea. And it works anywhere, wherever you don’t have your smartphone with you and your watch is always on your wrist.
How to use it?
The app is called Whisper Memo. The name comes from the Whisper, the name is inspired from OpenAI’s Whisper AI model, which is amazing. And this app brings that technology to your Apple watch, install it from the app store and then go to the app watch on your iPhone where you can install this app for watch. Once you have installed it, you can use it on your Apple watch.
Access it faster on your Apple Watch, using complications
Even better, you can add a complication. You can add a shortcut to your watch complication so that you can enable it in just one tap. It starts recording right away and when you stop it, it gets uploaded to your iPhone. I don’t think it can get easier than this.
Freemium Model
This app is not free, there is a limit of the number of times you can do the transcription on your mobile phone. But if you use it on your Apple Watch, it will still upload the audio to your iPhone and process it, and the limit doesn’t count here, at least for now.
This app is called Whisper Memos. You can install it on your iPhone and there is also an Apple watch app available that can be installed on watch.
In today’s rapidly evolving IT landscape, where containers and orchestration technologies have become the backbone of modern applications, a golden ticket exists to showcase your prowess: the Linux Foundation CKAD Pass Results.
CKAD is not just an accreditation; it’s a pathway to Kubernetes expertise, an invaluable skillset that opens doors to exciting career opportunities and empowers you to confidently navigate the complex world of container orchestration.
Grasping CKAD Certification
Overview of the CKAD Exam Format and Objectives
Picture this: a high-stakes challenge that tests your Kubernetes skills. That’s precisely what the Linux Foundation CKAD question-answer exam is all about. In this article, we’ll delve deep into the heart of the CKAD certification journey. You’ll gain a crystal-clear understanding of the exam’s format, its objectives, and what it takes to conquer it.
Advantages of CKAD Certification
The CKAD certification isn’t just another credential to add to your resume; it’s a career-changer. In this section, we’ll investigate the many advantages of procuring the CKAD certification. You’ll discover how it can supercharge your career prospects, opening doors to exciting job opportunities and increased earning potential.
Beyond the tangible benefits, CKAD is your ticket to becoming a Kubernetes expert, allowing you to confidently navigate the ever-evolving landscape of container orchestration. We’ll also dive into how CKAD can enhance your problem-solving abilities, boost your confidence as a developer, and contribute to the broader Kubernetes community.
Preparing for the CKAD Journey
Assessing Knowledge and Skills
This section will guide you through evaluating your current Kubernetes knowledge and skills. We’ll help you identify your strengths and pinpoint areas needing improvement. This reflective process will serve as the foundation for your CKAD preparation, ensuring you allocate your time and energy where needed most.
Gathering Essential Study Materials and Resources
Finding suitable CKAD study materials and resources can be daunting in the vast sea of Kubernetes information. But fear not, as in this section, we’ll be your compass, guiding you toward the best resources available.
From books and online courses to CKAD dumps, CKAD exam dumps, CKAD practice dumps, and communities, we’ll explore a treasure trove of materials to suit your learning style and budget. At “DumsCafe,” you’ll find the right resources at your disposal, and you’ll be well-prepared fo a successful CKAD journey.
Using Kubernetes playgrounds and sandboxes for practice
Practice makes perfect, and Kubernetes playgrounds and sandboxes are your training grounds. This section will introduce you to invaluable resources like CKAD test engines and CKAD practice tests, where you can experiment with real Kubernetes clusters in a safe and controlled environment.
Deep Dive into CKAD Exam Domains
Core Kubernetes Concepts Review
In this section, we’ll explore its foundational landmarks. Dive into the core Kubernetes concepts, including Pods, Deployments, Services, and other key objects that form the backbone of container orchestration.
But we won’t stop at identifying them; we’ll dive deep into their inner workings, demystifying their roles and relationships within your cluster. Labels, annotations, and selectors will become your trusted tools to navigate this city of containers, helping you understand how to orchestrate and manage your applications effectively.
Application Lifecycle Management
This section will be your guide to mastering Application Lifecycle Management. You’ll learn the art of creating and managing Deployments, ensuring your applications are always up and running.
We’ll also explore the intriguing world of rolling updates and rollbacks, giving you the skills to gracefully transition your applications while maintaining their integrity. Think of it as a journey through the lifecycles of your digital creations, from inception to evolution.
Core Concepts Practice
In this section, we’ll roll our sleeves and work with hands-on exercises and labs for key Kubernetes concepts. Whether it’s deploying an application, scaling it on demand, or managing configurations, you’ll get to put your newfound knowledge into action.
Additionally, we’ll provide you with sample questions and solutions, offering a taste of what the CKAD exam will throw at you.
Observability, Troubleshooting, and Debugging
This segment will provide you with the devices to screen your applications, dive into logging and monitoring within Kubernetes, and spot anomalies before they become issues. But when problems do arise, fear not. We’ll guide you through common troubleshooting scenarios, teaching you how to diagnose and remedy problems swiftly and effectively.
Application Design and Build
In this section, we’ll focus on the design and construction phase. You’ll learn how to build Docker containers tailored for Kubernetes, ensuring your applications are well-suited for containerization. Best practices for designing containerized applications will be your guiding principles, helping you create efficient, scalable, and maintainable solutions.
Security
Security is paramount in the Kubernetes ecosystem, and this section will fortify your understanding of it. Kubernetes RBAC (Role-Based Access Control) will be your shield, allowing you to control who can access and manipulate resources in your cluster.
Beyond that, we’ll explore the intricate art of securing containerized applications and safeguarding them from potential threats.
Conclusion
Embarking on the Dumpscafe.com CKAD certification journey is not just a step forward in your career; it’s a transformational experience. It’s a testament to your dedication to mastering Kubernetes, a technology at the forefront of the digital revolution.
We encourage you to seize this opportunity, embrace the challenges, and thrive in container orchestration. Remember that every great Kubernetes expert started somewhere, and your journey begins here. Believe in your capabilities, stay persistent, and let your passion for learning drive you forward.
Welcome to the exciting world of Azure certification. In this digital age, where cloud computing is at the forefront of technological innovation, obtaining an Azure certification can be a game-changer for your career.
Whether you’re a seasoned developer looking to expand your skillset or someone just starting their journey in cloud computing, Azure offers a vast landscape of opportunities. The AZ-204Developer exam is a key milestone within this vibrant ecosystem, testing your ability to design and develop solutions on Microsoft Azure.
Understanding AZ-204 Exam
AZ-204 Exam Overview
The AZ-204 Developer Exam is your gateway to showcasing your Azure development skills. Let’s break it down. First, you’ll want to know the exam format and what to expect, right? It’s a blend of multiple-choice questions and hands-on tasks that will test your Azure knowledge.
Click here for Free Microsoft Azure AZ-204 Questions and Answers
Azure Services and Concepts
Azure Basics
Let’s kick off our Azure adventure with the basics. Azure Portal is your gateway to the cloud, where you can manage and monitor all your Azure resources. It’s like your trusty dashboard for all things Azure.
And speaking of management, Azure Resource Manager is your go-to toolkit for orchestrating your resources. We’ll demystify these concepts, ensuring you’re comfortable navigating the Azure landscape.
Core Azure Services
Now, let’s dive into the heart of Azure, where the real magic happens! Azure Virtual Machines are like your digital workhorses, providing scalable computing power.
Azure App Service is your secret weapon for building and easily hosting web apps, while Azure Functions allows you to run code without worrying about servers. And, of course, we can’t forget Azure Storage, where you’ll store all your precious data securely.
Azure Development Tools
What’s a developer without their tools, right? Visual Studio is your trusty sidekick for building and deploying Azure applications. Azure CLI and Azure PowerShell are like your command-line wizards, helping you manage Azure from your terminal. And when it comes to collaboration and continuous integration, Azure DevOps has got your back.
Developing Azure Solutions
Creating and Managing Azure Resources
Azure Resource Groups are like your organizational superpower, allowing you to group and manage your resources efficiently. But what if you need to replicate your infrastructure? That’s where Azure Templates, or ARM templates, come into play.
Developing for Azure Storage
Data is the lifeblood of the digital world, and Azure Storage is where you’ll keep it safe and sound. Azure Blob Storage is your go-to for storing everything from images to documents, while Azure Queue Storage helps you manage your messaging needs seamlessly.
Implementing Azure Functions
Ready to make your code do some heavy lifting? Azure Functions are here to help! We’ll walk you through creating functions to perform specific tasks triggered by various events.
Building Web Apps with Azure App Service
Have you got a killer web app idea? Let’s bring it to life with Azure App Service! We’ll guide you through deploying web apps, making them accessible to users worldwide. But it doesn’t stop there; continuous integration and deployment (CI/CD) are the buzzwords for modern development.
Integrating Azure Services
Now that you’ve got your Azure foundation, it’s time to explore how to make these services work together seamlessly. Azure Logic Apps are like the conductors of your digital orchestra, orchestrating workflows across various applications and services. Azure Event Grid is your event-driven notification system, keeping you in the loop about important changes.
Azure Service Bus is your messaging powerhouse, enabling communication between applications and services. Lastly, Azure API Management helps you create, publish, and manage APIs effortlessly.
Get Your Success Here:
Securing Azure Solutions
Security is paramount in the cloud, and Azure has your back. Azure Identity and Access Management lets you control who has access to your resources, ensuring that only authorized users can make changes. RBAC is like your security guard, determining users’ actions within Azure.
Azure Key Vault is your digital safe, protecting your secrets and keys, and Azure Security Center is your watchful guardian, detecting and responding to threats.
Handling Azure Solutions
Building Azure solutions is just the beginning; you must ensure they run smoothly. Azure Monitor is like your observant companion, providing insights into your application’s performance and health. Azure Application Insights dives deeper, helping you understand user behavior and application dependencies.
Azure Advisor is your cloud consultant, offering personalized recommendations for optimizing your resources. And when things don’t go as planned, you’ll need to troubleshoot effectively.
Preparing for the AZ-204 Exam
Getting ready for the AZ-204 question-answerexam is an exciting journey, and we’re here to ensure you’re well-equipped for success. Let’s kick things off with study resources.
We recommend using the “Marks4sure” websites. AZ-204 pdfresources contain a treasure trove of knowledge, from recommended books offering in-depth insights to online courses and tutorials catering to different learning styles.
And don’t forget about AZ-204 test engines, AZ-204 practice tests, and mock exams; they’re like your trusty sparring partners, helping you sharpen your skills and build confidence. Similarly, AZ-204 dumps, AZ-204 exam dumps, and AZ-204 practice dumps help you better understand the topics in the exam.
Conclusion
As you stand on the cusp of Azure AZ-204certification, we want to leave you with a hearty dose of encouragement. Remember, this journey is about more than just passing an exam; it’s about acquiring skills that will serve you throughout your career.
Stay confident, stay curious, and keep embracing new challenges. You’ve got this. The AZ-204 certification is just the beginning of your exciting Azure career, and we can’t wait to see where it takes you. So go out there, shine bright, and make your Azure dreams a reality.
The gaming realm has transitioned from a pastime for aficionados to a booming business drawing global investment interest.
Bolstered by technological innovations and the expansion of online platforms, it’s become a financial juggernaut.
Newzoo’s Global Games Market Report projects the worldwide gaming sector to achieve an impressive $200 billion valuation by 2023, marking steady growth every quarter.
Spanning from mobile games and eSports to traditional console gaming and advanced virtual reality adventures, the sector offers a broad spectrum of avenues for investment.
There is a growing market for independent creators who are breaking the mold and presenting new and unique ideas. With this emerging space in the industry, smaller developers can finally build a name for themselves.
A New Opportunity
The rise of online gaming platforms has created a new potential investment avenue for investors all over the world. Platforms like Steam, Epic Games Store, and even casino-based game sites, such as betway zm, have seen a significant uptick in user engagement. The latter combines the thrill of entertainment with the prospect of financial gains, positioning it as a compelling choice for both gaming enthusiasts and investors.
Another factor to consider is the global reach of the gaming industry. Unlike many sectors that may be limited by geographical constraints, gaming transcends borders. A hit game in North America can easily become a sensation in Asia or Europe, multiplying revenue streams. This international appeal not only boosts sales but also provides a cushion against regional economic downturns.
Furthermore, the gaming industry’s adaptability is commendable. In the face of global challenges, many industries struggled. Yet, gaming saw an increase in users, with people turning to virtual worlds for escapism and connection. This resilience makes it a promising sector for long-term investment.
The eSports Phenomenon: A Lucrative Investment Opportunity
Building on the momentum of the gaming industry, the eSports segment stands out as a particularly promising avenue. A report by Fortune Business highlights its rise, with projections of the market reaching USD 6.75 billion by 2030 from USD 1.45 billion in 2022.
Driving this surge are factors like increased live streaming, rising viewership, and the growing demand for league tournaments. The allure of significant international prizes has also made eSports a sought-after career. In response, institutions like Syracuse University have introduced dedicated eSports courses.
Recent times bolstered online gaming, with giants like Nintendo and Tencent reporting revenue spikes. Advertising on platforms like YouTube and Twitch further fuels the industry’s revenue.
The Forefront of Modern Entertainment
The eSports industry stands at the forefront of modern entertainment, merging technology, competition, and global connectivity. Its meteoric rise, backed by solid financial projections and a widening audience base, underscores its potential as a powerhouse in the investment landscape.
For investors with an eye on the future, the eSports realm offers an opportunity that’s hard to overlook. So if you are looking for an industry to invest into, the eSports industry is a promising investment.
You may have seen those viral infinite zoom videos that seem to zoom endlessly into an image, revealing finer details with each magnification.
While these videos can sell the illusion of infinite scale, they are actually clever video effects created with AI.
Here’s how to make your own infinite zoom videos from still photos.
Watch the Short Video Tutorial
What is the Infinite Zoom Effect?
The infinite zoom effect, also called a fractal zoom, appears to seamlessly zoom in on a static image, uncovering more facets and patterns continuously. In reality, this effect is produced by AI generative algorithms hallucinating artificial details and enhancements.
Each “zoom” is just an AI rendering more image content that doesn’t exist in the original. But the effect mesmerizes viewers when well-executed.
Using AI to Create Infinite Zooms
Specialized AI tools can transform photos into infinite zoom videos automatically:
Online AI services like MidJourney use text prompts to generate fractal zoom animations. This requires a paid subscription.
Video editing apps like VideoLeap offer infinite zoom templates. However, some features require paid upgrades.
Creating Infinite zoom video using Mid Journey
If you want to create infinite zoom video using Mid Journey, you will have to use a combination of tools to do that because mid journey will only give you an output of a zoomed out photo.
You will have to do this a couple of times. For example, you can put your picture in Mid Journey’s discord server (I hope you know how Midjourney works), with a prompt, now when you get the output, repeat the process, 2 to 3 times.
This way, you will get multiple photos at different zoom levels. You can then import these photos in your favourite video editor, to make them look like as if it is a single file.
If you have no idea how to do that and it’s looks quite complex to you. Here is an easier one click solution. Like I said, there are multiple free tools available that will let you do this infinite zoom effect.
While AI-powered mobile apps may have limitations, they provide easy infinite zoom creation without advanced creative skills.
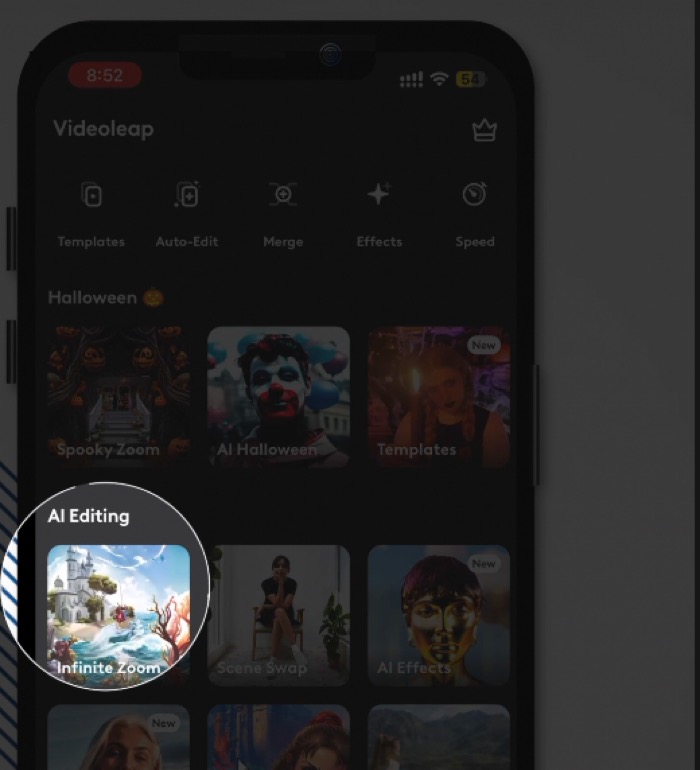
Creating Infinite zoom video using Videoleap
My favourite tool is Videoleap, which is available for both android and iPhone. And it is pretty easy to create this effect on any photo. The only catch is, free version will have a watermark on the output. If you want a watermark free video, you can upgrade to the pro version.
But, if you don’t want to spend money, here is how you can use the free version and still be able to remove the watermark, well, technically.
Install the Videoleap app on iPhone, or Android and then open it. You will find plenty of AI features on the start-up page. Select the infinite zoom effect. After that select the photo you want to add effect on.
Tips for Making Compelling Infinite Zooms
Use portrait orientation photos without too much clutter.
Photos with geometric patterns or fractal-like details work best.
Overlay music for added mesmerizing impact.
You will have to wait for up to 60 seconds to get the output. Once you get the output, you can save it on your mobile phone.
this output will actually have a watermark. If you’re using the free version so here is how to remove the watermark or actually hide it.
When you are posting it on your story or posting it as a Reel. Add a caption on your video. You can use AI tools like ChatGPT to come up with a creative caption, if you are lazy like me.
Add the caption just wear the watermark is appearing. This will hide the watermark. Genius, isn’t it?
With the power of AI, infinite zoom illusions are now accessible to anyone. Let your viewers get lost exploring an endless vortex hidden within a single static glimpse. Just be sure to credit the AI assistant who brought your imagination to life!
If you recently have an iPad or are planning to buy one, here is my recommendation for buying accessories.
The hardware of the iPad is capable of being used as a full-fledged computer, but the iPadOS is a bit limiting when compared to a full-fledged operating system like macOS or Windows OS.
Regular computing to get things done can be achieved if you purchase the accessories that will help you use your iPad in the best way possible.
Watch the Video
Get a magnetic case for the iPad
The #1 accessory is to get a magnetic case. When you buy such an expensive device, you should spend some money to buy a good case to protect it.
But at the same time, it should not be clumsy or bad and quality that takes away the joy of using such a nicely built iPad. That’s why I recommend everyone to get a magnetic case. Surely, it’s double the money. But it’s double the fun as well.
Magnetic cases can be easily removed from the iPad, so you can take off the magnetic case and enjoy it when you’re using your iPad for watching Netflix or random browsing while in your bed. It will also be lighter since the case will not be extra weight.
It is one of the cutest keyboards I purchased for using it with my MacBook when I use it in closed-display mode, but I found that it is also compatible with iPad. It is even advertised as one.
So, if you need more money to spend on the Apple Magic keyboard, this is the second best, affordable choice. It is also travel-friendly, so you can easily slide it into your bag and carry it with your iPad if you plan longer writing sessions.
I cannot stress enough how useful it is to have a physical keyboard. Read our full review
If you are an artist who loves to sketch and have bought the iPad to try drawing or learn it, I suggest you go for the official Apple Pencil.
But if you want to experience what it is like to use a pencil on an iPad for highlighting or doing signatures, then you can get those third-party Apple Pencil knockoffs.
These will be one-fourth of the price of the original Apple Pencil but will have 90% of the functionality.
The only thing missing would be wireless charging and pressure sensitivity, which is crucial for drawing.
I have been using a knock for the last several months, and the way I use it, I am thankful that I have yet to spend money on Apple Pencil because it would have been a waste of money. Read full review
I have the 64GB internal storage, fourth-generation iPad Air, and I opted for the 60 4GB version, which has effectively got around 50 GB of storage, which is less if you install many apps.
This is why getting an SSD can be really helpful. All the iPads have type C slots, and the SSD can be easily connected to them.
Apps like LumaFusion will let you directly edit files from the SSD.
iPad is a fantastic device, but it only has one slot type. You can use it for data synchronisation, adding accessories or charging it.
This is why a USB type C hub is crucial because he can do all of these things simultaneously.
You can connect it to a monitor to get a more prominent display. The latest iPads covered by M1 chip can extend the display to an external monitor, giving you more room to work on your apps. Other USB type C hubs can be used for adding additional accessories, such as the SSD.
Thanks to the Continuity Camera feature in macOS Ventura, you can use your iPhone as a wireless microphone to dictate, record, and capture audio on your Mac.
This provides a convenient way to add high-quality audio input to your Mac even when you’re away from your desk.
What You Need
An iPhone running iOS 16 or later
A Mac running macOS Ventura or later
Both devices signed into the same iCloud account
Setting Up Your iPhone as a Microphone
First, make sure your Mac and iPhone are updated to the latest operating system versions.
On your Mac, go to System Preferences > Sound. Under the Input tab, you will see a device option labeled “iPhone Microphone.” Select this as your input source.
That’s all you need to configure your iPhone as a wireless mic for your Mac!
Using Your iPhone for Dictation and Recording
With your iPhone set as the microphone input, you can now use it for:
Dictating messages, notes, documents etc. into any app
Recording vocals or instruments in GarageBand
Using Siri hands-free commands
Making and receiving phone calls through your Mac
Capturing audio for videos or podcasts
The iPhone mic will work anywhere a mic input is required on your Mac. You’re free to move around while maintaining high quality audio capture.
The benefits of This Integration
Using your iPhone as a Mac microphone provides great flexibility. Key benefits include:
Mobility to move around while dictating or recording
Leverages iPhone’s high-quality microphones
Easy access to notes or messages captured on iPhone
One less hardware peripheral needed
With just a quick settings change, your Mac can tap into the power of your iPhone’s mic. This brings convenience and great audio performance thanks to Apple ecosystem integration.
Exploring new use cases
The new MacBook Pro and MacBook Air are equipped with high-quality microphones which can record studio quality audio. But older Mac computers, where there is no high-quality microphone, and it is still upgradable to macOS Ventura, you can utilise this feature to record high-quality audio.
You can also use the iPhone’s microphone for zoom meetings or simply for doing voice overs. It just lets you use a high-quality camera that is already in your pocket, without having to spend money on any additional hardware.
What’s the Next Best Solution?
I know it’s cool to use this setup for recoding your audio in high quality, but it requires you to have both the devices. That’s why I recommend the Rode Wireless GO II mic for every creator. You get all the benefits of Wire-free experience without compromising with the quality.
It’s a must have for every content creator out there. Read my review of how I am utilizing it in different use cases.
I am a big fan of tools that speed up my work, so that I can become more productive.
On the blog, I have shared quite a lot of useful tools for that.
Watch the Video
Write Faster (and Better) with Voice to Text Tools
Here is another cool tool that will let you write anything without actually typing on your keyboard. The best part is, it works on mobile phones as well.
And it is quite useful on smartphones, because you can’t really type fast on virtual keyboards.
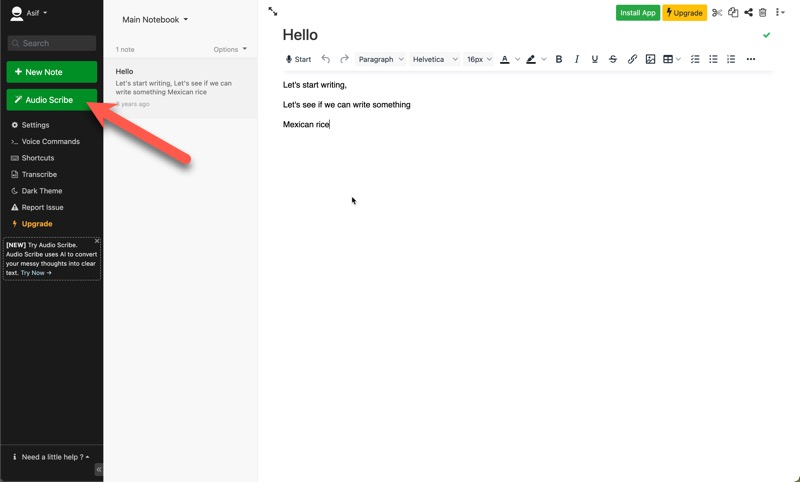
The tool is called Audio Scribe from Dictanote. It is actually from the same developers who have created this amazing chrome extension called VoiceIn.
The VoiceIn Chrome extension gives you real time transcription, just like like you get in Google Docs Voice Typing, because it uses the Google speech to text API.
Voice to Text Powered by AI
Audio Scribe, is powered by AI, which does an amazing job at transcription. This tool also fixes your random words into sensible sentences using the AI.
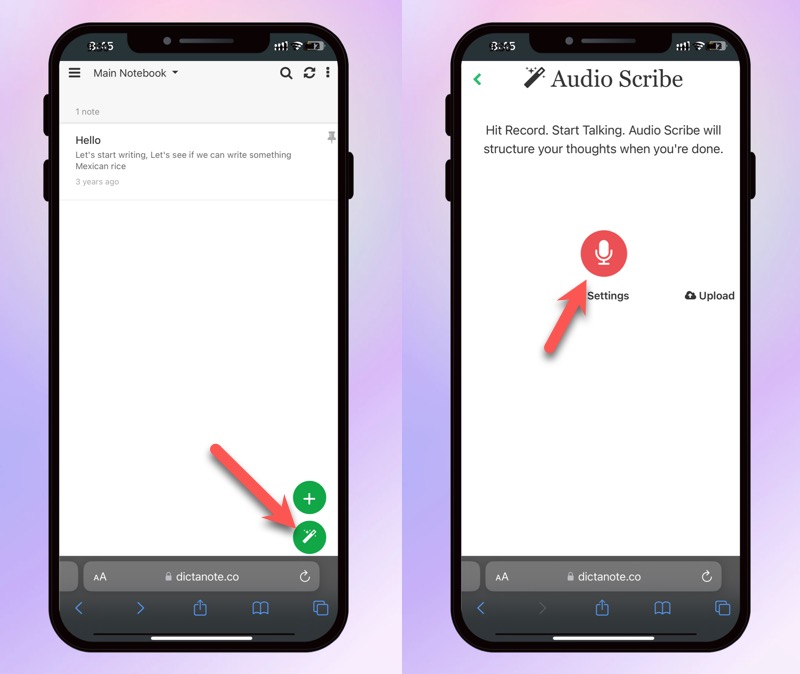
Currently, there is no app which you can install on your mobile phone so the Web App will be accessible on any web browser but for iPhones it only supports the Safari browser.
Simply open Dictanote.co, sign up and find Audio Scribe in the left sidebar (on desktop) and on bottom right (on Mobile), tap on the record button (allow the browser to use microphone) to start recording your audio.
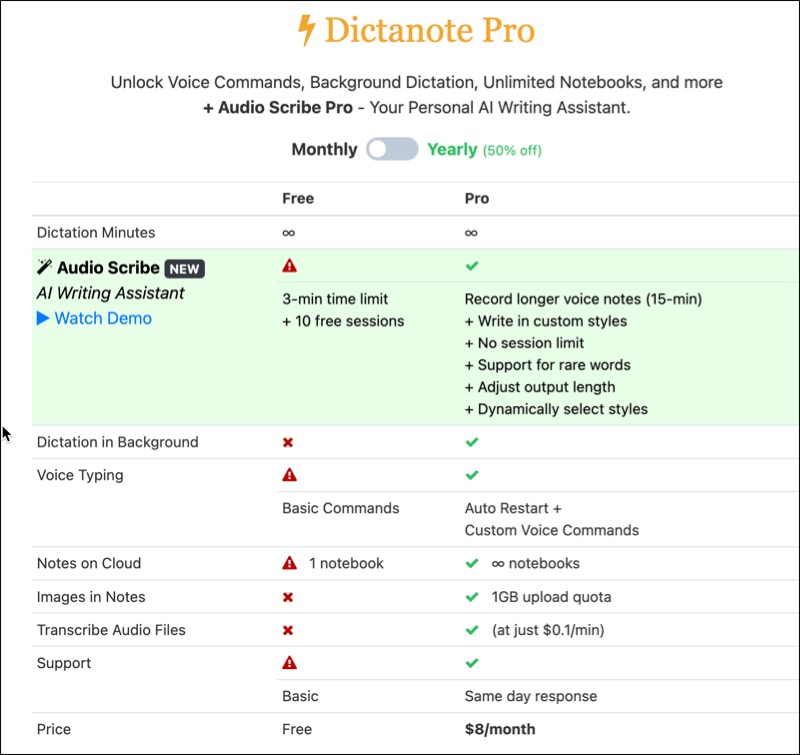
The free version let’s record audio for three minutes. An order then automatically stops and start transcribing and giving you a formatted output.
If you subscribe to their Pro plan, you will get to record 15 minutes of audio at a time, with some more functionalities which you can check out on their subscription page.
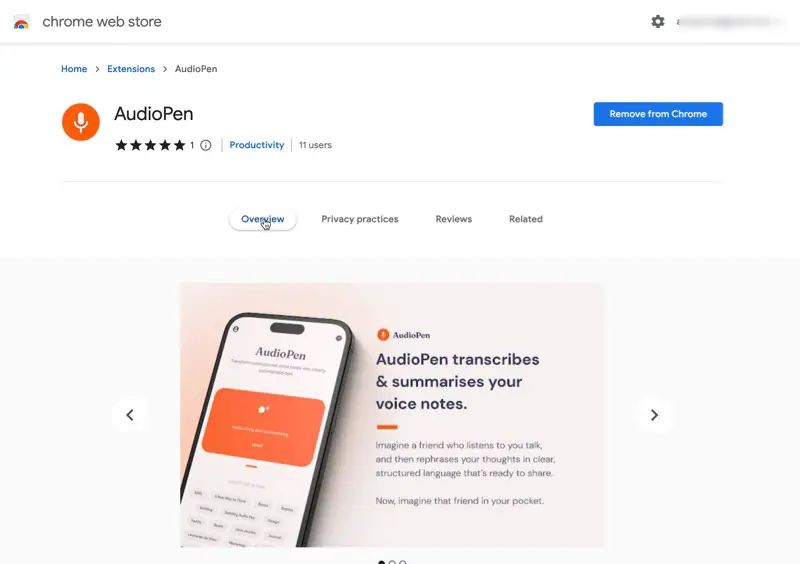
A Tool Similar to AudioScribe
Previously, I have shared a similar tool called Audio Pen which works exactly like this one. I’m surprised it took so long for the developers to replicate something like that.
Well, these both the web apps are quite amazing, especially because they are accessible on smartphones and you can talk into your microphone. Whatever idea you have and it will format it nicely so that it makes sense to you when you read it after a few days.
The Limitations of AudioScribe (and Similar Tools)
The only issue is the default formatting option in the free version is too restrictive and sometimes summarise your audio way differently than you would want it to.
And yes, the developers have solved this problem by offering the solution. But the solution is behind the pay wall. You have to subscribe to their provision to get these options.
If you’re okay using the free version, it’s still great to simply note down something that is in your mind and you don’t want to type using the keyboard. In fact, if you write long form content on social media platform or on a blog, this can be really useful.
Use my Custom Shortcut – Dictation Pro
But if you don’t want that limitation and on an iPhone here is an iPhone shortcut that I created for myself. I have named it dictation Pro and it works quite similar to these web apps.
But instead of having a limitation of only three minutes of recording, you can use it to transcribe after 30 minutes of audio. It will transcribe and format it and then automatically save it in your notes app on your iPhone..
With broad general knowledge and domain expertise, GPT-4 can follow complex instructions in natural language and solve difficult problems with accuracy. Learn about GPT-4
$0.03 / 1K tokens
$0.06 / 1K tokens
8K context
$0.03 / 1K tokens
$0.06 / 1K tokens
32K context
$0.06 / 1K tokens
$0.12 / 1K tokens
GPT-3.5 Turbo
GPT-3.5 Turbo is optimized for dialogue. Learn about GPT-3.5 Turbo
4K context
$0.0015 / 1K tokens
$0.002 / 1K tokens
16K context
$0.003 / 1K tokens
$0.004 / 1K tokens
Audio models
Whisper can transcribe speech into text and translate many languages into English. Learn about Whisper
Whisper
$0.006 / minute (rounded to the nearest second)
Older models
We continue to improve our models and periodically retire older, less used models. View pricing and info for older models
Here is a simple calculation for you, like how much will it cost you for one minute of audio transcription.
Download My custom iPhone shortcut from this link, It costs $1, and you can have it for the lifetime. The API cost will depend on your usage, but it will be still way less than the monthly subscription plans of these web apps.
I am personally comfortable paying for what I am using or getting an unlimited plan rather than subscribing to another monthly plan. If you feel the same and you own an iPhone, you can use the Dictation Pro iPhone shortcut.