How to Record Videos Faster to Speed Up Your YouTube Content Production

If you’re a solo creator on Youtube, chances are you want to maximize your productivity and record videos faster. Recording videos for YouTube can be very time-consuming and tedious if done incorrectly.

Fortunately, with the right tools and techniques, you can streamline the process and upload your content faster than ever.

In this article, we’ll provide some tips on how to record videos faster so that you can maximize your productivity as a solo creator on Youtube.

Let’s divide this video into three Segments, Preproduction, Production, and Post Production.

Pre Production

Have Your Ideas Ready

Create an idea file, write it on paper, or use the notes app on Mobile. Set time aside to come up with ideas. Else it will drain a lot of time.

There’s an advanced method explained in a dedicated video. I’ll post the link when it goes live on or YouTube channel.

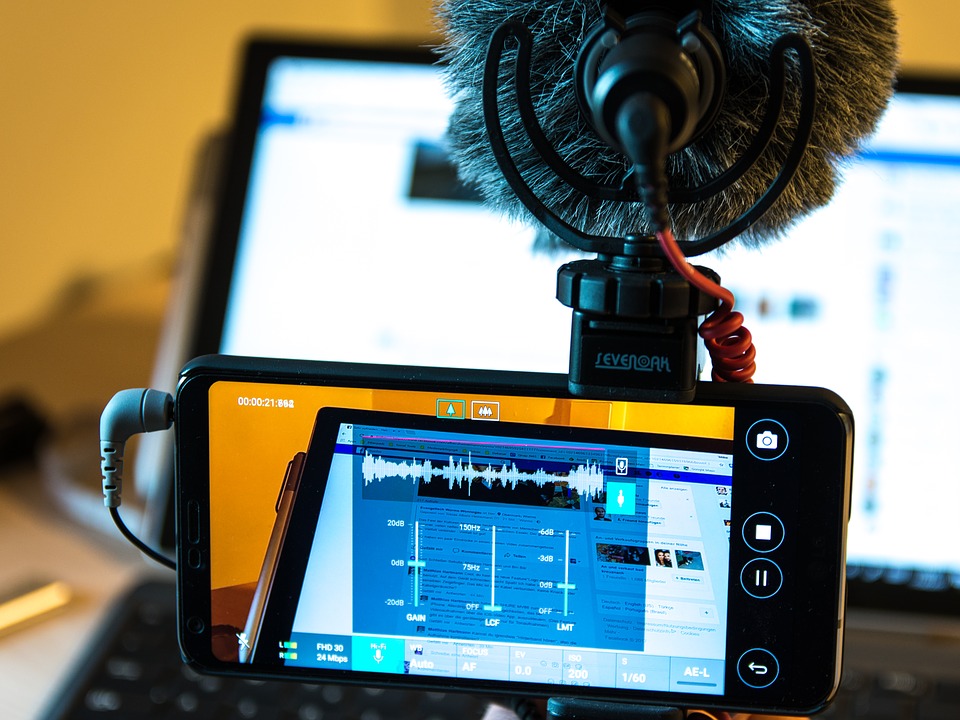
Shoot in the same setup

It’s good to have variety, but when you have the same setup for your videos, it will be easy for you to create them. If you plan to do talking heads, it’s even more accessible.

You won’t have to spend time changing background etc. Try having your tripod and camera set up all the time, and try automating it.

I have a dedicated video for automating your setup that talks about how you can turn off all your lights at once and have to keep your camera charged forever.

Production

Shoot in batches

It will be super easy for you to create multiple videos at once because once you are in a flow, it won’t take much time to shoot the second video.

If your videos require scripting, try doing them in batches, and do all talking heads at once. If you have to shoot b rolls, try doing them in batches.

Keep Bullet-points Handy

If you don’t work with scripts, try having me in bullet points I want to cover in your video while making the video.

Yeah, this will help you stay focused and call the only things you want to record else. The shooting time will be expanded, resulting in a waste of time while recording and editing it.

In some cases, scripting is also helpful. It takes some time to write a proper script, but the recording time can sometimes get reduced to half of what you would spend without a script.

Even use Teleprompter, but that’s a complex setup. If you are just starting, write scripts and go through them once before speaking in front of the camera.

Post Production

Keep Your Files Organised

Please spend some time thinking about how you want to store your files so that it becomes easy to find them while sitting at the editing table.

Create a folder as your Channel name, then subfolders for each video, where you put raw footage in one folder and photos in another. Try organizing all the assets you use in videos, such as music, effects, intros, outros, etc.

Learn your Editing Software

Pick one editing software and master it, learn the keyboard shortcuts, and organize projects and effects that can be reused.

For example, I use Final Cut Pro, and I have Sperate library for each of my channels, and it has an event called Assets, where all my effects, intro, outro, music, and effects are saved. I create separate events for each video under this library and reuse the Assets.

You can even create template projects to copy-paste them into new projects. I have a separate video for speed editing on the channel. Check it out.

Thumbnails, Tags, Headlines

To develop a template for Thumbnails, I use Canva and have bookmarked the direct link to the template. Instead of opening canvas and then opening my template, I directly open the template and make edits for the new video.

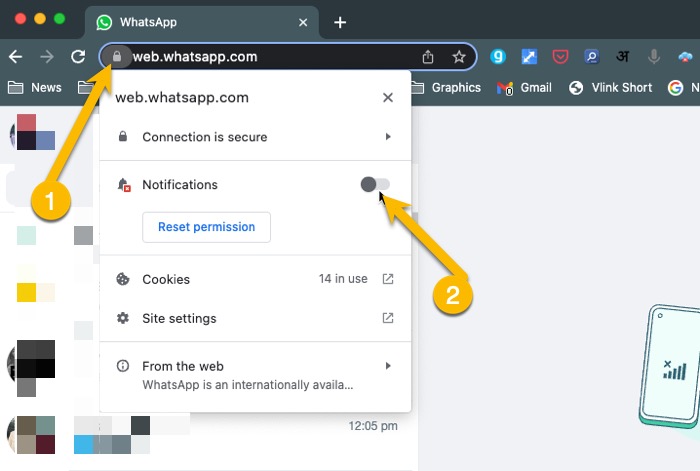
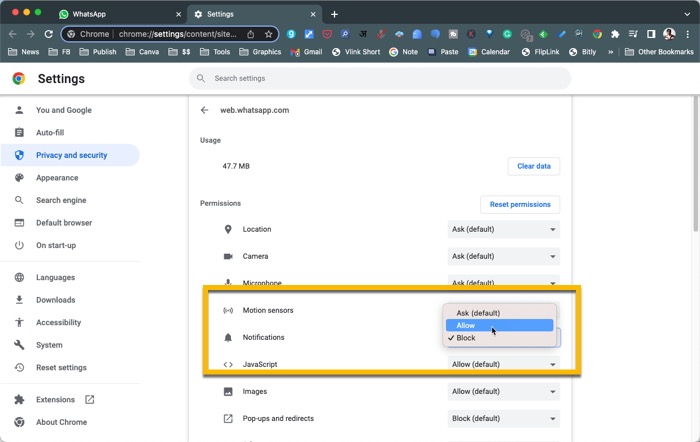
For Tags and Headlines, use Chrome Extensions like VidIQ and Tebubuddy. These will offer you insights about the video topic you have covered, find other videos related to your topic, and choose a headline accordingly.

You should use these in preproduction as well. For researching a video topic. This extension can help you find topics that have potential on youtube. The premium versions of this extension will save even more of your time. You will find the links in the description of this video.

Read This Blog for More Information

If you are a content creator, there is a lot you can learn about the process, how you can perfect it, and a creative workflow that is suitable for you. I have a blog dedicated to content creators, and I share everything I learn about creating content and doing it as a profitable business. Check out Creator’s Magazine.

I also have got a youtube channel that supports the blog by adding additional information in the form of videos, so you can also subscribe to that channel.

Download this as a PDF

How to Fix WhatsApp Web Notifications Not Working?

0

In this article, we will learn how we can fix the notification issues in WhatsApp Web.

If you spend more time in front of a computer, and WhatsApp is one of the important mediums for communication with your team or customers, you must have been using WhatsApp forWeb in your browser.

Watch the Video Tutorial

And if you are facing notification issues where you are not getting instant notifications whenever you are getting messages on Whatsapp, here is how you can fix it.

Check if Notifications are Enabled in the Browser

When you have WhatsApp Web opened in your web browser, look for a blue message on top of the chat list. If the notifications are disabled, WhatsApp will notify you by showing you a blue pop-up telling you to enable the notifications.

But it may not appear sometimes. In that situation, you can click on the lock icon in the address bar, just before the URL starts.

The Lock icon gives information about the website that is opened in the browser. If you find Notifications in there, and the toggle button is not turned off (it will be blue if it is turned on and it will be grey if it is done off). You can enable it just by clicking on the toggle button.

If notifications don’t show there, Click on Site Settings. Settings about the website (WhatsApp Web in this case), and the status of all the permissions given to this website to access via your Browser.

Look for notifications. If you are not getting notifications it might be blocked, you can select ‘Allow’ from the drop-down, and the notification will be enabled. Or even also click on reset Permissions.

Still not fixed on Mac?

If the issue is still not fixed, then notifications for the Chrome browser or the browser you are using for WhatsApp Web might have been disabled. You can check the status by going to Settings.

Click on Notifications and look for Google Chrome, or Safari (whichever you are using for WhatsApp)

Then click on the browser and Toggle the button to Enable Notifications. If it is Enabled already continue reading the article.

Still not Fixed?

Check out whether it is because of the Focus Mode on Mac. The Focus Mode in Mac allows you to put different settings and the Focus Mode can also be activated automatically if you have set a trigger which can be Location or Time.

Check if the Focus Mode that has been enabled has any setting which disables the notifications. For example, the ‘Do Not Disturb’ focus mode will turn off all notifications and all disturbances.

Similarly, work notifications might also have some notifications turned off. You can check it out by going to focus settings and seeing what things have been enabled for that particular focus mode.

How to Insert Images and Videos in Google Docs?

In this article, you will learn how you can insert images or videos into your Google Docs.

Google Docs is my favourite text editor where I write my articles. It is used by officials as well as students for writing official documents, research papers, and school assignments.

Adding images and graphics to your documents makes them more appealing and easy to understand. Google Docs gives you easy options to insert images.

Watch the Video Tutorial

You can find these options by clicking on Insert.

You can either upload the photo from your desktop if you have saved it. Or you can directly make a Google search. However, I wouldn’t recommend using Google search because the images that appear in Google search might not be copyright free.

Using copyrighted content is not a good idea, for any type of use case. Surely, if you are writing about a company or a brand, you can check out the website and the social media accounts of brands and companies to get relevant photos that you can download on your computer and then upload.

For any other purpose, you can check out websites like Pixabay.com which offer copyright-free images.

For example, I have an article that I have written about ChatGPT. And I would like to add an image that is relevant to this article.

I will go to Pixabay.com and search for robots since ChatGPT is an AI, visuals of a robot would represent an AI.

I find this image and I want to use it in my Gooogle Docs. Instead of downloading it on my computer, I can copy the image, and it gets copied into my clipboard.

I come back to my Google Docs and click on a place where I want to insert the image. Then I’ll paste it using right-click and paste or Command/CTRL. + V.

It works most of the time if it doesn’t work for some reason you can download and upload it the usual way.

How to Insert Videos in Google Docs

It’s a little tricky to insert videos into Gooogle Docs because it is not as straightforward as inserting an image.

But fortunately, there is a workaround that requires a few steps. You can insert videos that you have on your computer as well as videos from websites like Youtube.

For example, if I have to add a video to my Gooogle Doc. I will have to create a new slide from Drive.Google.com. Only the Slides app in Google Suit of documents has the option to insert images.

So when you create a new slide. You can click on the insert link, it will have the video option.

The popup will appear giving you options to search a video on youtube or add a video using a url or simply inserted from your Google Drive account. At this point if you have a video on your computer you can upload it on your Google Drive so that it appears in Google Drive section.

I have a video that I uploaded on youtube. I will paste the link into the Youtube section, and then select the video to insert into the Slides.

Once the video is added to Slide, I can adjust the size of the video. The formatting options will appear on the right hand side of the page. Once I am happy the way video is added to the slide, I can copy it by doing a right click.

Now I will go back to my Google Docs, click on insert, and this time I’ll select inserted drawing. And in pop up will appear when I click on new, I can paste the video that I have copy it from the slides, or simply do Command/CTRL + V.

The video will be added to the drawing, I’ll click save and close, and the video is added into Google Docs.

Now if someone has to watch the video inside the document, they can double click on the video and an in-pop-up will appear, where the video can be played.

Cut Your Instagram and Other Social Media Screen Time to Half on iPhone

0

If you waste a lot of time on social media on your mobile phone, which is the case with most of us, here is a solution that I have been using for the last few days and it has helped me reduce my screen time on my iPhone.

Uninstall the most distracting apps on your mobile phone

I know this is not easy for everyone, but this is the best method to cut down your screen time. Especially if it is a social media app.

Last year I uninstall the Facebook app for 30 days, and after 30 days I did not install it back. Crucial things can still be accessed on the web version of Facebook, which can be opened in your mobile browser.

But it is quite difficult for me to do the same with Instagram for various reasons.

I post videos on Instagram and for that,

I look for inspiration within the app.

I also follow some great creators who create content on Instagram.

Use ScreenZen App on your iPhone to Cut down your screen time

iPhone has already a feature called Screen Time built into the iOS itself. The app nicely tells your screen time and the amount of time you have spent on particular apps.

It also gives you the option to set limits for individual apps. For me, I have put a 30-minute limit on Instagram app usage.

This means after 30 minutes, it doesn’t let me get into Instagram directly and gives a screen which tells me that I am done for the day, but the screen also gives me the option to extend the time.

But I started using the ScreenZen app along with it and I can see a decline in the usage.

How does the ScreenZen app work?

It is a pretty straightforward app to use. Its sole purpose is to reduce your screen time by adding a barrier between you and the app that is distracting you the most.

It will add a splash screen before the app with some crucial information like the number of times you have to open the app for the day. You can set this limit inside the app. And you can also set the number of seconds this message will display on the screen before the app opens.

Most of us have gotten into this habit of picking up our phone in the middle of something, and our subconscious mind automatically opens Instagram or Youtube, but once we are inside these apps it is just mindless scrolling and we end up wasting a lot of time.

So the message appearing before the app opens allows you to make a conscious decision about whether or not you want to check your social media app.

Once you have installed the app on your iPhone, you can add the apps you want the message to display, there is no limit to the number of apps you can add.

There are advanced controls as well for you so that you can add different messages and times to different groups of apps.

You can install the app for iPhone. Here’s a similar app for Android users.

Why You Should Create New Google Accounts for Your Kids

0

If you are a parent of kids under 13. Take this advice from a parent of two under 13-year-olds.

In this article, you will understand why it is crucial for you to create individual Google Accounts for your kids.

We keep hearing about how the internet and smartphones are ruining our kids.

The possible solution given by these concerned people is to keep your kids away from smartphones.

But let’s face it, it is impossible for you to keep your children away from smartphones when you yourself are using them, or shall I say overusing them.

Overuse of everything is bad. Even the food you eat should be balanced. If you eat more you get fat if you eat less you get malnutrition.

The same goes for everything. If you keep your children away from technology, they will be far behind everyone else if they don’t understand that technology.

As a parent, your job is to give them screen time in moderation.

You can give them your own smartphone for half an hour every day for them to use specific apps. There are features built into smartphones, which you can use to lock in a single application of your choice so that they do not mess with other things on your smartphone.

Or better would be to have their own devices that can connect to Wi-Fi and use the internet, and Android tablets.

This is where creating separate Google accounts for your kids will be helpful. When you create new google accounts for your kids, put their real age while signing up, if they are under 13, Google will ask for a parent to link their Google account.

Google has a really useful application called Google Family Link, it is available for both Android and iPhone.

When you sign up on your Kid’s device using their Google account, you will be able to control their activity using the Google Family Link app.

You can check out another article to find more ideas on how you can limit screen time of your kids.

How to Limit Screen Time of Your Kids to Prevent Smartphone Addiction

This article is tagged under Smart Parenting,

Best Monitors for a Macbook Pro in A Budget

Are you looking for the best monitor to pair with your MacBook Pro? With so many options available on the market, it can be difficult to find the right one for you.

Fortunately, this article will help guide you through the process of selecting a monitor that fits all your needs.

We’ll discuss factors such as size, portability, resolution and brightness to make sure you have all the information you need when making your decision.

What is a 4K / UHD Monitor and Why You Should Go for a 4K Monitor?

4k is the common term for Ultra HD, which is 3,840×2160, where 3840 pixels is the width, and 2160 pixels is the screen’s height. It is said that 4k is 4000 pixels, which isn’t precisely the width, but you get the gist.

Most of the laptops available in the market right now have Full HD (1920×1090) resolution, and if you go high-end, you can get quad HD which is twice the resolution of full HD.

It is four times the resolution of Full HD, 4k monitor or UHD monitor will feel like there are 4 Full HD monitors stacked together. If you can keep two windows on your full HD monitor with four monitors, you will have eight windows, saving time as you won’t have to minimize and maximize windows.

So instead of stacking for full HD monitors, a 4k monitor or USD monitor is best suited if you want more screen real estate on a single screen.

Which size is best for UHD Monitor?

The size of the UHD monitor is crucial if you want to be productive. My MacBook Pro 16 has a retina display and a native resolution of 3456×2234, but the maximum I can go is 2056×1329, after which the text would be too small to be readable.

The default at 1728×1117 is comfortable to read on a 16 -inch monitor. So 4, double that resolution, would be comfortable on 32-inch.

Affordable 32 inch 4k / UHD monitors

A monitor smaller than 32 inches would be small for UHD resolution. There are 27-inch UHD monitors available, but the text at full resolution would be too small to read, so you can’t utilize all the resolutions.

BenQ EW3270U 32 Inch 4K Computer Monitor

BenQ offers quite an impressive product lineup, especially in the display segment. Their monitors are one of the most highly rated and feature-rich. The price according to the price is something only benQ offers.

Although the monitor supports HDR, it uses a VA panel, which is a bit downer. This is the only cost-cutting I found on this monitor.

Aside from HDMI for connectivity, the BenQ ES32270U has USB Type C for data and audio/video. It doesn’t offer power delivery, though,

This 32-inch monitor retails for $350. However, a 28-inch version of this monitor is $100 cheaper than this one. It’s the BenQ EL2870U which has an impressive response time of 1ms. Why is it important? Read the last section of this article.

➜ Buy it from Amazon

SAMSUNG 32 inch UJ59 4k monitor (LU32J590UQNXZA)

With just 4ms of response time, Samsung calls this a Gaming Monitor. Maybe used for gaming, or perhaps not, but it makes a highly affordable and functional UHD Monitor under $300 ($60 extra for the stand).

Under the list of features, it has Picture in Picture mode, where you can use the same monitor to display two devices (in split screen), a feature no one uses. But the AMD Freesync feature is helpful to sync the refresh rate on the monitor with the graphic card of your PC.

MacBook users or PC users with Type C ports will only have to buy an HDMI to Type C cable as there is no Type C port on this monitor. But the price-cutting has made it under $300 4K monitor.

➜ Buy it from Amazon

LG 32UN500-W 31.5 Inch UHD Monitor

If you don’t like Samsung, Here’s something similar, but a litter better looking from LG, the LG 32UN500 Monitor.

It comes with AMD Freesync and supports HDR but has VA Panels, but this list is about affordable 4K monitors for productivity, so we’ll let that pass.

The good thing is its response time, which is 4ms. Quite doable. And this one costs under $300 (stand included).

➜ Buy it from Amazon

Please Note: It's a 2020 model, and I couldn't find the 
the newer version, so please check it on Amazon. 

ASUS VP28UQG 28″ 4K/UHD

Although we recommend 32-inch motors for UHD resolution, if your budget is tight, you can get this 28-inch monitor from Asus for $250.

You might have to compromise on the size, but you get a response time of 1 ms on this monitor. Freesync is also supported. However, there is no HDR support. It’s super affordable.

➜ Buy it from Amazon

Can TV Be An Alternative to UHD Monitors?

If you are on a budget and you are looking for an affordable 4k monitor, you might already have one if you have got a 4k tv at your home that you have bought recently.

Most modern tv is supported HDMI, which can be used to connect your laptop or computer to output the screen in Full HD, but if the tv can be used as a USD monitor, what’s the need for a USB monitor anyway?

You can read my experience using a tv as a monitor, where I talked about the pros and cons of having a tv as your monitor.

If you don’t want to read that much, here is a tl;dr version.

Two things can influence deciding whether to use a TV as a monitor.

  1. Refresh rate
  2. Input lag

Refresh Rate

Most TVs have a 60Hz refresh rate, which is sufficient for most of the work you do on the computer. But if you have a specialized task such as gaming, are monitor is available with a 120hz refresh rate, which would be optimal for that use case.

most of the people, you would have no issues having a refresh rate of 60Hz on TV, it’s just that you will require a compatible HDMI cable, which has to be HDMI 2.0, and your laptop and desktop should also be capable of running UHD at 60Hz.

Input Lag / Response Time

It is the most crucial thing and can be a deal breaker if the input lag on your tv is high. Input lag means the time spent putting something in the computer, and it displays on the monitor.

The monitors usually have input lag in the range of 5ms to 1ms. In contrast, the TVs can have an input lag as high as 20ms, so it can get frustrating with that kind of input lag because moving your cursor and seeing it lagging is quite irritating and counterproductive.

Fortunately, there are TVs with input lag as low as 8ms, which would work perfectly fine in most use cases. But it should be as low as possible for the use case where you are gaming. That’s why there are give my pc is with an input lag as low as 1ms.

I hope this guide helps you decide which monitor to buy and whether to use your TV as a Monitor.

Here’s the Best App to Download YouTube Songs in MP3?

0

If you’re a fan of music and YouTube, you’ve probably found yourself wanting to save some of your favourite songs from the platform.

In this article, you will learn how to easily download YouTube songs in MP3 format.

Youtube is the largest video-sharing website on the internet. And with different types of videos uploaded to the platform, there is a lot of music that has been uploaded to Youtube.

And good thing is, there is an official way to enjoy music on Youtube,

  • in high quality,
  • You don’t have to keep your mobile phone screen turned on, and
  • You can also download the songs for offline listening.
  • It has a separate website for showcasing only music from the Youtube library.

Youtube offers paid service called Youtube Premium, where along with other benefits you have a separate app called YT Music, which gives you access to the entire music library uploaded on YouTube, which includes official music as well as the cover songs by underground bands and independent artists.

If you have ever come across a song on Instagram Reels, which is a remix of an official song, the chances are, you will not find it on Spotify or Apple music or any other music streaming platform. But high chance it will be available on Youtube if the remix is from an independent artist.

Because they might have uploaded that song to Youtube as well or maybe someone else has. Youtube music also offers a download feature. You can download any song and listen to it even when the internet is not available.

I have been a Youtube Premium subscriber for years and I prefer it over Spotify and Apple music.

And that is because just one subscription gives me features like an Ad-Free experience watching Youtube videos, on Desktop and Mobile, and it even allows you to listen to long Podcasts on YouTube and have your mobile phone screen turned off. No more excess battery drains

How to Download Music from Youtube to Computer in mp3 Format

If for some reason you do not want to get the subscription to Youtube Premium, there are work around that would let you download music from YouTube.

Since Youtube is a video-sharing website all the music you download will be in the form of video which means it will not play in the music player, and the files will also be bigger.

You can either download the video files from YouTube using these tools and then use video-to-audio converters to extract the mp3 from the video.

Or you can use online mp4 to mp3 converter that gives you the option to mp3 song download of the YouTube video. The problem with these online converters is sometimes they work, sometimes they do not work and it’s quite an effort trying to download.

That is why my recommendation would be to download an app for your computer. There are plenty of apps available. VideoDuke works better for me and it also gives the option to download videos as well as mp3 format.

Alternatively, you can also try doing a Google search instead of searching it on YouTube. If you have found your song on YouTube you can use the exact title of that video, and make a google search query by adding ‘mp3 download’ to it. You might have to go through the first few links, but, you will be able to eventually download the music you are looking for.

Disclaimer: This article is for your information only, and we do not promote piracy and do not believe in sharing malicious links to sites, apps, games or music. This is purely for educational purposes. 

WebChatGPT Chrome Extension Adds WebSearch Results to ChatGPT

0

This tool called ChatGPT has taken the internet by storm, it’s like chatting with a superhuman that knows about everything. It’s like it has read the entire internet. 

Turns out it did.

ChatGPT has scraped the internet till 2021. Anything you ask Chat GPT,  it will answer you by analysing all the data it has scraped.  But if you ask about anything that happened after 2021 it will tell you that it doesn’t know the answer. 

Watch the Video

For Example: if you ask who won the FIFA World Cup in 2022. It doesn’t know because it has only scraped content tale 2021.  

Wouldn’t it be great if it also scraped the internet in 2022,  maybe we will have to wait for an update from open ai to update its database of ChatGPT? 

But here is what you can do right now

You can make it more usable, and let it give you updated information from the internet.  You can install this Google Chrome Extension called WebChatGPT.  and it’s free. 

Once you have installed the google chrome extension the icon will appear in the browser address bar.  When you click on it, it will open the Chat GPT. 

And now when you type anything, this chrome extension will add results from Google Search results to the page. The number of results you can choose on the ChatGPT page. 

Along with the web search results, it will also write a prompt asking ChatGPT to give you an answer based on the search results.  Pretty cool right?

What are the use cases of using WebChatGPT Extension?

Although you can easily do a Google search if you are looking for answers, the chrome extension makes it easy for you to get a simplified answer by letting ChatGPT write it for you. 

Obviously, you will have to go through the search result pages if you are looking to do in-depth research,  it is still cool that you can get updated answers from Chat GPT without having to wait for the official update. 

Do you like using ChatGPT? How do you use it?

How to Fix Spotify Web Player Not Working?

If you are a Spotify user who has been experiencing trouble in playing songs in the Spotify Web Player, here are possible solutions to fix it, and have a smooth music experience. Continue reading to fix your Spotify web player not working issue right away.

Why Spotify Web Player is not working?

There could be n number of possibilities why the Spotify Web Player is not working in your Web browser. Maybe your Internet has issues. Or maybe it’s some browser cache-related issues. I would suggest you also check your Spotify account by playing songs on your mobile phone, to make sure it is not related to your Spotify account.

If the issue is happening on multiple devices then it is most probably related to your Spotify account and not a browser issue.

Also,

Before going down any further, make sure you have tried out solutions given on the official website of Spotify support.

  • Make sure your browser is up-to-date. Check and update it in your browser’s Help section.
  • Try opening the web player in a private/incognito window.

Some shared or public networks (e.g. schools/work/offices) restrict access to certain services. You can contact those responsible for managing the network for more information.

Your Internet Speed might be too slow

Before moving on to fixing by figuring out other possible reasons. Check your internet connection. Playing songs require your internet connection to be stable and fast. Do a speed check at speedtest.net.

It could be a browser caching issue.

If the browser web player is not working it is most likely the browser cache issue. Either this error started after your browser was updated or you upgraded your operating system. If this is the case, it’s shall be fixed either by the browser developer or Spotify itself.

There are things you can do by yourself such as clearing the browser cache. But before you do that, you can also open the Spotify web player in incognito mode. If it is working in the Incognito mode, you can then go ahead and clear the cache as It can be solved by Clearing the cache. How you can clean it will depend on which browser you are using. For Google Chrome, it is Settings – Privacy & Security – Clear Browsing Data.

You can also install tools like CCleaner for Windows and CleanMyMac for MacOS to do a deeper cleaning on your system. And maybe even restart your computer. (Restarting can solve the problem in 90% of the cases like these.

Enable Playing Protected Content?

Some websites have mentioned that you need to enable protected content in the Google Chrome browser if it is the browser you are having issues with Spotify on. This is also mentioned in the official support page of Spotify.

  • In Chrome browser address bar, enter chrome://settings/content
  • Under Protected content, switch on Allow site to play protected content.


  • In the Firefox browser address bar, enter about:preferences#content
  • Under DRM content, switch on Play DRM.

Some sites also suggested that you may need to Download Media Feature Pack, if you are using a N edition of Windows 10 computer. Perhaps, the codecs needed to play songs in the Spotify Web Player are not installed properly on your machine or may have been corrupted. You can download it from the Microsoft website.

Could it be a DNS issue?

Some websites have also mentioned it could be an ads issue and you need to flash DNS.

Disable Ad Blocker if installed any

If you are using any sort of ad blogger to block ads on web pages. It could potentially be the reason for your Spotify player not working in your web browser. Or maybe any extension that you have installed that you are not aware of. Disable or remove any browser extension that you don’t recognise, or do have not any use of.

Try A Different Browser, Like Firefox or Opera Web Browser

You can try playing Spotify in a different browser than your existing one, and if you really want to use the Spotify Web Player.

If you are using Google Chrome, you can try opening it in the Microsoft Edge browser or the Safari Browser if you are using a windows laptop or a mac respectively.

Alternatively, Download the Desktop App

The other alternative would be to teach the web player altogether and download the desktop app for Spotify. The good thing about Spotify is that it has apps available for all platforms, including Mac and Windows, and Android and iOS.

Also, the web player has an audio quality cap of 128Kbps for free users and 256Kbps for Premium users, whereas, in the desktop program, you can high-quality audio, up to 320Kbps. An app always gives a much better experience than a web-based player.

I hope you find this article useful if you did you can check out other articles to make your tech life easy.

DeepL Translator vs Google Translator. Which One is Better?

0

The rise of the internet has made it easier than ever to communicate with people from all over the world. But for many, the language barrier still remains a challenge. Fortunately, there are now tools available to help bridge this gap – like translation software.

In this article, we’ll compare two of these tools: DeepL Translator and Google Translator. We’ll look at how they both measure up in terms of accuracy, speed, cost, and convenience. Translation Accuracy

What is DeepL Translator ? and How does It work?

DeepL Translator is an online translation tool that uses artificial intelligence (AI) to quickly and accurately translate words and phrases.

Developed by the German-based DeepL GmbH, DeepL Translator is one of the most powerful and accurate AI translation tools currently available. The tool currently supports translations between English, French, German, Spanish, Dutch, Italian and Polish in more than 1,500 language combinations.

Although, the support for languages is limited. Users have found it to be more accurate than Google Translate.

Using cutting-edge neural machine translation technology developed by leading linguists from around the world, DeepL Translator can quickly produce high-quality translations for both professional and personal use. Its sophisticated algorithm learns from existing translations in order to ensure accuracy with each new translation project.

DeepL Translator is powered by Deep Learning technology

Some people have termed DeepL Translator a far better translator app than Google Translator as it works better at understanding the text. Perhaps Deep Learning technology has credit for it.

At its core, Deep Learning is inspired by how the human brain processes information. The technology uses a series of algorithms to recognize patterns in data and build models to predict outcomes based on those patterns.

The system works by capturing input data which is then used to train the network to recognize patterns or relationships within the data set. As a result, it can make predictions based on those patterns or relationships.

For example, Deep Learning algorithms have been used for Facial recognition software, Autonomous driving vehicles, natural language processing applications and more.

Google Translator for Translation – How does it work?

Google Translator has become an invaluable tool for those looking to translate from one language to another. It is estimated that Google Translator helps people interpret over 100 billion words a day in more than 700 languages.

It is considered the most popular free translation service on the web, used both by individuals and businesses alike.

How does this technology work?

Well, when you enter text into Google Translator, it uses a form of Artificial intelligence (AI) called Neural Machine Translation (NMT). This technology leverages vast amounts of data collected from past translations and other sources to produce the best possible translation results.

It also utilizes Natural Language Processing algorithms which analyze how words are used in sentences and phrases rather than simply translating word-for-word as some older systems did.

The result is more accurate, natural-sounding translations that can be better understood by readers in different languages.

While DeepL translator and Google Translate may be a product from different companies but the objective is the same and the technology working behind is also pretty much the same with different data set.

And since both are free, if you were using is personally (or maybe professionally even) you can check both services out and see which one is more satisfactory to you.

Enjoy the Apple Ecosystem Benefits on Windows PC if You have an iPhone

0

Finally, there is an app that lets you enjoy the Apple Ecosystem benefits if you have an iPhone and a Windows laptop combo.

Before it ruins your excitement, your Windows Computer needs to be Intel Based, there is a 63.5% chance of you having an inter-based Windows laptop.

Well, it’s easy to spot, you will find an Intel logo on either side of your laptop trackpad.

And now that you have confirmed that you have an Intel-based Windows Computer and also an important iPhone here is an app from Intel itself, that will let you enjoy the Apple ecosystem benefits the MacBook and iPhone users keep talking about.

Intel Unison lets you access your Smartphone from your Laptop. Features included are

  • File Transfer
  • Calling
  • Message
  • Notifications
  • More Features Coming Soon

Although the application supports both Android and iPhone to connect and access these features on Windows laptops, the exciting part is, it lets you access your iPhone as well.

File transfer, an Airdrop alternative.

The file transfer feature of this app lets you send photos and videos from your phone to your Windows Computer so that you can easily edit them using professional software.

Send and Recieve Messages

Alongside file transfer, you can also access all the messages you get on your mobile phone. You can also send messages from your laptop via your mobile phone.

Make and Recieve Calls from PC

The calling feature is another Apple Ecosystem feature where you can receive calls directly on your laptop. The Intel Unison app brings the same feature on Windows Computer as well where you can make voice call directly from your PC.

So, the next time, whenever you are getting a call, you can answer it from your PC itself or, call them back from your Laptop.

And you also get the notifications of your mobile phone on your laptop which means now you don’t have to worry about missing your notification if your iPhone is charging in the other room and you are working on your Windows Computer.

Are there any other apps similar to Intel Unison?

We have covered a lot of apps on our blog that let you connect your mobile phone to your Computer so that you can access some parts of your iPhone on your Laptop.

But the functionality of having your iPhone connected to your Windows laptop and accessing features exclusive to the Apple ecosystem isn’t something done perfectly by any other app.  But I surely update this article whenever I find one.

For now, you can install the Intel Unison app on your Windows laptop if you have got this Windows laptop in iPhone combo.

HomeMate Smart Power Strip Extension – Control Regular Electronics via Mobile or Voice Command

In our blog, we have talked a lot about home automation. How can we turn any regular electronic device into a smart device that can be controlled from your mobile phone or voice command?

With so many options available in the market, the devices that are not Wi-Fi enabled, you can use smart switches and smart sockets to at least switch on and switch off these devices.

Watch the Video

HomeMate Smart Power Strip Extension

HomeMate is one of my favourite brands in home automation products that I have been using for a long time. And I just got their smart power strip extension to control my studio setup using the voice command.

So I got this from amazon for Rs 2100, roughly $27. The good thing about this smart power extension is that it has multiple sockets, each with individual control through the mobile app. There are even three USB type A slots with quick charging support.

The built quality of this power strip extension is good enough for the price you will pay. It is not excellent, but it is not bad either. And considering all my purchases from HomeMate, it is working fine. I am expecting this to work fine as well.

HomeMate has an app where you can pair all their products, control them, and integrate them with Alexa or google assistant. Still, I find it easy to pair any smart device into a single app, the Smart Home app, where HomeMate products are also supported.

The pairing process is quite similar to all smart devices. You have to press the power button for a few seconds, and it will start blinking. When you tap on add new device in the smart home app, it will recognise the smart device you are trying to pair.

The three sockets on the power strip extension have individual switch buttons in the mobile app; 4th switch controls all three USB slots. So if you want two USB devices and control them separately, you can use any charging adaptor and put it in the socket.

Although the three-pin plug of this power strip is Indian type, the sockets on the power strip are universal, so I was able to plug my iPhone charging adaptor that I got from UAE and the one that I bought in India. 

After testing the individual buttons in the mobile app, I tried controlling specific buttons using the voice command via google assistant, but it did not work for some reason.

But there is a workaround, I created a scene which can be triggered using the voice command, and the same has further actions to turn on a particular switch, and it worked fine.

Everything Gamers Need to Know About Motherboards

Choosing the correct motherboard for your gaming rig is one of the most critical steps when building a powerful computer.

A motherboard’s primary function is to connect all components of your system, from the processor to peripheral connections and beyond. For gamers, the motherboard has a significant role in the performance of a build through the type of CPU and peripheral connections available.

Here we’ll cover what you should look for when going through a List of motherboards for the Ryzen 9 7900x. You should be able to find a motherboard that fits your specific gaming needs.

Understanding Motherboard Form Factors

A motherboard form factor defines the size, shape, and number of connections available. The form factor will also determine the type of CPU socket and memory slots available.

ATX: Advanced Technology Extended (ATX) motherboards are the mainstream size for full-sized towers and have a rectangular shape with six or seven PCI Express slots and upward of four memory slots.

Micro-ATX: Micro ATX motherboards have a slightly smaller rectangular shape than ATX motherboards but still provide a similar variety of connections, such as four memory slots and up to four PCI Express slots.

Mini-ITX: Mini ITX motherboards are designed for small form factor cases and typically provide two memory slots and two PCI Express slots.

Choosing a CPU Socket

The CPU socket type is specifically designed to fit only certain types of CPUs. Therefore, when choosing the best motherboard for gaming, it’s important to make sure the socket type is compatible with the CPU you intend to use. Here are some of the most popular socket types for gaming:

Intel: LGA 1150, LGA 1151, LGA 1200

AMD: AM4, FM2+, sTR4

Understanding DIMM and RAM

Random Access Memory (RAM) is a critical component of any gaming build. Most motherboards have four or more Dual Inline Memory Module Slots (DIMMs) dedicated to RAM. Make sure the motherboard you choose matches the type of RAM you’re using.

  • DDR3 RAM: Most motherboards with LGA 1150 and 1151 sockets support DDR3 RAM.
  • DDR4 RAM: Most motherboards use the DDR4 standard. This is the current type of RAM that is most widely used.

Understanding Expansion Slots

Expansion slots are the interface used to connect additional components to the organization’s system.

The expansion slot of a motherboard will determine what type of video card, network card, sound card, etc. can be connected. The type of expansion slot you need will depend on the type of parts you need to install.

  • PCI Express x16: This is the most common type of expansion slot and the one used for graphics cards. Most motherboards have one or two of these.
  • PCI Express x1: Used for connecting additional components such as Wi-Fi cards, sound cards, modems, etc., these slots are much smaller and less powerful than an x16 slot.

Understanding Overclocking

Overclocking is manipulating a system’s components to speed up a processor beyond the rated speed listed by its manufacturer. Many gamers overclock their CPUs to enhance gaming performance.

Overclocking may involve increasing the speed of the memory and processor core voltage and adjusting the system’s cooling system to ensure stability.

Different motherboards have different overclocking capabilities.

For example, motherboards with more robust power delivery systems can handle increased voltages, while those with fewer power delivery system components may not be able to handle more voltage and heat. Motherboards with more advanced BIOS usually allow for more flexibility when overclocking.

Microsoft’s VALL-E is an AI Tool That Can Speak in Your Voice with 3 Seconds of Sample Audio

0

Microsoft has been working on a new tool called VALL-E that can clone anyone’s voice with a second audio sample of that person. The tool uses Artificial Intelligence to create a natural-sounding voice.

Text-to-speech (TTS) technology has been around for some time, and Artificial Intelligence (AI) is changing how it works. AI is being used to improve text-to-speech capabilities.

I am assuming that this AI-based technology VALL-E, will complement Microsoft’s existing Speech Studio which has a dozen realistic human-like voices.

Microsoft is investing heavily in AI

VALL-E sounds similar to DALL-E, an AI product from OpenAI launched in 2021, where Microsoft has invested huge amounts of money. DALL-E is now in its second version called DALL-E 2, launched in 2022, which creates images from text prompts. The Images are quite realistic.

For example, when the prompt given to create Avacado Chair, here is one of the images it created.

Open AI launched ChatGPT in 2022, which attracted over 1 million users in just 5 days of its launch. It’s currently in Beta version so it is free to use

Microsoft made a $1 Billion investment in OpenAI in 2019. And it will be investing another $10 Billion in the company.

Here’s how VALL-E works

All though it has not been released to the general public yet Microsoft has showcased how VALL-E works and has put up some samples on a demo page on GitHub.

The page has many – second sample voices of people and VALL-E converting text in the same voice. In the demo, it states the AI is also capable of depecting the acoustics of the orginal sound. If it’s a telephonic voice sample, the text any be convered the same telephonic type voice.

It can also depdict the emotion and put that one the voice created using Text-to-Speech.

The Potential Risk of Voice Cloaning

Like every other technology, this one also has its pros and cons. I can see tools and services building on top of these technologies. For Example, maybe you have a sample voice of your deceased loved one. You can still talk to them and they will reply to you.

But there is also DeepFakes, which can be really nasty political tool as we have already seen several of them. With tools like these becoming more accessible, we will be seen more such videos.

VALL-E, is not the first product that clones a human voice. There already tools available, but the difference is, the amount of sample data they require.

There is a tool called Discript, which can also clone your voice. It offers a text based editing for Podcasts, where you can use clonsed voice to easily dub words between your orginal Podcast.

But it requires you to authorize it for closing your voice and you have to speak for a few minutes, then it will upload the data to its servers, and the process takes sometime before you are able to use the cloned voice.

With VALL-E creating and cloning voice with samples as short as 3 seconds, things are going to be a little more scary. Microsoft nose that, and they have included ethics statement on the demo page itself with says,

Since VALL-E could synthesize speech that maintains speaker identity, it may carry potential risks in misuse of the model, such as spoofing voice identification or impersonating a specific speaker.

We conducted the experiments under the assumption that the user agree to be the target speaker in speech synthesis. If the model is generalized to unseen speakers in the real world, it should include a protocol to ensure that the speaker approves the use of their voice and a synthesized speech detection model.

Make Video on Any Platform Popout and Play in Floating Windows with this PiP Video Chrome Extension

0

Here is a cool tip for people who work on their laptops and want to be productive at the same time.

Video is everywhere. And it is a better medium to gain information about something. Be it a video on Youtube, or a video embedded on a website here is an easy way to pop that video out of the website and let it float on the top of every window opened on your laptop so that you can continue doing something else while watching the video.

Usually, get my work done when I can it my laptop with my 4k monitor so that I have an extra screen to work. But when I am using only my laptop, I am limited to the full HD screen only.

I do it all the time, sometimes I watch a Netflix Show which does not require 100% of my attention, I can use this PiP Chrome extension which will Pop-out the video so that I can casually browse other websites.

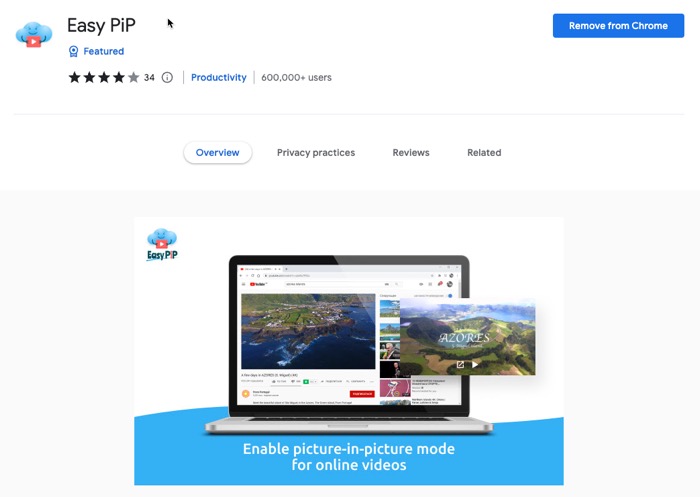
It’s a pretty cool Google Chrome extension that automatically gets added to my google Chrome whenever I add it to a new computer and log in using my google credentials.

The good part about this Chrome extension is that it also works on websites where the video is embedded, either why are YouTube or any other source. For example, there are a lot of videos on our website as well.

And you can use the Chrome extension to pop that out and let it float so that you can continue watching our tutorial, or any other information video while browsing other tabs.

I have been using it for the last few years and anyone in my friend circle sees this in action on my computer and gets excited.

And now you also know how you can Pop-out any video from any website so that it floats on top of every window on your computer.

If you want to only pop-out videos from YouTube, you can install the Chrome extension called Enhancer for YouTube which has many other features to actually enhance your YouTube experience.

Enhancer for a Youtube Chrome extension will add a bunch of extra buttons below every YouTube video. These extra buttons let you control different aspects of your video.

One button will make it play in the loop, which is quite useful when you are listening to songs, or meditation sounds (rain sounds or ocean sounds etc), and you want it to play on a loop.

There is a button which will focus more on the video player and will darken everything else on the YouTube website.

The Enhancer for the YouTube Chrome extension also has a feature to easily change the speed of the video player, or maybe take a screenshot, to create a meme out of it, or your use case would be anything.

And like I said, it also has the option to Pop-out the YouTube video in a floating window. And fortunately, this window wants to stay on top of every other window. So maybe this will not work in your favour if you do not have extra screen real estate.

The Easy PiP Chrome extension makes more sense when you are screen space is limited and you want to multitask.

Pop out & Play Facebook Videos on Mobile Outside the App

Facebook now lets you play the videos on its platform while you are scrolling your newsfeed for the next video to play. You can even play it outside the app, something like Facebook Messenger Chat Heads, that can float on your Mobile phone anywhere.

There is no denying how aggressively Facebook is promoting itself as a video platform, my newsfeed is filled with Videos. It is directly competing with YouTube. I’ve actually written about it in detail.

Undoubtedly, YouTube is still the king when it comes to Videos, but there are a few features Facebook has nailed, like the ability to keep scrolling through the news feed while still watching the video. It was earlier enabled for the desktop version of Facebook. You could play Videos on Facebook while scrolling on the Desktop.

Also, here’s a cool way to PiP videos from any website (Facebook, Twitter, YouTube etc), and it plays on top of every other window on your laptop screen.

Play Facebook Videos anywhere on your Mobile

I know how addictive the videos that appear in Facebook Newsfeed are, they Autoplay one after another, making it tougher to get out of the loop.

Update: Facebook has moved their settings in the latest design list, so you might have to find these settings which aren’t the way this tutorial shows. But it’s easy to find and enable Pop-up videos. 

Thankfully this feature will save little of our time since we can now at least scroll and view other stuff while the videos play.

To enable it, 

  • Find the Popout icon on the top left of the video player. 
  • The Facebook app will require your permission to overlay the video over other apps. 
  • Once you allow it, the video can appear on the corners of your mobile phone while you scroll your newsfeed.

If you tap on Home button, the video continues to play even when you exit the Facebook app.

The action is not as snappy as it should be but is still a big time saver if you too find yourself stuck in the Facebook video loop.

While this is an app-based feature bought by Facebook, a similar feature will be natively available in Android O and is called Picture-in-Picture. Google has already given a demo at the Google I/O, 2017. It will initially work on YouTube though.

But having this feature built-in natively in the Android OS is not enough, considering only less than 7% of the total Android user base is on Android Nougat, which was released last year.