How to Create the Viral Infinite Zoom Videos from Photos Using AI | Step by Step Tutorial

0

You may have seen those viral infinite zoom videos that seem to zoom endlessly into an image, revealing finer details with each magnification.

While these videos can sell the illusion of infinite scale, they are actually clever video effects created with AI.

Here’s how to make your own infinite zoom videos from still photos.

Watch the Short Video Tutorial

What is the Infinite Zoom Effect?

The infinite zoom effect, also called a fractal zoom, appears to seamlessly zoom in on a static image, uncovering more facets and patterns continuously. In reality, this effect is produced by AI generative algorithms hallucinating artificial details and enhancements.

Each “zoom” is just an AI rendering more image content that doesn’t exist in the original. But the effect mesmerizes viewers when well-executed.

Using AI to Create Infinite Zooms

Specialized AI tools can transform photos into infinite zoom videos automatically:

  • Online AI services like MidJourney use text prompts to generate fractal zoom animations. This requires a paid subscription.
  • Video editing apps like VideoLeap offer infinite zoom templates. However, some features require paid upgrades.

Creating Infinite zoom video using Mid Journey

If you want to create infinite zoom video using Mid Journey, you will have to use a combination of tools to do that because mid journey will only give you an output of a zoomed out photo.

You will have to do this a couple of times. For example, you can put your picture in Mid Journey’s discord server (I hope you know how Midjourney works), with a prompt, now when you get the output, repeat the process, 2 to 3 times.

This way, you will get multiple photos at different zoom levels. You can then import these photos in your favourite video editor, to make them look like as if it is a single file.

If you have no idea how to do that and it’s looks quite complex to you. Here is an easier one click solution. Like I said, there are multiple free tools available that will let you do this infinite zoom effect.

While AI-powered mobile apps may have limitations, they provide easy infinite zoom creation without advanced creative skills.

Creating Infinite zoom video using Videoleap

My favourite tool is Videoleap, which is available for both android and iPhone. And it is pretty easy to create this effect on any photo. The only catch is, free version will have a watermark on the output. If you want a watermark free video, you can upgrade to the pro version.

But, if you don’t want to spend money, here is how you can use the free version and still be able to remove the watermark, well, technically.

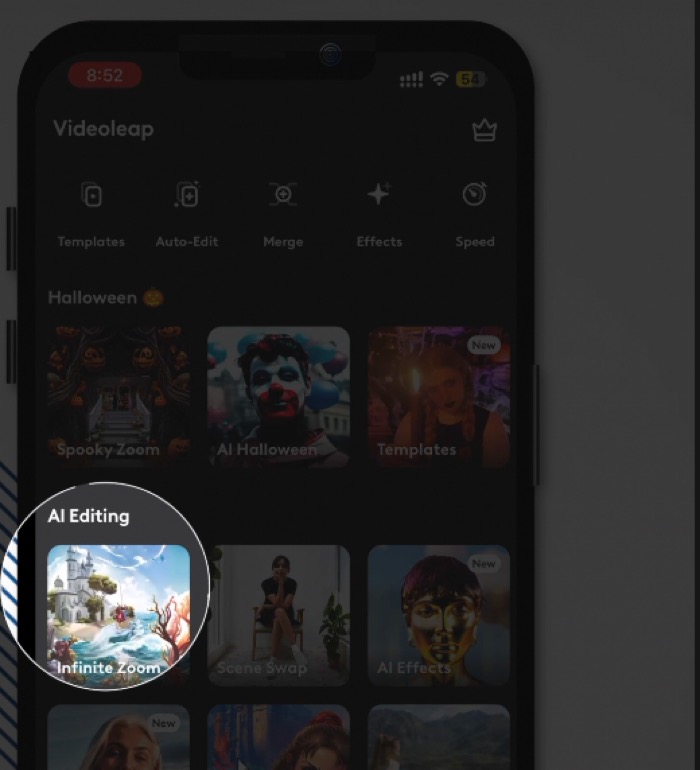
Install the Videoleap app on iPhone, or Android and then open it. You will find plenty of AI features on the start-up page. Select the infinite zoom effect. After that select the photo you want to add effect on.

Tips for Making Compelling Infinite Zooms

  • Use portrait orientation photos without too much clutter.
  • Photos with geometric patterns or fractal-like details work best.
  • Overlay music for added mesmerizing impact.

You will have to wait for up to 60 seconds to get the output. Once you get the output, you can save it on your mobile phone.

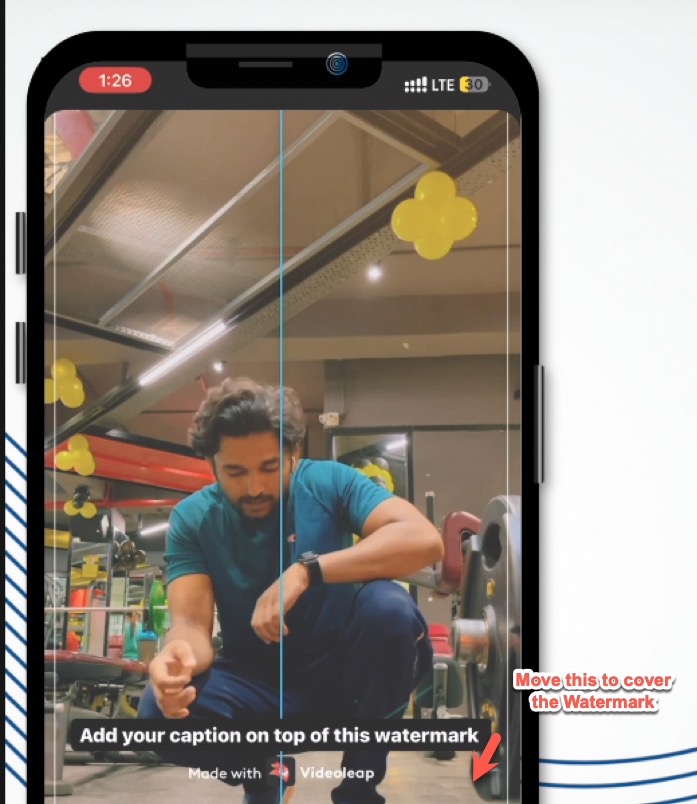
this output will actually have a watermark. If you’re using the free version so here is how to remove the watermark or actually hide it.

When you are posting it on your story or posting it as a Reel. Add a caption on your video. You can use AI tools like ChatGPT to come up with a creative caption, if you are lazy like me.

Add the caption just wear the watermark is appearing. This will hide the watermark. Genius, isn’t it?

With the power of AI, infinite zoom illusions are now accessible to anyone. Let your viewers get lost exploring an endless vortex hidden within a single static glimpse. Just be sure to credit the AI assistant who brought your imagination to life!

Here’s Five Best Accessories for iPad to Make the Most out of it

If you recently have an iPad or are planning to buy one, here is my recommendation for buying accessories. 

The hardware of the iPad is capable of being used as a full-fledged computer, but the iPadOS is a bit limiting when compared to a full-fledged operating system like macOS or Windows OS. 

Regular computing to get things done can be achieved if you purchase the accessories that will help you use your iPad in the best way possible. 

Watch the Video

Get a magnetic case for the iPad

The #1 accessory is to get a magnetic case. When you buy such an expensive device, you should spend some money to buy a good case to protect it. 

But at the same time, it should not be clumsy or bad and quality that takes away the joy of using such a nicely built iPad. That’s why I recommend everyone to get a magnetic case. Surely, it’s double the money. But it’s double the fun as well.

Magnetic cases can be easily removed from the iPad, so you can take off the magnetic case and enjoy it when you’re using your iPad for watching Netflix or random browsing while in your bed. It will also be lighter since the case will not be extra weight.

Logitech K380 Bluetooth Keyboard

It is one of the cutest keyboards I purchased for using it with my MacBook when I use it in closed-display mode, but I found that it is also compatible with iPad. It is even advertised as one. 

So, if you need more money to spend on the Apple Magic keyboard, this is the second best, affordable choice. It is also travel-friendly, so you can easily slide it into your bag and carry it with your iPad if you plan longer writing sessions.

I cannot stress enough how useful it is to have a physical keyboard. Read our full review

A ₹2500 Apple Pencil Knockoff 

If you are an artist who loves to sketch and have bought the iPad to try drawing or learn it, I suggest you go for the official Apple Pencil. 

But if you want to experience what it is like to use a pencil on an iPad for highlighting or doing signatures, then you can get those third-party Apple Pencil knockoffs. 

These will be one-fourth of the price of the original Apple Pencil but will have 90% of the functionality. 

The only thing missing would be wireless charging and pressure sensitivity, which is crucial for drawing. 

I have been using a knock for the last several months, and the way I use it, I am thankful that I have yet to spend money on Apple Pencil because it would have been a waste of money. Read full review

Samsung T5 SSD

I have the 64GB internal storage, fourth-generation iPad Air, and I opted for the 60 4GB version, which has effectively got around 50 GB of storage, which is less if you install many apps. 

This is why getting an SSD can be really helpful. All the iPads have type C slots, and the SSD can be easily connected to them. 

Apps like LumaFusion will let you directly edit files from the SSD. 

A USB type C Hub

iPad is a fantastic device, but it only has one slot type. You can use it for data synchronisation, adding accessories or charging it. 

This is why a USB type C hub is crucial because he can do all of these things simultaneously. 

You can connect it to a monitor to get a more prominent display. The latest iPads covered by M1 chip can extend the display to an external monitor, giving you more room to work on your apps. Other USB type C hubs can be used for adding additional accessories, such as the SSD. 

How to Use Your iPhone as a Wireless Mic for Your Mac

0

Thanks to the Continuity Camera feature in macOS Ventura, you can use your iPhone as a wireless microphone to dictate, record, and capture audio on your Mac.

This provides a convenient way to add high-quality audio input to your Mac even when you’re away from your desk.

What You Need

  • An iPhone running iOS 16 or later
  • A Mac running macOS Ventura or later
  • Both devices signed into the same iCloud account

Setting Up Your iPhone as a Microphone

First, make sure your Mac and iPhone are updated to the latest operating system versions.

On your Mac, go to System Preferences > Sound. Under the Input tab, you will see a device option labeled “iPhone Microphone.” Select this as your input source.

That’s all you need to configure your iPhone as a wireless mic for your Mac!

Using Your iPhone for Dictation and Recording

With your iPhone set as the microphone input, you can now use it for:

  • Dictating messages, notes, documents etc. into any app
  • Recording vocals or instruments in GarageBand
  • Using Siri hands-free commands
  • Making and receiving phone calls through your Mac
  • Capturing audio for videos or podcasts

The iPhone mic will work anywhere a mic input is required on your Mac. You’re free to move around while maintaining high quality audio capture.

The benefits of This Integration

Using your iPhone as a Mac microphone provides great flexibility. Key benefits include:

  • Mobility to move around while dictating or recording
  • Leverages iPhone’s high-quality microphones
  • Easy access to notes or messages captured on iPhone
  • One less hardware peripheral needed

With just a quick settings change, your Mac can tap into the power of your iPhone’s mic. This brings convenience and great audio performance thanks to Apple ecosystem integration.

Exploring new use cases

The new MacBook Pro and MacBook Air are equipped with high-quality microphones which can record studio quality audio. But older Mac computers, where there is no high-quality microphone, and it is still upgradable to macOS Ventura, you can utilise this feature to record high-quality audio.

You can also use the iPhone’s microphone for zoom meetings or simply for doing voice overs. It just lets you use a high-quality camera that is already in your pocket, without having to spend money on any additional hardware.

What’s the Next Best Solution?

I know it’s cool to use this setup for recoding your audio in high quality, but it requires you to have both the devices. That’s why I recommend the Rode Wireless GO II mic for every creator. You get all the benefits of Wire-free experience without compromising with the quality.

It’s a must have for every content creator out there. Read my review of how I am utilizing it in different use cases.

AudioScribe Lets Your Random Thoughts into Meaningful Text

I am a big fan of tools that speed up my work, so that I can become more productive. 

On the blog, I have shared quite a lot of useful tools for that. 

Watch the Video

Write Faster (and Better) with Voice to Text Tools

Here is another cool tool that will let you write anything without actually typing on your keyboard. The best part is, it works on mobile phones as well. 

And it is quite useful on smartphones, because you can’t really type fast on virtual keyboards.

The tool is called Audio Scribe from Dictanote. It is actually from the same developers who have created this amazing chrome extension called VoiceIn

The VoiceIn Chrome extension gives you real time transcription, just like like you get in Google Docs Voice Typing, because it uses the Google speech to text API.

Voice to Text Powered by AI

Audio Scribe, is powered by AI, which does an amazing job at transcription. This tool also fixes your random words into sensible sentences using the AI.

Currently, there is no app which you can install on your mobile phone so the Web App will be accessible on any web browser but for iPhones it only supports the Safari browser.

Simply open Dictanote.co, sign up and find Audio Scribe in the left sidebar (on desktop) and on bottom right (on Mobile), tap on the record button (allow the browser to use microphone) to start recording your audio. 

The free version let’s record audio for three minutes. An order then automatically stops and start transcribing and giving you a formatted output.

If you subscribe to their Pro plan, you will get to record 15 minutes of audio at a time, with some more functionalities which you can check out on their subscription page.

A Tool Similar to AudioScribe

Previously, I have shared a similar tool called Audio Pen which works exactly like this one. I’m surprised it took so long for the developers to replicate something like that. 

Well, these both the web apps are quite amazing, especially because they are accessible on smartphones and you can talk into your microphone. Whatever idea you have and it will format it nicely so that it makes sense to you when you read it after a few days.

The Limitations of AudioScribe (and Similar Tools)

The only issue is the default formatting option in the free version is too restrictive and sometimes summarise your audio way differently than you would want it to.

And yes, the developers have solved this problem by offering the solution. But the solution is behind the pay wall. You have to subscribe to their provision to get these options.

If you’re okay using the free version, it’s still great to simply note down something that is in your mind and you don’t want to type using the keyboard. In fact, if you write long form content on social media platform or on a blog, this can be really useful.

Use my Custom Shortcut – Dictation Pro

But if you don’t want that limitation and on an iPhone here is an iPhone shortcut that I created for myself. I have named it dictation Pro and it works quite similar to these web apps.

But instead of having a limitation of only three minutes of recording, you can use it to transcribe after 30 minutes of audio. It will transcribe and format it and then automatically save it in your notes app on your iPhone..

The only thing required is Open API key, and you will be charged of your usage. Here are the plans from the open AI pricing page

ModelInputOutput
GPT-4With broad general knowledge and domain expertise, GPT-4 can follow complex instructions in natural language and solve difficult problems with accuracy. Learn about GPT-4$0.03 / 1K tokens$0.06 / 1K tokens
8K context$0.03 / 1K tokens$0.06 / 1K tokens
32K context$0.06 / 1K tokens$0.12 / 1K tokens
GPT-3.5 TurboGPT-3.5 Turbo is optimized for dialogue. Learn about GPT-3.5 Turbo
4K context$0.0015 / 1K tokens$0.002 / 1K tokens
16K context$0.003 / 1K tokens$0.004 / 1K tokens
Audio modelsWhisper can transcribe speech into text and translate many languages into English. Learn about Whisper
Whisper$0.006 / minute (rounded to the nearest second)
Older modelsWe continue to improve our models and periodically retire older, less used models. View pricing and info for older models

Here is a simple calculation for you, like how much will it cost you for one minute of audio transcription. 

Download My custom iPhone shortcut from this link, It costs $1, and you can have it for the lifetime. The API cost will depend on your usage, but it will be still way less than the monthly subscription plans of these web apps.

I am personally comfortable paying for what I am using or getting an unlimited plan rather than subscribing to another monthly plan. If you feel the same and you own an iPhone, you can use the Dictation Pro iPhone shortcut.

Easily Remove Vocals From Music With this AI Tool

0

Need to isolate vocals or instrumental music from an audio track? Thanks to advancements in AI, specialized web apps can magically separate vocals and music with just a few clicks.

Check out the Video

Check out VocalRemover.org

VocalRemover.org is a free web app powered by AI that splits audio into two isolated tracks:

  • Vocals only
  • Music/instrumentals only

It works by analyzing the unique characteristics of vocals compared to accompanying music. The AI then intelligently extracts the voice, leaving just instruments behind.

To use it:

  1. Go to VocalRemover.org
  2. Upload your chosen audio file or enter a YouTube link
  3. Click “Separate Vocals” and wait for the AI to work its magic
  4. Download the isolated vocal and instrumental tracks

VocalRemover does an shockingly good job isolating the vocals, providing studio-grade splits.

Use Cases for Vocal Removal

There are many creative uses for stripping vocals from music:

  • Make custom karaoke tracks by removing vocals from popular songs
  • Sample acapella vocal riffs for remixes or music production
  • Create meme-worthy clips from movie dialog with music removed
  • Produce soundtrack instrumentals for video projects
  • Remove background music from audio recordings to isolate speech

For Content Creators

For YouTubers, streamers, podcasters and other content creators, VocalRemover is an invaluable tool. You can erase background music from clips flagged for copyright issues. Or liven up stale footage by laying new music underneath.

The AI vocal/music separation opens up new creative possibilities for audio and video editing. And it’s completely free!

I have previously shared a similar type of trick to remove background music from vocals. The tool is called Descript.

While descript provides similar vocal isolation capabilities, its limited free plan makes VocalRemover.org an appealing forever-free alternative for casual users.

By leveraging the power of AI, tools like VocalRemover make tasks like music production, editing, and content creation far more accessible. The future of AI-assisted creativity is bright!

If you are a content creator, check out our Content Creator Guide series to make better content.

How to Block Adult Sites for Kids

As a parent and a member of your family, you may not want certain sites to be accessible to kids or even grown ups on your household.

In today’s age, when everyone has their own devices, keeping a tab on everyone’s online activities is quite hard. Surely, you can make a set of rules to be followed. Here are some general tips that may be helpful.

Educate Your Kids About Online Safety

  • Have open conversations with your kids about online safety and setting boundaries on what sites they visit. Establish shared guidelines.
  • Use parental control features built into your operating systems and devices. All major platforms like Windows, iOS, Android have options to restrict access.
  • Install family safety apps or DNS filtering services designed to block unsuitable material. Research reputable services.
  • Enable safe search settings on browsers, YouTube, and search engines to filter explicit results.
  • Place internet-connected devices in open family areas rather than private spaces.
  • Set screen time limits on devices to control exposure.
  • Monitor browsing history periodically, with your child’s knowledge.

The most effective strategies involve education, communication, and mutual understanding.

Despite doing all this, but content, not suitable for kids, will still find its way to their devices. This is why you need to use solutions available to block these websites.

Using DNS Filtering for your Home Wi-Fi

DNS (Domain Name System) filtering allows you to block certain websites and content by routing domain requests through a filtered DNS server.

Rather than connecting directly to the website’s IP address, requests first pass through the filtering DNS which can deny access.

Benefits of DNS Filtering

Some benefits of setting up DNS filtering on your home WiFi include

  • Blocking access to inappropriate, dangerous or distracting sites like pornography, gambling, etc.
  • Safeguarding children from viewing adult content and predators.
  • Increased privacy by blocking ad trackers and malware domains.
  • Ability to set filtering rules and whitelists for each device.
  • Works across all connected devices and browsers that use the WiFi.
  • Many free and paid filtering server options.

How to Set Up DNS Filtering

To enable home DNS filtering, you’ll need to:

  1. Choose a filtering DNS provider like OpenDNS Home or CleanBrowsing.
  2. Configure your router’s DHCP settings to assign the filtering DNS servers rather than your ISP’s servers.
  3. Set your router’s DNS settings itself to also use the filtering servers.

With the right DNS filtering service configured on your home router and WiFi, you gain better control, security and privacy across your networked devices.

Do it on Individual Devices

If you don’t want to put restrictions on the entire home network, you can block sites, on individual devices.

For Android Devices

Go to your Android phone’s settings. Search for Private DNS and open it. Tap on Private DNS and type in DNS Provider Hostname ‘family-filter-dns.cleanbrowsing.org‘. Save it. Now, no adult website will open.

For Apple Devices

To set this in your iPhone, go to Cleanbrowsing.org/filters Scroll down and tap on Family Filter. Here, you have to do Download Configuration. Press Allow.

Then, go to iPhone’s settings. Go to Profile Download and tap on Install. Install again and done. No wrong websites will open.

If your kids are under 13 years of age, and they have their own devices, you should consider creating their Gmail accounts, which will let you control ther devices as parents. It has more control than just blocking unwanted sites. Check out detailed article.

How to Track Your Lost Android Mobile using Google Find My Device

0

Losing a smartphone is always a Nightmare especially when does not want his expensive and you have got a lot of personal data on it.

Thanks to the technology available, it is now possible to track a mobile phone, and thanks to Google for making it easier than ever before so that anyone can track their own mobile phone using their Google account credentials.

Before we go any further to talk about how you can track your lost Android mobile, I would like to mention a few important things that will allow you to use this feature.

Here are the things you should do if you lose your Mobile Phone. This is Important

✔ You should have a Google account added to your Android smartphone. This is very likely that you do have Google account added if you have used Play Store to install apps, navigated using Google Maps and whatnot.

✔ Just make sure you know your Google account login credentials because you will be needing them to login clear Google account from PC.

✔ The other thing is that, in order for this feature to work, your phone needs to be connected to the internet. Fortunately, with mobile data getting cheaper and more accessible majority of us have got at least the mobile data on, on our smartphones.

Enabled ‘Find My Device’ on Android ASAP

You need to have this enabled before it gets lost. If this is not enabled, this method will not work. 

You can enable Find my Device by going to the security section from *Settings then tap on Device manager. You will find the ‘Find my device’ option and make sure it is checked.

*This may be different depending on the smartphone OEM.

Tap on back to go back to the settings area again then tap on ‘Location’, and make sure it is turned on with location method being ‘high accuracy‘.

Below the same window, you will find ‘Location history‘ make sure it is also turned on. If you have multiple devices signed into a single Google account, make sure all your devices are turned on for location history.

Note: Mostly all these settings are turned on by default, but it is better to verify it to avoid any mishappening.

How to track your lost Android mobile using Google find my device manager

Open Google Chrome Browser on your laptop or PC, and make a Google search something like ‘find my phone location‘ or, ‘track my phone‘. You will find the option to track your mobile phone right on the search result.

You get two direct options one is to Ring your smartphone, which will bring it for next 5 minutes (even if your phone is on silent mode),

This is quite helpful even if your phone is not lost and you just looking at it in your home and it’s on silent. Using this trick you can bring your phone and find it, I guess 5 minutes are more than sufficient to turn your phone upside down to look for the smartphone.

Anyway containing to the tutorial,

You can click on the ‘Recover’ option on the search result to find more information about your smartphone. Alternatively, you can click on this link to go directly into Google Find My Device Manager.

You can also type directly in your browser address bar, it would be ⟶

myaccount.google.com/find-your-phone.

In Google Find My Device Manager, you can locate your smartphone on Google Maps to a very high accuracy.

Please note that Google would show the last location recording when the internet was enabled on the smartphone.

  • You can also check whether the smartphone is connected to a Wi-Fi and how much battery is left on the smartphone.
  • You can Ring your phone,
  • You can lock it down and log out of your Google account, and,
  • You can even erase all the data on your device remotely, which would be the last resort and it’s just the data you are worried about.

Check out this video tutorial showing you how this feature works.

If you’re looking to track your lost iPhone you can check out this article.

What To Do If You Lose Your Mobile Phone – A Step-By-Step Guide

Losing your mobile phone can be extremely stressful. Your private data, accounts, and contacts are suddenly compromised. Thankfully, there are steps you can take to protect your information and prevent misuse if your device goes missing.

Act Quickly to Remotely Lock Your Phone

Immediately remote lock your phone using the device manager app. For Android phones, use Find My Device. For iPhones, use Find My iPhone.

Remote locking secures the device with a passcode and displays your contact details on the lock screen. This prevents access and alerts good Samaritans about returning your phone.

Temporarily Suspend Service to Disable Functionality

Contact your mobile carrier quickly and request suspension of service for the SIM card in the lost phone. Temporarily deactivating service renders the phone unusable for calls, texts, and data.

This is crucial to prevent misuse of calling, messaging, and consuming mobile data on your account. Most carriers can instantly suspend service once notified.

Erase All Personal Data Using Remote Wipe

If there is no hope of recovery, remotely factory reset the phone using your device manager app. This erases all accounts, contacts, apps, media, and other private user data.

Wiping the data ensures your info doesn’t fall into the wrong hands if the device isn’t retrievable. It’s an essential safeguard of your privacy.

Change Passwords and Beef Up Account Security

Take action to protect online accounts that may have been logged in on the lost device:

  • Update passwords on accounts like social media, email, and financial apps.
  • Enable two-factor authentication wherever possible.
  • Watch for unauthorized access attempts and review account activity regularly.

Removing Access and Unlinking the Lost Device

Go through accounts connected to the lost phone and unlink it:

  • Remove the phone number from online accounts like social, shopping, and other apps.
  • On iPhones, use Find My iPhone to unpair the missing device from your iCloud account.
  • On Androids, remove device access via your Google account settings.

Inform Contacts About the Missing Phone

Let friends, family, and coworkers know about your missing phone in case they are contacted fraudulently from your number.

Warn them not to send sensitive info or engage with any suspicious communications from your device. This helps prevent social engineering attempts.

By taking quick, proactive measures, you can mitigate risks and prevent negative consequences if your mobile phone is lost or stolen. Act fast to lock it down, wipe it out, and wall it off.

5 Ways to Retrieve Your Mobile

After you have done the following steps mentioned in this article, you can try retrieving your mobile phone.

If there is mobile data connection on your mobile, all is not lost. You might still be able to retrieve your mobile phone. Check out this article that goes in detail about different ways you can try retrieving mobile phone.

How to Track Your Lost Android Mobiles

If you have lost your android mobile phone, you might be able to get your smartphones location using google feature called find my Device.

For this to work, you will require the same google account which is locked into your android mobile. Use a computer and or different mobile phone to access find my device. Do a google search with the keyword ‘Find my device’ and click on the first link, or directly click on this link. Check out this article for a detailed step by step guide

How to Track Your Lost iPhone

Similar to the Android’s ‘Find My Device’, the iPhone also has a feature called ‘Find My’. In fact, it’s a better than Android’s ‘Find My Device’, because even when your iPhone’s battery dies, some amount of battery is reserved to make the phone findable.

Which means, you will be able to track the exact location of the lost iPhone. There are also some third party apps that can help you find your lost iPhone.

Check out this article that goes in detail about different apps that will help you get your iPhone back.

Should You Buy a Chromebook in 2023?

Chromebooks saw huge growth over the past few years as budget-friendly, web-focused laptops. But with sales slowing in 2022, is a Chromebook still a smart buy in 2023? Let’s examine their pros, cons, and outlook.

They were quite a thing a few years ago. I loved them, loved them so much that I bought three of them. I still have the Samsung Chromebook Plus.

But I hear the term ‘Chromebooks’ a lot less in 2023. Are people done with it? are there any better alternatives? or are Tablet PCs a true replacement? we find out in this article

The Appeal of Chromebooks

Chromebooks are laptops running Google’s Chrome OS operating system. Their key advantages include:

  • Low cost, with models starting around $150-$200 new. Great value.
  • Instant boot-up and software loading thanks to solid state drives.
  • Long battery life, commonly 10+ hours. Great portability.
  • Auto sync and backup to the cloud. Easy accessibility.
  • Regular OS and security updates direct from Google. High reliability.

These factors made Chromebooks a hit, especially in education. They provide a streamlined experience for basic web browsing and Google Workspace apps.

Slowing Sales and Competition

However, after years of growth, Chromebook shipments slowed in 2022. Contributing factors include:

  • Weakened demand from schools as education budgets declined post-pandemic.
  • Supply chain constraints hampering production and inventory.
  • More competition from discounted Windows laptops and tablets.

While still maintaining 13-15% market share, Chromebook’s momentum has slowed. Tablets and low-cost PCs are luring some budget buyers.

Chromebooks Launched in 2023

HP Dragonfly Pro Chromebook

The HP Dragonfly Pro Chromebook is the best overall Chromebook. It is a premium device with a sleek design, powerful performance, and long battery life. It also has a number of business-friendly features, such as a MIL-STD 810G durability rating and a fingerprint reader.

HP Elite Dragonfly Chromebook

The HP Elite Dragonfly Chromebook is another great option for business users. It is similar to the Dragonfly Pro, but it has a slightly lower price tag. It also has a number of security features that make it ideal for use in the workplace.

Acer Chromebook Spin 714 (2023)

The Acer Chromebook Spin 714 (2023) is the best Chromebook for most people. It offers a good balance of performance, features, and price. It has a 13.5-inch touchscreen display, an Intel Core i5 processor, and 8GB of RAM.

Samsung Galaxy Chromebook 2

The Samsung Galaxy Chromebook 2 is a great choice for media consumption. It has a beautiful 13.3-inch AMOLED display and a powerful Intel Core i5 processor. It also has a built-in S Pen for taking notes or drawing.

Asus Chromebook CX5601

The Asus Chromebook CX5601 is a good option for students. It is affordable and has a long battery life. It also has a 15.6-inch display, which is larger than most other Chromebooks.

Tablets are Becoming More Like PCs

Apple’s iPads have reduced the line between a Tablet PCs and an actually PC or Laptop. With a range of accessories available for Tablets like iPad, Samsung Tab and Tabs from other OEMs, the Tabs are capable of doing a lot more than they used to do a few years ago.

Google’s itself is working on their Pixel Tab, powered by Android.

Here are some tablet PCs with detachable keyboards that can serve as alternatives to Chromebooks

Microsoft Surface Pro

The Surface Pro tablets run Windows and have detachable keyboard covers and pen input. Great laptop replacement.

Microsoft Surface Go 3

More affordable and portable Surface tablet with keyboard cover option. Runs full Windows.

Apple iPad Pro

Powerful iPadOS tablet with keyboard case and Apple Pencil support. Great for creative work.

Lenovo Yoga

2-in-1 tablets with 360 degree hinges and keyboard. Run Windows. The Yoga Book is especially slim.

HP Elite x2

Business-oriented tablet with keyboard case and Windows OS. Good performance.

Samsung Galaxy Tab S7/S8

Android tablets with attachable keyboard covers and S-Pen. DeX mode for productivity.

Asus Transformer – Windows tablets with docking keyboard design. Transformer Book series are high performers.

Acer Switch Alpha 12

Detachable 2-in-1 tablet with keyboard dock. Fanless. Runs Windows.

Google Pixel Slate

Now discontinued but can still find them. Detachable keyboard and pen input. Runs ChromeOS.

More articles about Chromebooks

What Happens When You Delete A WhatAapp Message with A Single Tick ✅

It can be embarrassing if you send a message to someone on WhatsApp that you regret later, and WhatsApp it.

This is why they introduced the Delete for everyone feature. With the feature, users were able to delete the messages they’d already sent under the 7-minute window.

If you’ve spent more than 7 minutes sending the message, the feature can’t help you, because it won’t be there. You have now 2 days to request to Delete the message.

Watch the Video

It has saved me from so many bad situations when I commit to something in a flow, but then delete the message and replace it with another one, a diversion message to avoid that awkward moment.

It makes people think the deleted message might be a typo or something similar to the one they’re reading but a better rephrased one.

What happens when you delete a message that has a single tick ✅?

Let’s just understand what different ticks mean, if you already know, you can skip this part.

Single tick ✅ means, the message you sent, has gone to the WhatsApp server, and has been saved there,

Double tick ✅ ✅ means, the recipient’s Whatsapp has internet access and the message has been delivered.

Blue double tick ✅ ✅ means, the recipient was online on WhatsApp and they’ve read the message.

You have the feature to delete the message in all of the three stages as long as it’s under 7 minutes.

And in all cases, the message will be deleted, and “Deleted for everyone” will be shown like in the screenshot. The recipient will know a message has been deleted.

Some people are confused as to whether this will be displayed if it’s just a single tick ✅ since it’s not been delivered yet.

But the message is already on the servers, it just has to be delivered to the recipient’s phone.

So, it appears to let them know a message was se deletent but it got deleted.

How to Delete. A WhatsApp Message

If it is not clear already here is how you can delete our message after sending it. Long press on the message you want to delete, you will get these options in the popup, tap on delete.

On the next screen tap on delete icon again and select Delete for everyone. And the message will be deleted.

How to Delete Multiple Messages?

If you want to delete multiple messages you can select other messages after selecting one message. After selecting multiple messages, tap on Delete icon. And after that, tap on Delete for Everyone.

What happens if you block the person temporarily?

The outcome would be the same, doesn’t matter if you block or not. Once the message is on the WhatsApp servers, it goes there.

OIS vs EIS: What’s the Difference and Which One is Better?

Capturing sharp, blur-free photos and videos requires keeping your camera steady. Both optical and electronic image stabilization help reduce shake, but work in different ways. Here is an in-depth look at how the two stabilization technologies compare.

What is Optical Image Stabilization?

Optical image stabilization (OIS) is a hardware solution that physically moves lens elements to offset camera shake. Here’s how it works:

  • Gyroscope sensors inside the camera detect tilt and motion.
  • Special actuators can tilt or shift lens elements on two axes.
  • When camera shake is detected, lenses shift in the opposite direction to stabilize.

By stabilizing the optics internally, OIS allows slower shutter speeds without blur from handshake. It works for both photos and videos.

OIS has no image quality penalty since stabilization happens optically. But the gyroscopes and actuators require space, adding size and cost.

Watch the Video Explanation

What is Electronic Image Stabilization?

Electronic image stabilization (EIS) uses a software technique to smooth out video footage. It has two main steps:

  • Analyzing pixel data across frames to detect camera shake.
  • Shifting the video frame position slightly to compensate for shake.

Rather than moving optics, EIS shifts the digital video content itself. This introduces a minor crop, resulting in some potential image quality loss.

EIS relies on processing power rather than physical components. So it’s easy to implement in smartphones and video editing apps.

Comparing OIS and EIS

Here is a comparison table for Optical Image Stabilization (OIS) vs Electronic Image Stabilization (EIS):

FeatureOptical Image StabilizationElectronic Image Stabilization
How it WorksPhysically shifts lens elements to offset camera shakeDigitally shifts video frames to offset shake
Based OnHardware (gyroscopes and actuators)Software algorithm
StabilizesStill photos and videoMainly video
Quality Loss?NoMinor loss from digital processing
Effective ForLow light & slow shutter photosSmoothing minor bumps in video
Found InLenses, camera modulesSmartphone and camera processors

The takeaway? OIS is critical for crystal clear handheld photos. But combining both OIS and EIS gives the smoothest, steadiest video possible.

Best Smartphones with OIS Feature?

If you are looking for a smartphone for better photography and mobile film-making, you should check these smartphones.

  • iPhone 14 Pro
  • Samsung Galaxy S23 Ultra
  • Sony XPeria 1 V 5G

Affordable Smartphones with OIS Feature

Since not everyone will is willing to invest $1000+ in a smartphone, I have curated a list of affordable smartphones that have has got the OIS feature for better videos. Check out this article to find your next smartphone with OIS feature.

7 Affordable Smartphones with Optical Image Stabilization (OIS) for Shooting Smooth Videos

0

Suppose you take a lot of videos from a Smartphone, Personal, YouTube, or Facebook. If you are into Mobile filmmaking, having Optical Image Stabilization (OIS) in a smartphone can drastically improve the quality of the video.

The OIS was an exclusive feature that was only available on high-end smartphones. Thankfully, there are a few smartphones that are still affordable and have got this feature.

I wrote this article where I mentioned some affordable smartphones with the optical image stabilization feature, and it was pretty popular among mobile filmmaking enthusiasts.

Because, with a bit of practice, you could achieve smoother shots, which you could get using a Smartphone Gimbal.

But, now that the Smartphone Gimbal prices have come down, and the costs of premium smartphones having optical image stabilization have become overpriced, it doesn’t make sense to go for a higher-end smartphone if you are on a budget. Check out the article if you are on a budget.

Check out the list of Smartphones having OIS

These are a few generation old smartphones, but nothing drastic has changed in the smartphone market over the years. So, with the one or tow year old hardware, you can still use these smartphones without any issues.

*The list is in no particular order

iPhone 13 Mini

If you are strictly looking for a smartphone with a great camera under budget, then iPhone 12 mini can be considered. Although it’s a few generations old, the cameras in iPhone 12 was remarkably better than the cameras in iPhone 11.

The 64GB variant is more affordable than the OnePlus 9, the most value-for-money flagship android smartphone available in the market, with a fantastic set of cameras.

Sadly Apple didn’t launch an iPhone 14 mini, but you can still go for iPhone 13 mini if you ca nraise your budget a little high. The iPhone 12 mini is still, which has the same set of cameras the iPhone 12 has got.

The only complaint of iPhone 12 mini owners is its battery life, which can be solved using a power bank. Considering it is tiny, it is an excellent device for taking videos of high quality.

Buy from Amazon

Poco F4

Poco F4 is actually a flagship smartphone and a sub brand of Xiaomi, but Xiaomi is known for its affordability. That’s why despite being packed with features, the Poco F4 only costs $450.

The Poco Smartphones are something else, I mean I bought the Poco F1 in 2018 and it’s still with me, is able to handle heavy games and runs smooth. Image getting this one, which is actually highest specs possible for a smartphones in 2023.

Buy from Amazon

OnePlus Nord N30 5G

It has a 6.72-inch FHD+ display, Qualcomm Snapdragon 695 5G processor, 6GB/8GB RAM, 128GB/256GB storage, 50MP main camera, 8MP ultrawide camera, 2MP macro camera, and 16MP front camera. It also has a 4500mAh battery with 33W fast charging. Price: $299.

Buy it Now

Like other Flagships on the list, the Zenfone 7 has all the high-end specs, a great camera, and good looks. Unlike every other smartphone with Notch, Punch Hole design, Asus gives you a clear all-screen experience with its unique flip camera mechanism.

The Zenfone 7 doesn’t have the OIS, but the gyro-based EIS is pretty impressive. I am still using the Asus 6z as of 2021 because I love the phone, and sadly Asus didn’t launch the phone in India. So alternatively, you can buy an Asus 6z in India. It’s still that great.

Buy it Now

Samsung Galaxy A23 5G

It has a 6.6-inch FHD+ display, MediaTek Dimensity 700 5G processor, 4GB/6GB RAM, 128GB storage, 50MP main camera, 8MP ultrawide camera, 2MP macro camera, and 5MP depth sensor. It also has a 5000mAh battery with 25W fast charging. Price: $299.

With features like Optical Image Stabilization, the output is going to be stunning if you are into mobile filmmaking.

Buy it Now

Motorola Moto G Stylus 5G (2023)

It has a 6.8-inch FHD+ display, Qualcomm Snapdragon 695 5G processor, 6GB/8GB RAM, 256GB storage, 50MP main camera, 8MP ultrawide camera, 2MP macro camera, and 2MP depth sensor. It also has a 1080p OLED display, a stylus, and a 5000mAh battery with 10W fast charging. Price: $249.

Buy from Amazon


If you do not find these smartphones a good buy or outside your budget, you can still shoot high-quality videos with only EIS smartphones. Or get a Mobile Gimbal that’ll take care of the OIS part and works with almost every smartphone.

I have posted a few videos I shot on my Instagram account using my phone. Follow me on Instagram to see it yourself.

Lately, more smartphones are launching in the market with the EIS feature. You can find it in the Mid Range segment of smartphones from Xiaomi and other companies. You can go through this article to find the difference and decide for yourself.

How to Open Non-Clickable Links on Instagram

0

Instagram limits clickable links to only User Bio, for security reasons and to avoid spam. Surprisingly, Youtube has also followed suit, and stopped clickable links for Youtube Shorts.

Anyway, let’s get back to the topic.

You may come across non-clickable links in captions or comments that you want to access. Thankfully, here’s a clever workaround to open these links from Instagram posts.

Watch this Short Video

The Problem with Non-Clickable Links

When scrolling through Instagram, you’ll likely see posts with links in the image description or comments. But tapping these links does nothing – they aren’t clickable or tappable.

Instagram disables links outside of bios to prevent spam and phishing attempts. But this also blocks users from accessing useful links that appear in posts.

The @mention trick used to open profiles from captions also doesn’t work for links. So iPhone owners need another solution to access non-clickable Instagram links.

Using Screenshots to Open Links

Here’s the trick: take a screenshot of the post containing the link, then open the link from the screenshot.

For iPhone Users

On iPhone, take a screenshot of the Instagram post with the non-clickable link visible. Crop the screenshot so only the link is shown.

Open the screenshot in your Photos app. Press and hold the link shown in the screenshot. A menu will appear with the option to “Copy Text from Image”.

Tap this option. The link text will be extracted and copied. Now when you paste it into Notes or Messages, the link will be clickable.

This handy workaround is powered by a new iOS 16 feature that recognizes text in screenshots and makes it selectable.

So iPhone users on iOS 16 or later can easily convert non-clickable Instagram links into accessible, clickable links. It takes just a few taps.

While not an ideal system, it provides temporary access until Instagram hopefully implements clickable captions to match their feed links. In the meantime, leverage your iPhone’s OCR screenshot power to open unclickable Instagram links!

For Android Users

Android mobile phone also office similar functionality. It has got a feature called Google Lense, which is also integrated in Google Photos. So the process of taking the screenshot would be similar to that of iPhone.

Once you have taken the screenshot open it in Google Photos, then tap on the google lens icon appearing at the bottom bar of Google Photos app. This will use android ocr technology to find out elements in the screenshot. And you will be able to highlight and copy the text, including the hyperlink.

When you have copied the link, you can open your mobile browser and paste the link in the address part to access the link.

How to Export High Quality Videos from InShot without Watermarks for Free

InShot is a versatile video editing app for mobile. It provides professional tools for trimming clips, applying effects, and more.

I create almost all my Instagram Reels using the InShot app. I love the convenience of being able to edit videos on mobile phone. That’s why I created a series called mobile filmmaking where I showcase tips, tricks and resourceful tools for people who want to create contact using their mobile phones.

InShot is a paid application, but it also allows people to use it for free, However, it adds its logo watermark when exporting unless you upgrade.

Here’s how to remove watermarks and save videos in HD from InShot for free.

Watch the Video

Getting Started in the InShot App

First, install InShot from the App Store on your iPhone or Android device. Open the app and tap “Video” to start a new project.

You’ll need to allow InShot access to your photo gallery. Now you can browse and select a video clip to edit.

Enhance and Edit Your Video

InShot provides extensive editing and enhancement capabilities like:

  • Trimming clips and rearranging segments
  • Adding text, stickers, and animated overlays
  • Applying filters, color grading, and other visual effects
  • Inserting background music or voiceovers

Edit your video however desired, whether adding stylish effects or splicing segments. Tap the checkmark when finished.

Removing the Watermark

By default, a prominent InShot watermark is applied in the bottom corner. To remove it:

  • Tap the X icon on the watermark preview.
  • Select the “Free” removal option.
  • Watch a 30-second video ad to completion.

After the ad, the watermark will be gone!

Exporting Your Video in HD Quality

With the watermark removed, go to the export screen. Make sure to select:

  • “HD” for the highest 1080p resolution.
  • “MP4” for universal format compatibility.
  • “Maximum” bitrate for minimal compression.

This exports your video in full quality up to 1 GB in size. The file will save to your camera roll for easy sharing.

Avoid Paying for InShot Pro

Watching short ads is a small price to pay to unlock InShot’s pro exporting features for free. You get Hollywood-style editing tools and indistinguishable quality without the monthly subscription.

With these simple steps, you can create spectacular watermark-free videos with InShot at no cost. Polish your clips and share them in stunning HD resolution!

If you are into mobile film making you should check out these free video editing apps available for Android and iPhone

How to Easily Add Chapters to YouTube Videos with the Chrome Extension

Adding clickable timestamp chapters to your YouTube videos makes them more engaging, search-friendly, and easy to navigate. But manually entering timestamps for chapters can be extremely tedious. Here are two methods to simplify the YouTube chapter creation process – one paid and one free.

Watch the Video

Method 1: Using the TubeBuddy Extension (Paid)

TubeBuddy is a popular Chrome extension for YouTubers, packing tons of analytics and productivity tools. One handy feature is its chapter creation capabilities.

After installing TubeBuddy and linking your YouTube account, click the “Chapters” button it adds to your video editor. From here, you can:

  • Add chapter titles and timestamps with one click.
  • Divide the video into logical sections like Introduction, Overview, Conclusion.
  • Insert a chapter screenshot to give viewers a preview of that section.
  • Reorder chapters easily by dragging and dropping them.

TubeBuddy chapters save directly to your video for viewers to see. The downside is that the chapters feature requires TubeBuddy’s $9/month Star plan. But for avid YouTubers, the time savings may justify the cost.

Method 2: The YouTube Chapters Editor Extension (Free)

For a free alternative, the YouTube Chapters Editor Chrome extension works directly on YouTube Studio. To use it:

  • Install the extension from the Chrome Web Store.
  • Open the YouTube Studio editor for the video you want chapters on.
  • Click the extension icon to activate the editor panel.
  • Play through the video, pause at logical breakpoints, and click “Add” to insert chapters.
  • Title each chapter appropriately based on the content.
  • Click “Save” when finished to add the chapters to the video.

While not as robust as TubeBuddy, the Chapters Editor gets the job done without any subscription. Just watch your video start-to-finish, pausing to add timestamped chapters at key points.

Tips for Efficient Chapter Creation

Adding chapters as you edit makes things easier than doing it after. Consider:

  • Adding obvious segments like Introduction, Overview, Pros/Cons, Conclusion
  • Inserting title slides in the timeline to indicate the start of a new section
  • Not going overboard – focus on 4-6 high-level chapters
  • Keeping titles short but descriptive

Proper chaptering takes some work initially, but ultimately enhances the viewer experience and discoverability of your videos. Just use the method that best fits your budget and channel size.

Photopea – A Free Photoshop Alternative for Editing Photos Online

0

Adobe Photoshop is the industry standard for image editing, but it requires an expensive subscription and only runs locally on desktops. You need computers with heavy processing power otherwise it is going to be a nightmare try to use photoshop on a lightweight, student friendly laptop.

But thanks to the growing popularity of web apps, you can get similar features just why accessing these web apps in your browser. In this article we will learn about one search cool alternative to Adobe Photoshop that has pretty much every feature of Photoshop.

Photopea provides a free, browser-based alternative for basic to intermediate photo editing needs.

Watch the Video

What is Photopea?

Photopea is an advanced online image editor that works directly in your web browser. It doesn’t require any software installation or account registration.

Photopea contains many of Photoshop’s core features for manipulating photos, including:

  • Layers for stacking and blending image elements
  • Selection and masking tools for isolating areas
  • Filters like blur, sharpen, distort, and color adjustment
  • Drawing and shape tools
  • Content-aware fill for seamless object removal
  • Support for PSD, XCF, Sketch, XD and other file formats

Photopea runs fully online, meaning you can access it from any device with a browser – laptops, tablets, even Chromebooks.

Here is a table comparing the features between Adobe Photoshop and Photopea.com

FeaturePhotoshopPhotopea
LayersYesYes
Selection ToolYesYes
Drawing ToolYesYes
Filters and EffectsYesYes
Color AdjustmentsYesYes
Text ToolsYesYes
ShapesYesYes
Pen ToolYesYes
History PanelYesYes
MasksYesYes
Content-aware FillYesYes

Benefits of Photopea Over Photoshop

As an online Photoshop alternative, Photopea offers several advantages:

  • Completely free to use with no account needed
  • Works on any device and operating system
  • No software installation required
  • Lightweight performance in the browser
  • Auto-saves progress to prevent losing work
  • Can open and edit Photoshop PSD files

For casual users, Photopea provides powerful photo editing without the cost or hardware requirements of Photoshop.

Use Cases and Limitations

Photopea covers a wide range of basic and moderate photo editing needs for free. This includes:

  • Removing backgrounds
  • Layering elements and graphics
  • Applying filters and adjusting color
  • Cropping and resizing images
  • Drawing shapes and text

However, Photopea lacks some of Photoshop’s advanced capabilities like comprehensive liquify, lens correction, Camera Raw, and 3D tools. Extensive or professional projects may require upgrading to Photoshop.

But for everyday image editing involving layers, adjustments, and composition, Photopea gets the job done for free. The convenience of the browser-based interface makes it accessible for casual photo projects.

If you need top-tier image manipulation capabilities, Adobe Photoshop remains the industry leader. But for budget-conscious users, Photopea provides an excellent free alternative online.

Long time leaders of my blog know that I am a big fan of Chromebooks and I still have got one and I use Photopea.com for image manipulations on Chromebook.

In fact I have become so if efficient at it, I have uninstalled Adobe Photoshop from my Mac computer. And I use Photopea.com whenever I have to work with .PSD file or have to work in use cases where Canva doesn’t offer that feature, such as Product Mockups.

I have written a detailed guide about creating product Mockups using Photopea.com and I know it is not as great as Adobe Photoshop, but you will still be able to get the results that will match 90%.